Showing posts with label tutorial. Show all posts

Sunday, February 22, 2015

Graph Hat Photo Tutorial


***The graph used for this tutorial has not yet been released. I plan on releasing a written pattern for it very soon along with a few other spring graph hats! Also, just because I've seen this done to other designers, comments about my nails won't be approved for the blog :p I keep them short because I prefer them short lol - otherwise, enjoy and I really hope this tutorial helps you!***

I currently have near 20 different graph hats out and, in the past year of designing them all I've gotten some common questions from various people wanting to make them. So, I decided to make a step by step photo tutorial showing the different techniques I apply and how I arrive at the finished product as well as why I size the hat the way I do. :)

If you have any additional questions, feel free to ask!

Now, first things first. Let's talk about color changes and carrying yarn as that is the most common question I get and will be what I most go over in this tutorial. Throughout the images, you will see 4 different methods I use. All of them work and will give you a great looking graph hat... they are just a different way of getting to that final result.


  1. Carrying the yarn
  2. Cutting and rejoining 
  3. Making bobbins 
  4. Estimating how much more yarn I'll need and cutting to that length. 
Before we can get any farther into the color changes, let's get the hat started! 


First we have round 1 which consists of 12 dc in a magic circle. This image shows exactly why I prefer to use the magic circle method as it leaves no hole at the top! If you are unfamiliar with it, you can view a tutorial of it HERE.
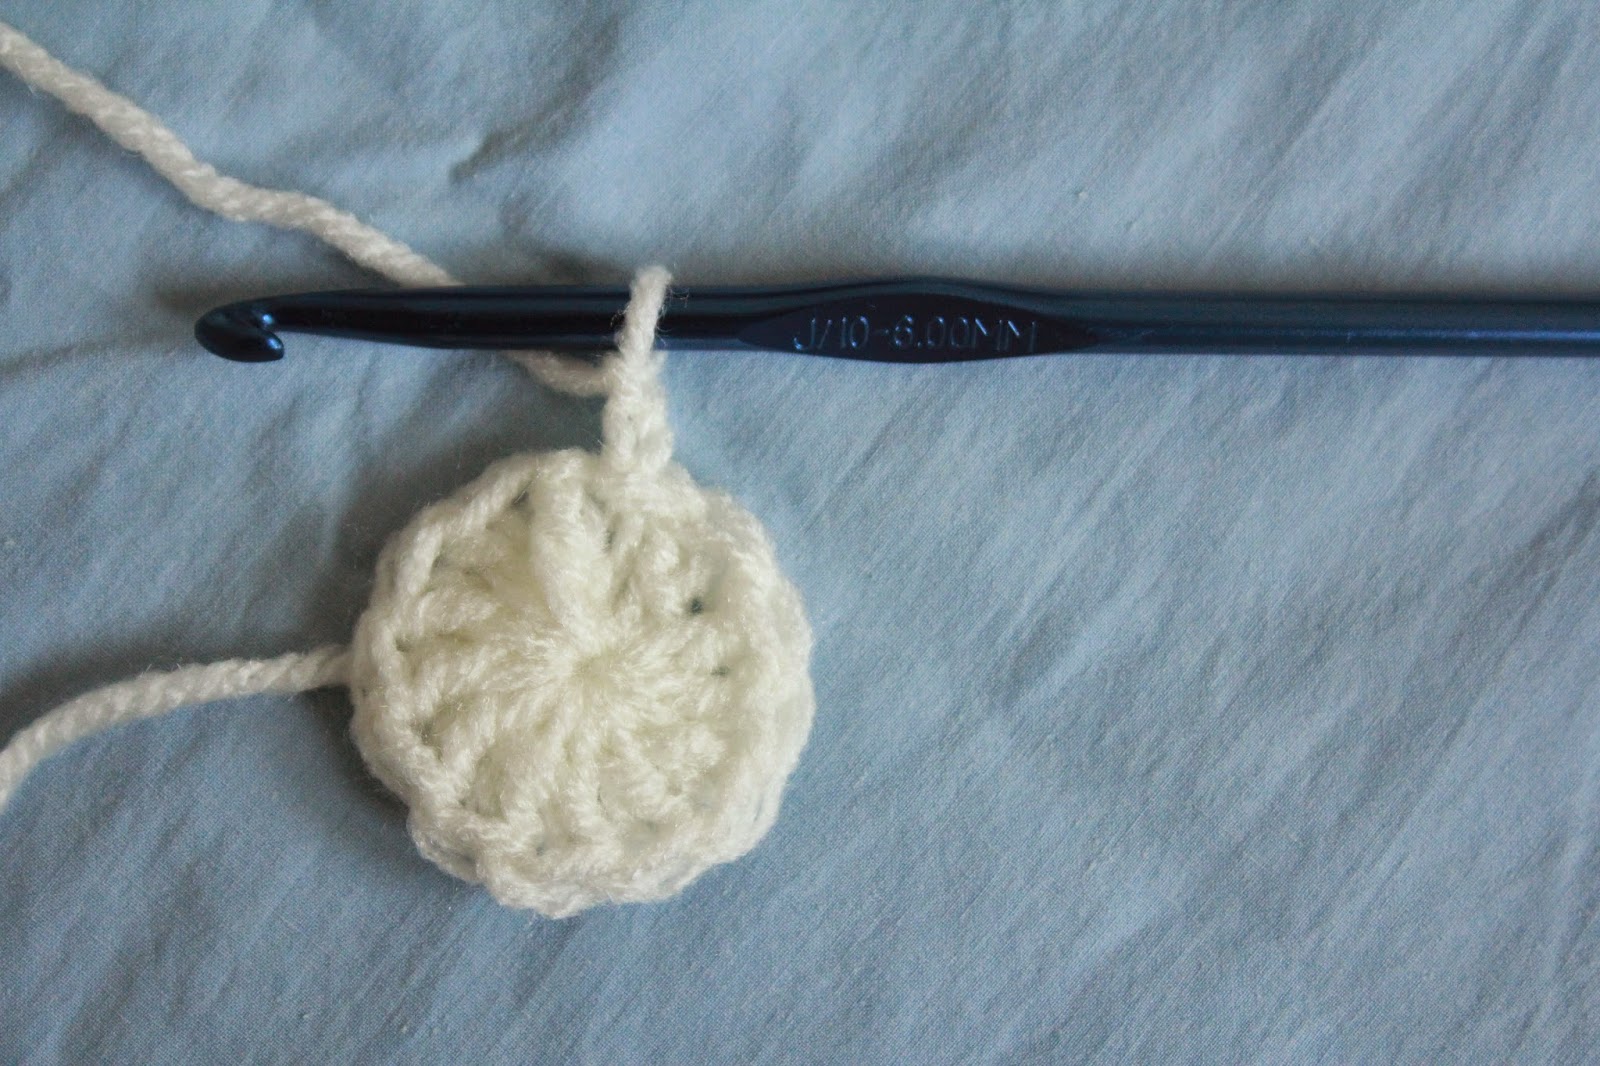
The start of round two comes with a ch 2 - I use a chain 2 because it makes it where the fpdc doesn't get pulled down or up and fits between the rounds nicely. 
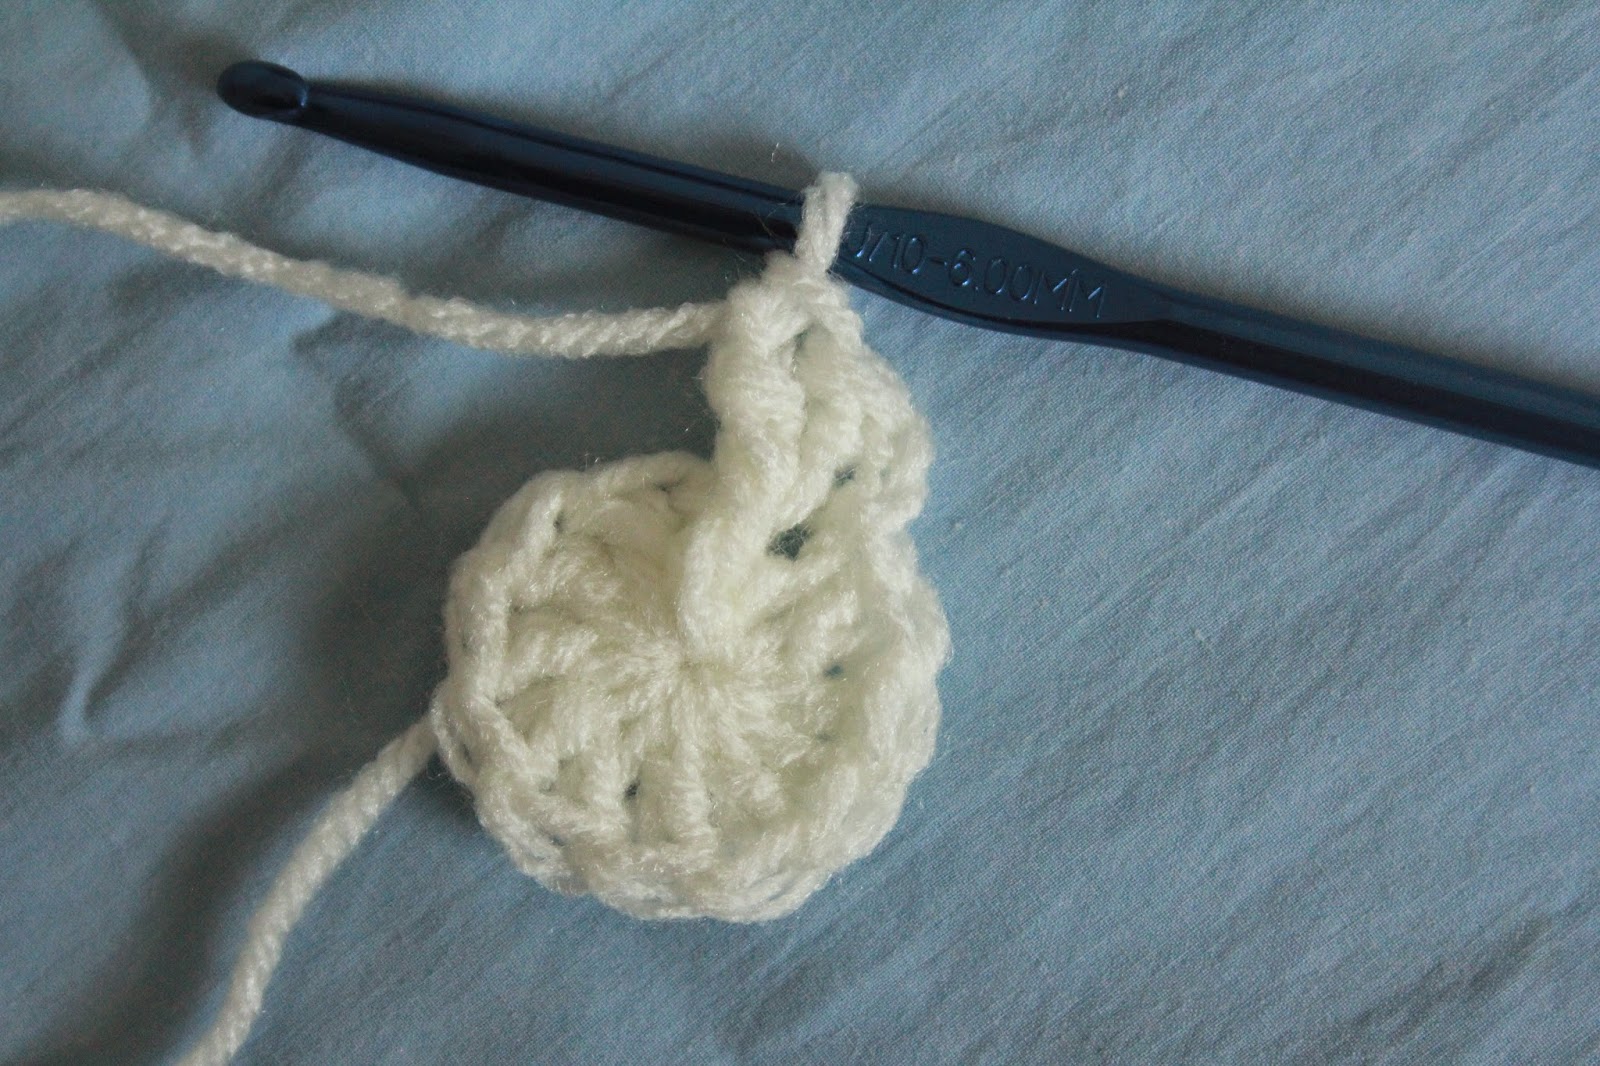
Here you see 2 fpdc around the first stitch. This same thing will be done around every stitch. You can find a tutorial on how to do front post double crochets HERE

In this photo you see me joining into the first st of the round. You skip the ch 2 and join directly into the first st as if the ch 2 isn't there. 

This is the start of round three. You can see that the first st has one fpdc and the next has 2. This is similar to regular increase rounds but uses fpdc as the stitch. 

This image skips ahead a bit and shows you a few stitches into round 6 where there are no increases, you just do one fpdc around every stitch. 

And you repeat that until it's time to start the graph, which for this hat, wasn't until round 15! 

I'll be showing you multiple methods used within one hat. One of these methods will be the bobbin method. I'll be using this method with the flower petals and got them all wound up and ready to go. 

When I get to my first color change, I do it as I would any other color change. If you are unfamiliar with how to change colors in double crochet, you can find a tutorial video HERE

And then I change back to white. This step is important because I use two different color changing methods basically at once. We're using the bobbin method with the flower and carrying the base color along. 

Like this :) 

I just stick the bobbins in the hat as I go along. :) 

Next, is another method. The cut and rejoin method. I wouldn't normally use this method right here but for the sake of a tutorial, here you go. This method does involve more work at the end because something has to be done with all of those ends but it doesn't affect the stretch of the hat at all, which is a plus. 

Here we see, that despite using a bobbin so we don't have to do any additional carrying or excessive cutting, the yarn does still get carried to an extent. Because the hat is worked in the round, we don't pick up right where we left off, we pick up on the other side where we had originally started. 
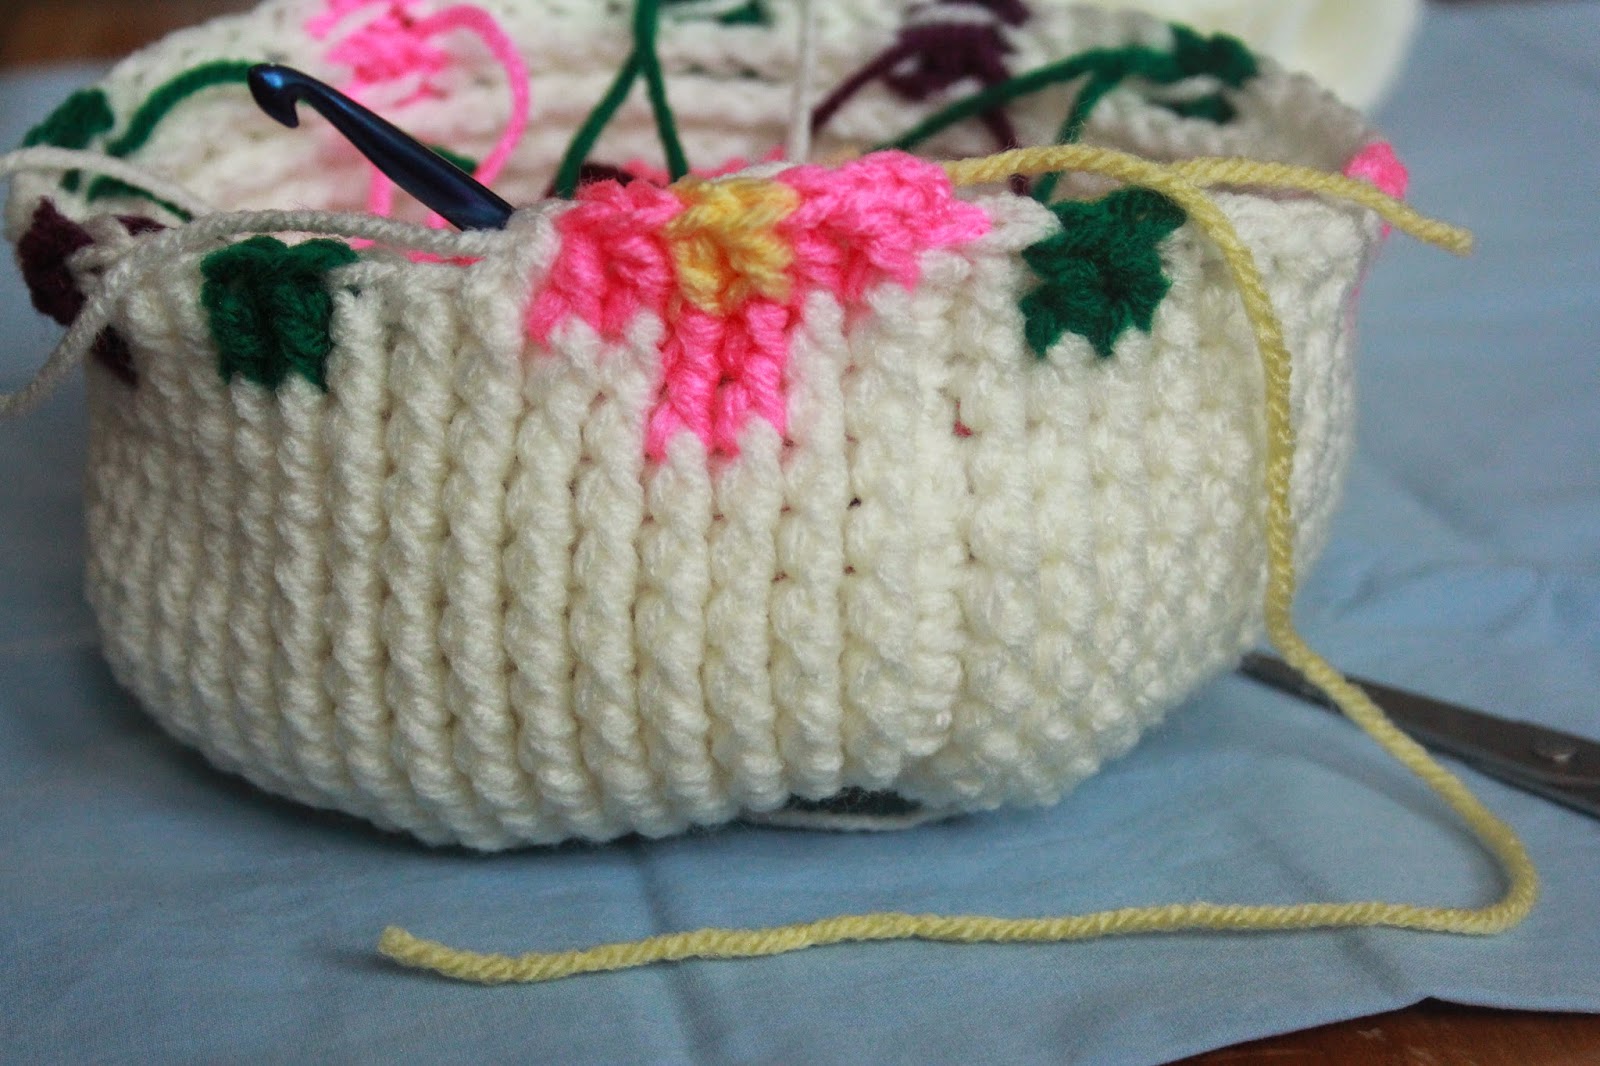
This next image shows another method I use. It is similar to the bobbin method but without the bobbin :p Because I know I only need the yellow for 2 more stitches in the next round, I pull out and cut the amount I think I'll need and just let it hang out until I use it all up. 

This picture goes hand in hand with the next, so please pay close attention to the next image. 

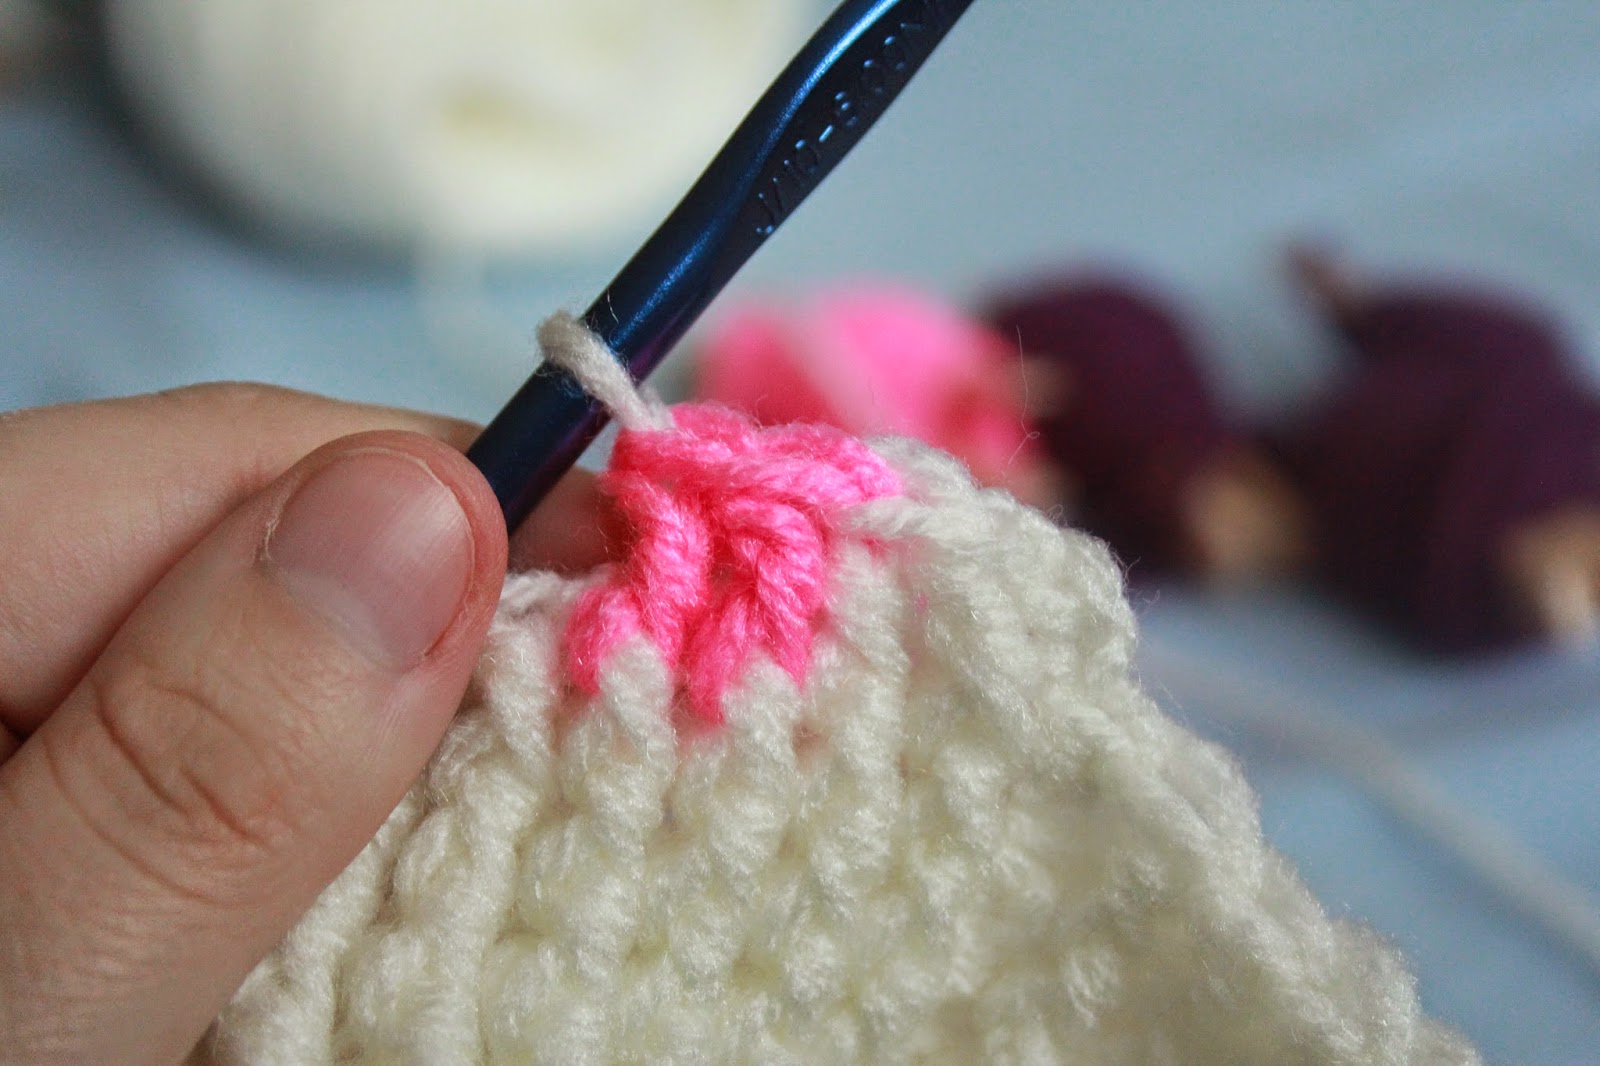
Because this hat typically requires some carrying, the concern of it decreasing stretch arises. Fortunately, there is a simple solution to this so that it won't affect stretch *at all*. If you look at the first image, you'll see how the yarn angles up as I wrap it around the hook but in the second pic, it's level with the hat. By doing it the second way, I give just enough slack in the carried yarn to where I keep the stretch of the hat but don't have excess yarn just hanging out on the inside of the hat. You'll get a good look at the inside of the hat farther down to see what I mean about it being "just right". You want the yarn to remain relaxed when the hat is relaxed so that it carries the same stretch as the stitches do. 

This image takes us to the last round of the graph. You'll see the strand of pink there showing that I cut it from the bobbin. As I finish with each color, I just cut it so that it's the size I need it to weave in or tie off (depending on what I decide to do with that particular hat) so that when I'm all the way done with the round, I can just keep going with the remaining rounds without things weighing down the middle of the hat. 

Now that we are at the end of the hat, let's compare our methods. You can see the leaf has about double the number of ends on the flowers. I normally would have used the same method that I did for the center of the flowers for the leaves since there were only four rounds and 10 stitches total per leaf. It would have cut down my weave in/tie off time and saved yarn. :p You can also see the carrier yarn and hopefully the image gives you an idea of what I meant by "relaxed" earlier. The yarn, despite being carried, isn't loose to where it will snag easily or tight to where it will prevent stretch or be felt on the hat. It doesn't add any additional thickness to the hat and almost goes into the little slips between rounds! 

One method I use to tie off ends is a slip knot which can then be followed by fabric glue (just a tiny drop so it won't be felt). I do this by going through two loops near the hat, pulling up a loop and then pulling the strand through the loop. 

I also will just tie off the ends. The thickness of the hat hides the knots well to where they can't be felt (I know because I have worn the hats I've made and even wore this one!) but weaving in is usually the best route to go. I was running out of daylight to take pictures with so I had to take the easy way out ;) 

Now... the final product!!! 

When you look at this image and the next image, I want you to take into consideration that they are the SAME exact hat (not two hats with the same graph but literally the same hat). The stretch is good enough to where it will fit my four year old's little head and my grown-up large head. :p

What's significant about this is how I achieved it. By using a J hook, meeting the gauge I now list on my graph hat patterns (3rd & 3st = 1") I'm able to achieve a hat that can be made much quicker and will fit MOST sizes without changing the pattern. Great right? The only drawback is this also limits the size of the graph as I only have 17 rounds and 60 stitches to get a graph into. However, this can easily be resolved by throwing quick and multi-size to the wind. I'll talk more about that with an example of a much larger graph I put onto a hat ;)

Here is me wearing the hat. :) (Be nice, I haven't been feeling well :p) The only change I really suggest making to get a full adult size is to add an additional round or two before you start the graph so it's a tad bit longer, but as you can see... that isn't a must, it's a personal preference because if I'm going to wear a beanie, I want it to be longish. 

Now... onto the the largest graph I've put on a hat. The graph was 44 st wide by 30 st long AND the graph had to fit on just the front of the hat. The hat ended up being about 40ish rounds and 90 stitches around! I achieved this by going all the way down to an F hook! 

As you can see, this technique has no limits! :) And you can get even bigger if you go to a smaller yarn weight. This was still made with red heart super saver :p 


Monday, April 21, 2014

Using Seed Beads in Crochet Tutorial - 2 Methods

 I love working with seed beads. They are tiny and dainty so they don't take away from the crochet part of the work I do. I absolutely love the subtle and stylish look they add to crochet!

Below you will find two methods to get size 6/0 seed beads on regular, medium (4) sized yarn! One is for those who don't have the special needle and the other is for those who want to get it. The amount of time it saves you is amazing but this way, you'll have options! I live in a town that only has a wal-mart and had I not discovered this needle before moving away from the big city I would never have known about it!

The first method I share will be the easier method. The second method will be the trickier method but doesn't require the needle which is harder to find unless you have a good sized craft store near by. After the second tutorial check out a few patterns I have designed that either use this technique or would look amazing coupled with this technique!

The 1st Method (the easier way because the best should never be last ;):

My supplies

For this tutorial I chose some light colored yarn and beads because I have the darker brown contrast behind them. 
  • You'll need scissors. This pair I found at wal-mart for about $5 bucks and they are incredible. They are small so they fit into my hook case and they cut yarn perfectly! 
  • You'll need a big eye beading needle. Their are TONS of beading needles out there but this one is perfect for yarn because it is two super thing needles put together. You can pull them apart just enough to get the yarn through easily. I've used other needles before but I'd always have to split the yarn and put in one half first and then the other half second to make it work. This is SO much easier. I got this pack of 2 (because I get aggressive with my beads and break my needles LOL) from Jo-Anns for right around $5-6 bucks. If you have a 40% off coupon (and they aren't already on sale) you can get quite a steal on them! 
  • You'll of course need seed beads. There are a couple of different bead sizes and I prefer the 6/0. Any samller and I don't think they'd fit on the yarn. 
  • Last, you will of course need the yarn! I used Red Heart Super Saver (worsted weight medium/4) for this tutorial. 

This photo shows the first step you have to take in order to get the beads to slide onto the yarn smoothly. When you put the yarn through the needle, you'll fold it in half. That means you don't just have to get the bead over ONE piece of yarn, you actually have to get it over two. So, I stretch the yarn. If you look at the right side of the image you'll see that the yarn has been pulled tight and is half the size of the yarn on the left. 

To achieve this, pick a spot near the end of the yarn and pull. You do not want to break it, of course but it will feel like you're about to! What's great about this step is that if your yarn does happen to break (pulling it like this does make it more fragile), all you have to do is restretch the piece at the end and you're good to go. 

Because it is difficult to pull on the VERY end of the yarn, I pulled about a couple of inches from the end and then trimmed that part off. 

If you click the photo to enlarge it you'll see the little split between the two needles. It's a pretty neat needle! 


For the sake of the tutorial, I wanted to show an image of a single bead being put on the needle and pushed onto the yarn. It was very effortless. Seed beads are not all symetrical. You'll have some that are larger or smaller. So, if you get a bead that won't slide on with ease when most of them will, it's probably that bead. Just don't use it. I have a bead file where I can actually grind the inside of the bead just enough to make it work but even then, I usually will just discard it. 


You do not have to do one bead at a time! Of course, if you don't and one won't fit on, you have to take all of your beads off of the needle. It still makes it go much faster then doing one bead at a time though!

Also, as you can see in this photo, the yarn at the top together looks to be the same size as the yarn towards the side of the image. This really demonstrates the importance of stretching the yarn. When you double it, it doesn't actually double! 


Method 2 (if you don't have a way of getting a big eye beading needle): 


It's important to take note that this way is much more time consuming and tricker then the other method. I've broken my fair share of beads this way! But it will get the job done. The required material in this method is a small steel crochet hook that you should be able to find at walmart (and almost everyone has one of those! hehe) - I use a size 11 hook but you can change the size of the hook based on what you are comfortable with. I personally want to use the largest size possible because the larger the hook, the easier it will be to hook the yarn without tearing it. 


For this next step, check out the picture in the first method. You'll want to stretch the yarn. It will make the strands squeeze together better and give the hook a better chance of holding on. As you can see in the image, I literally fold the yarn around the hook and then I pull that through a bead. Sometimes I can get it to go through two beads at once to speed the time up but not always. And like in the first method, some beads will not fit. Its best just to not use those ones. 


And here it is, on the yarn. You can actually see in this image the stretched yarn opposed to the "normal" yarn. Stretching is key regardless of which method you use!! 

Projects you can use this technique on below: 


The free pattern for this beautiful ribbed sun hat can be found here


This beautiful hat would look beautiful adorned in a matching pattern of beads around the last round of the brim! This free pattern can be found here


This beautiful little pattern coems in three different styles/lengths and all in one pattern! This paid pattern can be found here

This technique works will with more designs then just hats and you can use it for other beads as well! These little pearls make these booties absolutely precious. This paid pattern is available in an eBook that can be found here

I hope you enjoyed this tutorial and are able to apply it to all sorts of different crochet projects! I know I sure have and will continue to do so! 


Tuesday, March 18, 2014

Crocheting: A Pain in the... Everywhere!

***Scroll to links/bold portions if you are in a hurry!*** 

I first picked up a crochet hook when I was about 10, maybe 11. I struggled to grasp the concept of it and didn't have anyone willing to teach me. By age 13-14 I had mostly figured it out with some help here or there along the way. I didn't become serious about it until I was pregnant with my first born though. Until I found out her gender at 17 weeks, I had never completed a large project (minus a pillow casing). In fact, before finding out her gender I started about three blankets and dropped them.

But when I found out I was having a little girl I started crocheting like crazy. I found a pattern I liked (the chevron pattern) and made a huge mistake in it for about the first 14 rows. For whatever reason it wasn't zig-zag, it was straight, but it did have the points! I figured out what I did and instead of undoing all the hard work I'd done on those 14 rows I just fixed it and kept going. I had to replicate that mistake in the last 14 rows and ended up with a rectangle chevron blanket. It was the best mistake I had ever made.

Here is a picture:


So there you have it: my first project and most successful mistake. But that isn't isn't what this really post. It's about how much pain crocheting can cause you and what you probably haven't thought to do about it. Having been actively crocheting since age 17 (I'm 21 now) I've experienced my fair share of pain from this art! 

I've read the blogs that give the advice on what to do about some of this pain but have not yet seen one mention SMR. This abbreviation stands for Self Myofascial Release. I learned about this technique while working with a personal trainer and working to lose weight (successfully lost 60 lbs after having my son!). There were several things I struggled with aside from weight that caused me to seek out a personal trainer. One was immense pain. Having broken my back at 16, daily pain throughout my entire body was a norm for me, particularly due to muscle tightness. My trainer gave me this purple, hard rubbery ball she called an SMR ball and promised that I would fall in love with it. 


I have to admit, I took it home and let it sit on my shelf. She quickly caught on to that so she showed me how to use it at the gym and the relief I felt afterwards was indescribable. It was like an instant release. The pain it took to get that release (this ball is also called a pain ball, jokingly) was a bit difficult but so worth it in the end that I still use this ball months after I stopped working with my trainer. 

Now on to how it helps with crochet related pain! 

When we crochet, we sit. Sometimes we will sit for hours! Our posture isn't always perfect and we don't always stretch out afterwards. Crocheting is one of the most beautiful forms of art in my opinion but it comes at a cost! Neck pain. Shoulder pain. Back pain. Wrist pain. The list goes on and on of different pain complaints I've seen and experienced myself. 

Well, one day my husband walked up behind me and started to massage my shoulder because I had commented that it was hurting. I reached back and felt the muscle he was working on and it felt as if I had hit a brick wall with my hand. It was so hard! Muscles are not usually so hard and aren't supposed to be, right? So I grabbed my handy little SMR ball and worked it for 1 minute on that spot. The pain I felt in that one minute radiated down my arm as the muscle got worked. After about 30 seconds, I started to feel some release and after the minute was up, my muscle was completely soft and relaxed. 

It was amazing. 

I have no idea why I hadn't thought of using SMR for my stiff muscle pains due to crocheting before! Oh the pain it would have saved me. 

SMR works the same way trigger points do. If you've ever been to a chiropractic office (which I also recommend as not much feels better then getting your wrist adjusted when it is hurting from long hours of hooking) that has done trigger point therapy you already have an idea of how this work. Trigger points are areas in your body that hurt and when deep pressure is applied, it helps to alleviate the pain. The attached link has wonderful information as well as a weird looking picture that can really give you an idea of what it is and where they are located. 

Trigger point therapy was a painful therapy for me (and one that would make me pass out while pregnant, I do not recommend this while pregnant unless you talk to a doctor first), but one that left me feeling refreshed and springy afterwards. I say springy because before the nurses at my chiro's office would do it, I would feel condensed which is a horrible feeling of tightness and lack of flexibility. :p 

Some key things my trainer informed me with the SMR ball when she first started me on this path:

  1. Never put it on your spine. Put it on one side or the other but never on your spine. The point of this exercise is to help with your muscle tightness/pain. Placing it on a bone will just cause needless pain. 
  2. Work it in groups. If you do it on one spot on your shoulder that is real tight and hurts, pick a spot on that same shoulder in a different spot and repeat it. Do it on a third spot as well. She always had me work it in three similar areas before picking a different spot. 
  3. Places I commonly use it: my hips, my shoulders, my neck, my mid and low back (I'd usually do two spots on my low back and 1 spot on my mid), my butt (check out that trigger points link and you'll see the trigger points located in that area) - and then repeat it on the other side. 
  4. I would feel creepy crawlies go down my arm or in completely different areas of my body while doing this exercise. She told me this was normal, after all our muscles are a system. One affects others.
This is something, upon simple research or even clicking the links I've shared above, that you will see is commonly associated with exercise and athletes. That does not mean it can't help in other areas of your life!

Here are some youtube links showing you how others use this ball:

Youtube 1


You can use it on your calf, the balls of your foot, your hips, your butt, your back, the very base of your skull (helps with headaches caused by muscle tension), your shoulder, your chest, etc! It's a long list of stuff this ball can help. 


Oh, and if you don't want to spend the $20 buck son an actual SMR ball, others use tennis balls and lacrosse balls. :) If you're looking to save money hit up the pet store and get one for $.99!

The last bit of equipment that I used with my trainer that helped with this ball is a Airex Balance Pad. They are a bit pricier and you can totally get an off brand one. The reason this pad helped me was because holding yourself up and lowering yourself onto the ball takes a lot of body control. Sometimes it will be easy and you can just lay on the ball and hit that spot. Other times you will have to raise yourself off the ground (always keep your body in line, ankles, knees and hips in line) and really work the ball. I encourage you to look at other videos that might show you different ways to achieve this! The pad helps by taking some of the work off of your body because you sit one side on the pad and it pushes the other side (that is on the ball) a bit deeper onto the ball.
So there you have it. That's the trick I use to help with my regular back pain from my crochet (and everything else) related pain. It works and has so many more benefits then just pain relief.

***I am not a doctor and urge you to talk to a professional. This will not work for everyone.***


Monday, February 24, 2014

Surface Slip Stitch Tutorial

Hey y'all! I'm doing this tutorial to go along with the Spring Time Booties. This is how you do the decorative edging on them!

Start off by making a slip knot as if you are starting a chain. Insert the hook where you want to start the surface slip stitching, grab the loop you just made and pull it through. 

Once you have the loop pulled through, it will look like this. The entire piece can easily slide through the hole, so hold on to the tail to prevent any slippage. 

Insert hook into next stitch, pull up a loop and complete the slip stitch. 

Continute until you have the desired design. This is what it will look like if you are doing the booties.