Lately I've been doing some winter wear type round-ups and on my last one (shawls) someone asked me if I had done a poncho one and I realized I hadn't. Obviously, I had to remedy that! So here it is ;) 10 free poncho patterns all compiled for your enjoyment!
This beautiful pattern appears to be made with a chunky material and worked with a lot of spaces so that, despite the chunky it won't be to heavy or to warm (is that even possible with it already starting to snow in some areas??) Get the free pattern HERE.
This pattern is opposite of that first pattern in all of the best ways. First, it gives you some choices and second, it's a lighter material without the holes. Same effect achieved a different way! Get the free pattern HERE.
This designer has a different style of pattern writing than I've seen before but she is incredibly talented. In fact, there is another design of her's that I will share later on in this round up! Get this free pattern HERE.
This free pattern is a PDF download from BobWilson123 and features a few other of her poncho designs on the same page. Check out this beautiful poncho and a few others HERE.
This pattern is beautiful. No ifs, ands or buts about it! It's just beautiful! The pattern is written in chart form so you might just want to learn how to read a chart so you can make it! Find it HERE.
This pattern is another one you can download. It looks like it would be simple to make and would look fantastic in an assortment of colors! Find the free pattern HERE.
I really like how this poncho has arm holes. It would be perfect for a younger child too. Check out the free pattern HERE.
This pattern screams winter just with its name alone! Ice Crystals. Nice right? Get the free pattern HERE.
This pattern is particularly nice if you want something light to put on that will also have a decorative purpose! Get the free pattern HERE.
And to "wrap it up" (haha) let's end with this beautiful pattern!! Get the free pattern HERE.
This week's free pattern round up will follow a wintery "lets get ready for the cold" theme with fingerless gloves! Check out all the incredible patterns below.
These little gloves are perfect for teens! They look like they'd work up quick too. Check out the FREE pattern HERE.
Don't these gloves look so unique with the stitch that is being used? I love it! Get the free pattern HERE.
If you're a fan of the crocodile stitch, these wrist warmers are for you! Get the free pattern HERE.
This designer is on fire using yet another unique stitch for some beautiful wrist warmers! Get the free pattern HERE.
The name of these gloves hint that a rather awesome stitch has been used as well! Get the free pattern HERE.
These would be perfect for my daughter! I might just have to make up a pair! Get the free pattern HERE.
These wrist warmers look like they'd work up quickly and be super warm! Get the free pattern HERE.
These wrist warmers look so classy in my opinion! Perfect to wear to any occasion! Find the free pattern HERE.
I just love the accents on these beautiful fingerless gloves! They are so awesome. Find the free pattern HERE.
And to wrap this wrist warmer round up, lets finish it off with one of my own patterns! Find the free pattern HERE.
For the past month, ALS has been abundant in our Facebook feeds, our Youtube feeds and even on the news! And maybe in these past 30 days you've stumbled upon 2 or 3 that are actually about ALS. I'd like to share one with you that I feel has had the most impact on how I personally view and feel about ALS. This video touched my heart in a way that the ice bucket challenge videos couldn't, which was the point of this video. Listen to what he has to say:
His raw emotion can't be ignored. The severity of how this disease has affected him and his family touches the heart in a way that makes it where you'll never forget. And that, my friends, is the first step to truly understanding ALS.... not forgetting about it when the trend of the challenge dies out.
Enjoy these two free patterns and wear your support of ALS everywhere you go. Place the sunflower on a hair clip, a pin for your shirt, a headband, a head wrap or a beanie as I've done. And any time someone asks what the sunflower is for, you'll be presented with an excellent opportunity to continue talking and raising awareness about ALS.
And the hat is in the ALS colors, blue & white. This hat is listed in the baby size but can be made in any size by doing extra increase rounds (more about that in the notes). Spread the word and let's do more then raise money for ALS, let's truly raise a type of awareness that isn't a trend, but something people truly will not forget.
First, the sunflower and the article that inspired it which can be found HERE.
Hook: H Material: Red Heart Super Saver (or
equivalent)
Gauge: non-essential
Tips &
Hints:
-Round
1 of petals will have 1 sl st and 6 sc in every petal.
-Round
2 of petals will have 1 sl st and 5 sc in every petal.
-The
purpose of round 3 of the center is to push both loops of round 2 forward to
make them easier to work with.
-Round
3 does not increase because the back post stitches prevent it from curling.
Abbreviations/Stitches:
-Ch
– chain
-Dc
– double crochet
-Sl
st – slip stitch
-Sc
– single crochet
-Bpsc
– back post single crochet
-St
– stitch
Center:
Round 1) With brown,
using magic circle, ch 2, 12 dc in circle, pull tight and join to first dc with
sl st – 12 dc
Round 2) Ch 1, 2 sc in
every st around, join to first sc with sl st – 24 sc
Round 3) Ch 1, bpsc
around every st around, join to first sc with sl st – 24 bpsc
Petals:
Round 1) Starting in
both loops of round 3, join with yellow, *ch 8, sl st in 2nd ch from
hook, sc in every st down, sl st into next st*, repeat from *-* all the way
around, sl st into first worked st and tie off.
Round 2) Starting in
both loops of round 2 (that have been pushed forward by the round of bpsc), *ch
7, sl st in 2nd ch from hook, sc in every st down, sl st into next
st*, repeat from *-* all the way around, sl st into the first worked st and tie
off.
Weave
in ends and trim.
And the hat:
Hook: I Material: Red Heart SS, Red Heart
w/Love, I Love This Yarn Gauge: 7 st & 4 rows = 2”
Hints &
Tips:
-The
back post stitches pop the shell stitches forward.
-You
can create any size by adding increase rounds/adjusting hook sizes and then
following the instructions as is, just compensate with extra rounds between 5
& 7 of the pattern given, extra repeats of rounds 8 & 9, and adjusting
for the correct stitch count.
-The
next size up would increase to 60 dc and the size after that to 72.
Size: 0-3 months
Round 1) With MC - Using
magic circle, ch 2, 12 dc in circle, pull tight and join to first dc with sl st
– 12 dc
Round 2) Ch 2, 2 dc in
every st around, join to first dc with sl st – 24 dc
Round 3) Ch 2, *dc in
next st, 2 dc in next st* around, join to first dc with sl st – 36 dc
Round 4) Ch 2, *dc in
next 2 st, 2 dc in next st* around, join to first dc with sl st – 48 dc
Round 5 – 7) Ch 2, dc in
every st around, join to first dc with sl st – 48 dc
Round 8) With CC - Ch 1,
sc in same st as joining, *sk next 2 st, shell in next st, sk next 2 st, sc in
next st* around, join to first st with sl st – 48 st
Round 9) Ch 1, bpsc
around every st around, join to first sc with sl st – 48 fpsc
Round 10 – 11) With MC –
Repeat rounds 8 & 9
Round 12) With CC –
Repeat round 8
Round 13) Ch 1, *bpdc
around 1st/next st (should be a sc), bphdc around next st, bpsc
around next 3 st, bpdc around next st* around ending with a bphdc join to first
fpdc with sl st and tie off – 48 st
This week's round up (because I didn't forget this time lol) is all about rainbows. Actual rainbows, rainbow color arrangements and... well a mixture of the two! In this round up you will find abundant talent, design and an amazing passion for crochet from tons of different designers! - Just click the pictures to go to the free patterns!
Sometimes I have a really hard time choosing between two patterns that are similar but different as well. This one was an easy choice though. It is an incredible pattern, comes in two languages and will leave you completely satisfied in your finished product!
My own children never really did the crib thing. Well, my daughter did for a couple of months but no sooner did we start using it did she learn how to climb out. None the less, I really want an excuse to make this beautiful project!
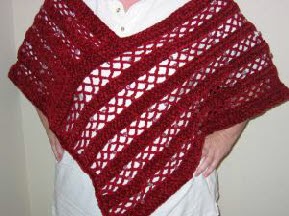
This beautiful scar would look... well beautiful in any color! It's such a nice looking scarf! Major kudos to the designer, right?!
So, the point of this clutch is... well a clutch. But with school season not that far away I'm sitting here thinking pencil case and then using the same pattern to work up a backpack! It would be a wonderful set to send any little girl to school in :) Or, just leave it a clutch and send your teen daughter to school with so she has somewhere cute to put her lunch money!
I. Love. This. The end. I don't need to say anymore. I love it. I want it. My kids will want it too and I'll be like NO it's mine. lol Then I'll give it to them and make me another one :p
This hat is AWESOME... but then again, so is everything Miss SnappyTots comes up with!
Cre8tion Crochet came out with this not to long ago and I loved it the second I saw it. I can just imagine a toddler toddling around with it!
This is another pattern that would work great in any color but especially pulls of the rainbow variation!
So, when I saw this blanket my first thought, as a designer myself, was "dang, such creativity! This is incredible". I stand by my original assessment. incredible.
This just looks so beautiful. Simple, lovely and could be so much more! A blanket lovey for twins. One would get the sun, one would get the rainbow. Perfect right? Or just as is decorating a bed or dresser. Perfect again!
So, this week's RPF are flowers! Three flower total but only using TWO patterns and ONE technique. Cool huh? Over at My Hobby is Crochet, you'll find all sorts of beautiful patterns but these two flower patterns stood out to me the most. I'll explain why I have three different flowers with just two patterns below :)
Firt we have this flower:
You can find it's pattern HERE. This beautiful flower is simple, works up within five minutes and can go on all sorts of things! First, you can make the hole in the middle just a bit larger and use it for an interchangeable flower beanie! Second, you can put it on headbands. Third, you can put it on hair clips. Fourth, you can just make it because you like flowers :p
Next we have this flower which can be found HERE. It's the same as the next flower with a few changes. First, I didn't make the second set of petals, I stopped after one set of petals. Second, I didn't flip them inside out like the directions call for. It's a simple 5-petal flower and it looks beautiful! Then if you want a more complex pattern, follow the same pattern for this one (but actually follow it all the way) and you will end up with:
Flower are always a fun project to make because they work up quick and can be used in so many different ways and on so many different things!
In honor of working on my own back to school set, I thought this was the perfect Friday to do a back to school round up so you guys have tons of options!
This darling little backpack is perfect for any teenage girl! It's decorative with a sophisticated look. It's also small for those days where you just don't need a whole lot!
Over at Petals to Picots we have a couple of darling patterns that are free! First we have this stripped pencil case... and then she ups the antics by doing this next case:
This pattern is absolutely delightful and a must for kids going to school. With all the germs floating around in schools, this could truly make a difference, and it's stylish! (For the boys, just use some camo colors and you're still good to go!)
There are a couple of things I love about this freebie. First, it's adorable and has a classy "old timey" feel to it. Second, it's adorable and can function as a key chain. Third, it's adorable and is the perfect way to make sure you don't lose your chapstick. ;)
This free Ravelry download is darling. It has a spunky look to it! It also is adorble, functions as a key chain and is a great way to not lose your chapstick but it brings something different to the table. It SCREAMS teenager girl and I love that about it.
This backpack is so colorful. I can envision myself making it and sending my daughter off to school in it for the very first time. I can also picture sending her to school in it as a teen... Okay, now I can't. Because the thought of my darling little baby girl ever becoming a teenager frightens me... so I can't. ;)
This bag reminded me of myself as a high school student. I hated backpacks and often opted for a large tote/book bag. I would have loved taking this to school!
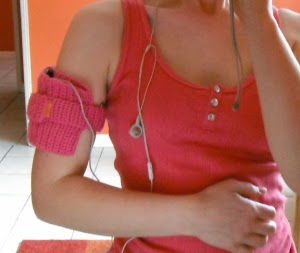
I must encourage bad behavior with this post... a cell phone case so your kiddo has a soft place to put their phone while at school. While schools don't like phones, I find them important and would like my child to be able to get a hold of me or me them if the need were to arise. This little case gives you the advantage of being able to keep your phone on with the volume on vibrate and the soft case will smother the vibrations! hehe
To end this round up (to soon, I know) I bring you this awesome find... an iPod armband carrier thingy lol. It is wonderful! Easy to customize to whatever size of iPod or mp3 player you have and it can be safely secured to your arm, a backpack or anything else you want it on!


Light.jpg)