Showing posts with label newborn. Show all posts

Thursday, July 17, 2014

Bermuda Pearl Mermaid Tail Photography Prop


MNE Crafts is officially releasing the Bermuda Pearl Mermaid Photography Prop! This beautiful pattern was entered into the Battle of the Stitches to compete against 11 other AMAZING designers! While we didn't win, it was a great opportunity that taught me so much and pushed me to new levels of creativity! 

Purchase the pattern via the eMag (which will also include the other designers patterns), via Ravelry or Etsy at the links below. 

eMag - TooYarnCute - look for the Fun in the Sun (currently the 2nd block listed with the first being a subscribe and save!)  

Friday, June 20, 2014

Photography Props Round Up - 18 Free Patterns


This round up is a little bit different then my others as, instead of only 10 free patterns, it has 18!!! Crazy right? But in just the right way! We have several different patterns here by the same designers but they were just to cute not to include!! Talent is abundant in this round up!

1) 
This pattern was designed by Wichecraft and can be found: HERE. You can see just how much work went into this unique pattern that the designer is giving for free! Talent and giving. Two very beautiful qualities. 


2)


Next we head on over to Stitch 11 where you can find this turtle pattern HERE. The colors are wonderful, the shell is the perfect size and the hat fits it perfectly!!

3)


Also from Stitch 11 is this unique Yoda hat that you can find HERE. This is the perfect find for any Star Wars fans! I've personally started falling into Star Trek (the new movies and Voyager only which probably makes me a horrid fan) but Star Wars will always be a favorite of mine!

4)


If you enjoy downloading your free patterns, this is the one for you because it is a free Ravelry download that can be found HERE


5)
.


These next few patterns can all be found at Repeat Crafter Me. I'm never surprised when one of her images pops up in my search because she is so darn talanted!! And creative at that. This pattern can be found HERE.

6)


And this one can be found HERE.


7)


And this last one can be found HERE.


8)


Next we have a pattern from ME! Yay lol I designed this pattern quite a while ago and I still love it today! It's easy and effective! It can be found HERE.


9)


Also from me is this simple but adorable mermaid tail! It's a great way of achieving a mermaid tail with minimal work and is great for beginners! It can be found HERE.


10)


When I saw these hats I HAD to include them. Like... I really had to. First reason is because everyone forgets about Anna! It's all about Elsa. I keep seeing her but never Anna but this talented designer (found at Rick-A-Bam-Boo) was like No! They both rock. So she designed a hat for both! Find them HERE.


11)


When I saw these little head bands I instantly thought of my own little girl and the birthday party she will be having in a few months to celebrate her fourth year (I can't believe it). They would work up quick, cost of matierals would be low and they would be a great party favor! These can be found HERE.


12)


Over at Knot Your Nana's Crochet we find another talented designer who believes that Anna is not to be neglected! Here is a pattern for her cape!! It can be found HERE.


13)


So often I see the Monster Inc. inspired beanies but not often is it a full on prop! This is incredible and can be found HERE.


14)


This beautiful (and free) pattern is perfect if you have a family member in the military and want your little baby to do photos to honor him/her! It can be found HERE.


15)


This pattern is precious! It's a bunny photography prop with a little bit of fluff. Just perfect! It can be found HERE.


16)


This pattern is cute and dainty and let me tell you, those lady bug buttons are the perfect touch! It can be found HERE.


17)


It's a KOALA!!! Enough said ;) It can be found HERE.


18)


This little party has requires a couple of links to get to. The link I give you will take you to the images of this hat and then you will find a link there that will take you to the pattern. I did this so you can get the pattern for FREE as well as a few different ideas of things you can do with it! It can be found HERE.

Thursday, May 29, 2014

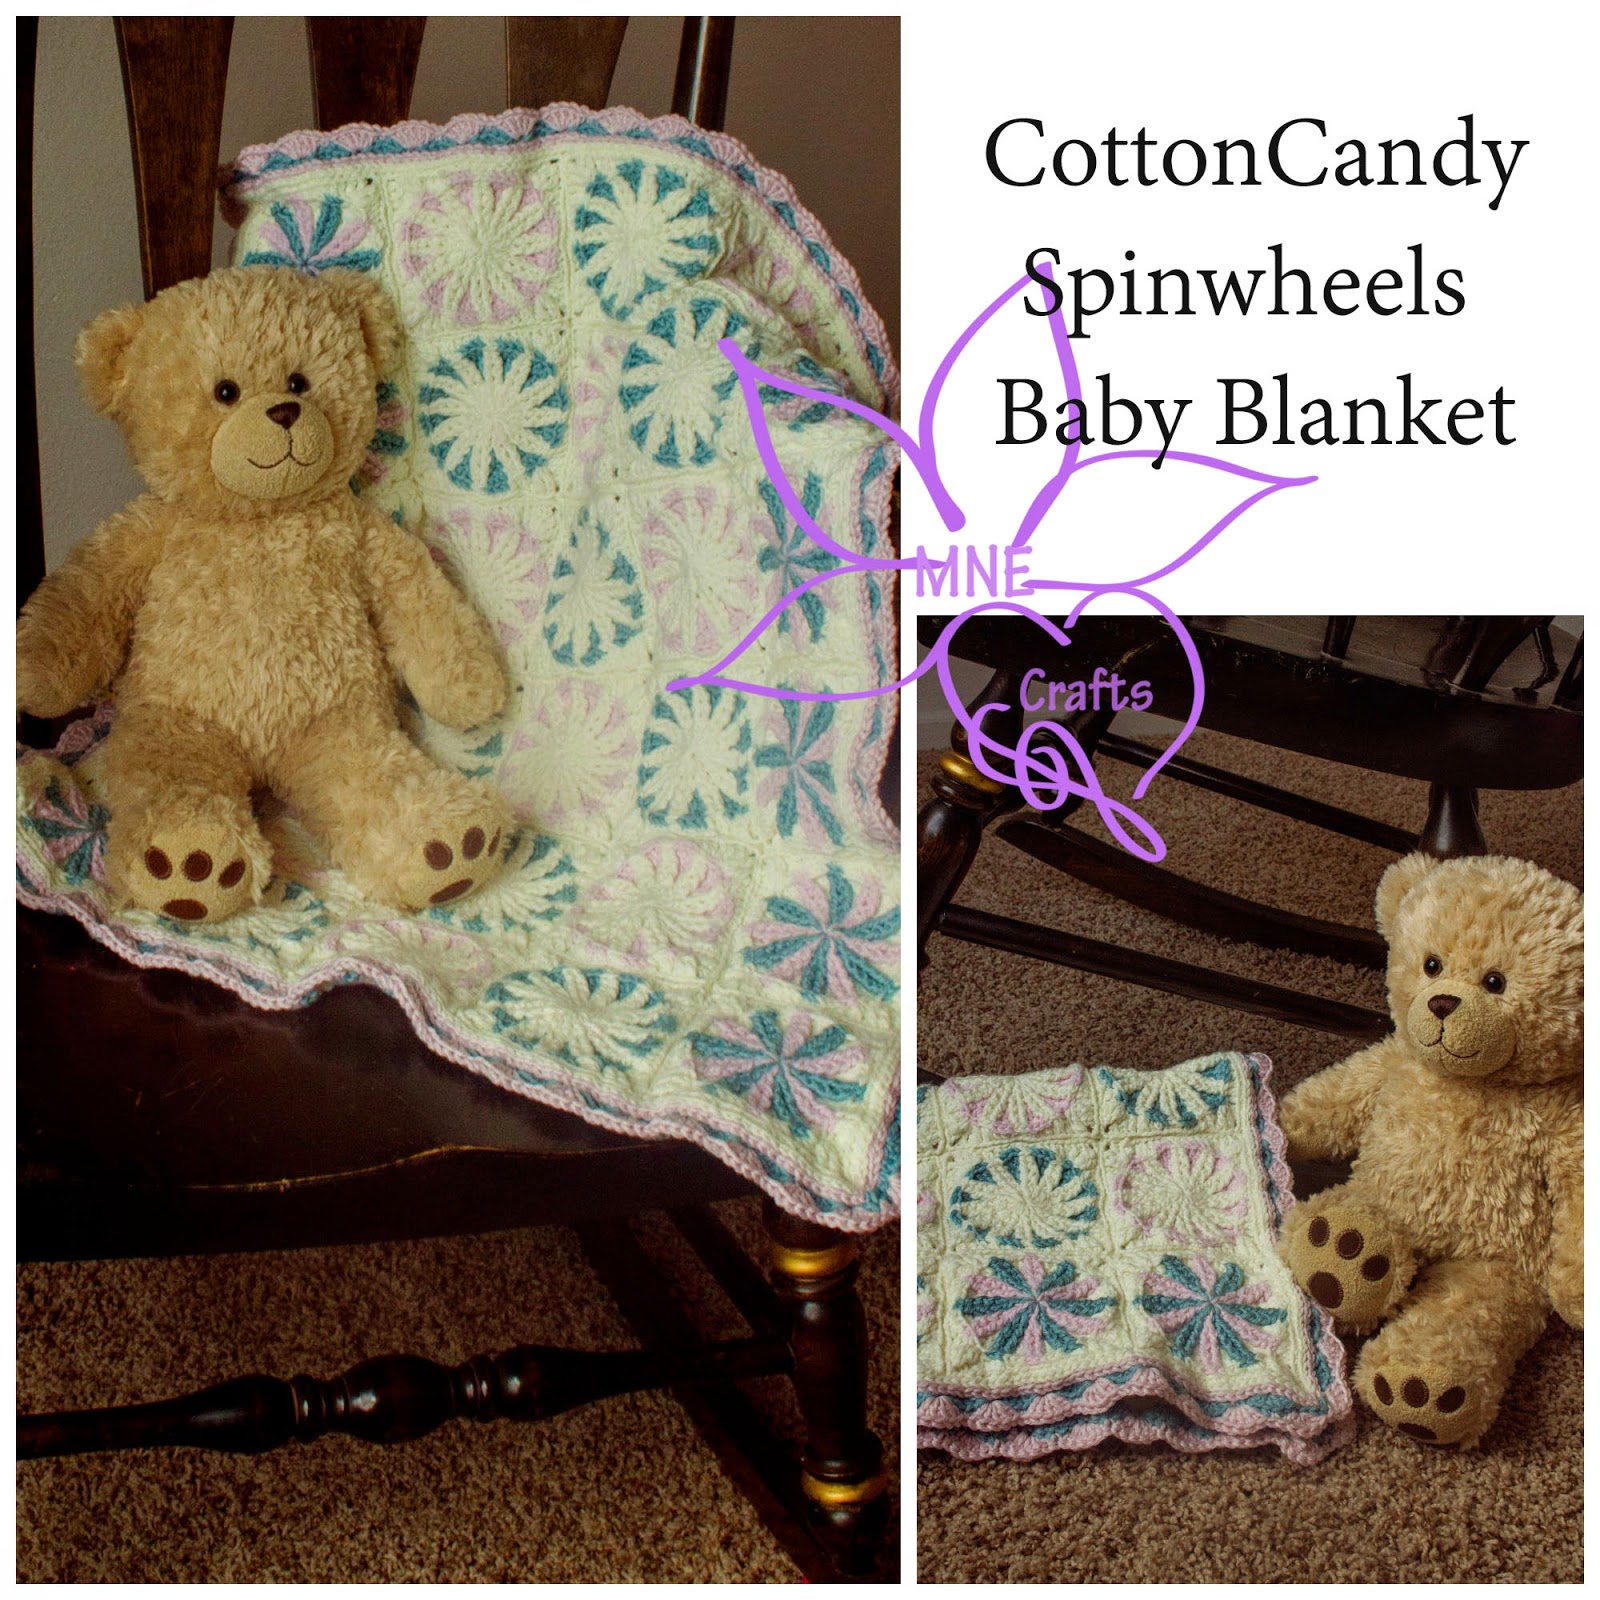
Cotton Candy Spinwheels Baby Blanket


Hook: 7 – 4.5 (a G hook but verify the number)
Material: Martha Stewart Crafts Extra Soft Wool Blend
Gauge: (non-essential)

Hints & Tips:
-          Ch 1 doesn’t count as a stitch
-          When doing round 2, the 2nd fpdc goes in front of the 1st fpdc
-          When you do the squares with all three colors, you will start off with color B and C, alternating them in the first round and then only putting a color B fpdc around a color B and a color C around a color C
-          I will be releasing a video for this square in the next few days which I will use to show you where the third loop is in the stitch so you can complete the square correctly.
-     I recommend the yarn I do because of the color options and how darn soft the material is. It makes an absolutely perfect baby blanket! Lion Brand has the absolute best customer service I think I've ever exerienced. The first three rolls of yarn I purchased had some problems towards the middle. I contacted Lion Brand and not even a week later I had all three colors arrive at my door step. It was absolutely fantastic.
-     For the size I made, I used about 8 rolls, four of which were white.

Special stitches:
      -     half Trbc - YO twice, insert hook into stitch, YO, pull up a loop, YO, pull through two loops on                   hook, YO, pull over remaining loops on hook - with a trbc you will YO and pull through two loops               three times, but with the half, you only YO twice.

Color A:  white
Color B: pink
Color C: blue

With color A
Round 1) Using magic circle, ch 1, dc 12, pull tight, join to first dc with sl st – 12 dc

Round 2) Ch 1, 2 fpdc around every st, join to first fpdc with sl st – 24 dc

Round 3) Ch 1, *fpdc around next 2 st, change to color B (or C), dc in between last fpdc and next fpdc, change to color A* around, join to first dc with sl st – 36 dc

Round 4) Ch 1, *fpdc around next 2 st, change to color B (or C), dc in between fpdc and dc, dc in between dc and next fpdc, change to color A* around, join to first dc with sl st – 48 dc

Round 5) Ch 1, *fpdc around next 2 st, change to color B (or C), dc in next dc, dc in between dc and next dc, dc in next dc, change to color A*, around, join to first dc with sl st – 60 dc

Round 6) Working in 3rd loop only: ch 1, dc in next 2 st, *half trbc in next st, 2 trbc… ch 2… 2 trbc all in next st, dc in next 2 st, hdc in next 2 st, sc in next 4 st, hdc in next 2 st, dc in next 2 st, half trbc in next st* repeat to end, join to first dc with sl st


To join:
 Face squares right sides together, working in the back loops only (so the front will be visible when you finish), join with a ch 1 in the 2nd ch of a corner, sl st all the way down the squares to the other 2nd ch of a corner. Once all the squares are into rows, repeat these instructions but with the rows.


Edging:
Round 1) With color A - Join in any corner with a ch 1, work in 3rd loop only - *2 sc, ch 1, 2 sc  in corner, sc in every st across* repeat around blanket, join to first sc with sl st

Round 2) Repeat round 1 with color B

These next instructions are not specific because depending on the size of your blanket you will end up with a different stitch count then I did.

Round 3) In corner: working in 3rd loop only - sc, ch 1, sc – between corners, shell stitch – 5 dc in next st, skip next 2 st, sc in next st, skip next 2 st across and then repeat corner and shell instructions all the way around.

Round 4) 1 sc in every corner – Shell (5 dc in 1 st) in every sc and 1 sc in every 3rd st of every shell, join to first st with sl st and tie off


Placement:
I made a 7 square long by 6 square wide baby blanket. I did not measure the exact dimensions of the blanket as I was making it as a gift for a baby shower that got planned a bit sooner due to the mommy to be moving. I used the squares requiring three colors for the outside long edges of the blanket and then alternated the squares requiring two colors on the inside. Really, you can do whatever you want with this design because it will look beautiful regardless! 

Friday, May 23, 2014

Baby Blanket Round Up - 10 Free Patterns


When deciding on the theme for this weeks round up I decided to give you all a sneak peak of what my next free pattern is going to be!!! A baby blanket pattern! :) Soft and sweet and just perfect for babies... that is what this round up (and my next pattern) is all about! Check out the awesome freebie patterns below. Just click on the images to go to the link! 

1) 
This free ravelry download is brought to you by C. L. Halvorson. What stood out to me about this pattern is just how much like a quilt it looks! I  mean, that is clearly what the designer was going for and it is rather impressive! 


2) 
This beautiful tutorial, done by Esther at Happy in Red, gives you exactly what you need to make the most beautiful baby blanket. You can decide on how large or little you want it because this designer tells you how to make the stitch! Isn't it nice to have the control in your hands sometimes?


3) 
 This Lazy Daisy baby blanket Red Heart pattern is remarkable. It's soft, its dainty and it is perfect for a baby. 


4)
This breastfeeding logo baby blanket is brought to you as a free ravelry download by Waiyi Choi because of how passionate she is about breastfeeding... and due to my own passion about breastfeeding I just had to include it! 


5) 
This Honey Sweet Tunisian crochet baby blanket is a beautiful design done by Kim Guzman. I've just recently started improving my Tunisian crochet skill (actually released my first Tunisian pattern the other day!) so this pattern was an obvious choice. 


6) 
This next pattern is another free ravelry download and the designer is Diane Kenduck. Isn't it beautiful? I love the overlapping colors. 


7) 
This unique and colorful baby blanket is brought to you by Be a Crafter. Isn't it darling?! It would definitely make any baby happy!


8)
This baby blanket has several things about it that I completely love. The biggest thing that drew me to it was the color arrangement. Absolutely beautiful and so very beachy and brought to you by Little Monkey's Crochet!


9) 
This zebra blanket is so lovely! The different stripes work together so well that I just couldn't help but fall in love with it! It looks very realistic wouldn't you say? This design is a free ravelry download by Karin Whit. 


10) 
This last pattern is another free ravelry download and brought to you by Elizabeth Lowe. What I most loved about this pattern was the way she joined the squares. It is unique and really accents the design! 

Friday, April 25, 2014

10 Free Patterns - Sandals


As a mother of two wonderful children, I learned several years ago just how much I love baby feet. They are so tiny! When my daughter was born (she was my first) I would hold my thumb up against her tiny little foot and marvel at how her thumb was barely any larger then my thumb! And I have some small hands. Prior to her birth, when we got baby socks, my husband would obsessively stick them on his own thumb amazed that they would fit. We just couldn't believe feet could be so little! But they can be and size plays no role in how large of an impact those tiny little feet can make on your heart! 

Enjoy these free sandal patterns (don't worry, I threw in some patterns for mom too!)


1) Mary Jane Shoes by Lisa Auch - When I found these I knew they had to be in this round-up. The swirly little flower is so darn adorable and I could just picture my own daughter wearing them! They are absolutely adorable! 


2) Crochet Baby Sandal by Everything's Crochet - These little daisy looking sandals are so cute and so perfect for tiny female feet. What I like most about this pattern is that it achieves fashion without complicated stitches. Sometimes, simple is perfect! 


3) Crochet Baby Sandals by Ashlee Marie - Crochet shoes for little girls are typically an easy find so when I discovered these my first thought was how perfect they would be for my little man! They are cuter then anything I've found in the store and can be made in whatever color/material I choose. That is perfection! 


4) Crochet Baby Sandals by This Lovely Life - When doing my search for free sandal patterns, I right-clicked this pattern to open it in a new tab at least three times. These little shoes were everywhere and they caught my eye every single time they showed up. The conclusion was easy to come to. They must have a spot in this round up! They are simple, they are high in fashion and they are adorable. Plus pink. They are also pink. ;) 


5) Baby Button Gladiator Sandals by Whistle & Ivy - The unique name that goes along with these sandals is absolutely perfect because they are absolutely unique! And the name is gender neutral because if not for the pink, these sandals could easily adorn the feet of a mighty little warrior boy! I'm thinking brown with grey buttons for a little man, perhaps? 


6) The Granny Triangle Flip Flop by The Oxford Family - After all of the patterns involving baby feet, I had to break it up with something for mom. I don't want to give everyone baby fever, after all ;) These flip flops are perfect and practical. Take the soles of some cheapie flip flops from Wal-Mart and turn them into so much more! 


7) Stripes Boy Sandals by Emi Herrington - These little shoes come in sizes from baby all the way to adult. There is a perfect fit for everyone in the family! These shoes are practical, can be made color specific or in colors that will match any outfit! They are what you can call "perfect". hehe Oh and they come as a FREE ravelry download!


8) Baby Crochet Sandals by "the difference is in the details" - These little shoes remind me of the beach, water and sand. I can only assume because of the brilliant use of colors in this image. These little shoes look so "ocean" and "sand" like, it isn't funny. Like, I wish I lived near a beach (that had water) just so I could make some and put them on my child! I specify a beach with water because for most of my life I lived near the largest beach ever and it had absolutely no water. Well, on the surface. Check out the White Sands and your mind will be blown by the beauty! 


9) Flower Power Baby Sandals by - Lovely Little Life - What make me so happy about these sandals is just how much they scream "spring" and "summer" at the same time. We have the green, the red and the adorable baby foot. Again, perfection! Gosh, just look at those little toes!! 


10) Baby Rainbow Sandals by is it a toy - I love bright colors that are also simple. It gives this complicated look that is actually super easy. The criss-cross pattern these shoes have are unique and fun!

Annnnd just because I feel that I left the adults out to much... enjoy this wonderful antique shoe design for mom! 


All I'm going to say is BEAUTIFUL! - Evening Shoes 


Saturday, March 22, 2014

Ruffles Galore Newborn Diaper Cover


Hook: I
Material: Redheart Black & Redheart Boutique Sashay Cotton Candy

Band
Row 1) Ch 5, sl st in 2nd ch from hook in back loop only (for entire band) and in next 3 ch in back loops only here and throughout band

Row 2) Ch 1, sl st in 2nd ch from hook and in next 3 ch  

Row 3 – 66) repeat row 2

Diaper:
Round 1) Ch 1, sc in between every row across, join to first sc with invisible join to form a ring – 33 sc

Round 2) Ch 1, hdc around in back loop only, join to first hdc with invisible join  – 33 hdc

Round 3) Ch 1, hdc around in both loops, join to first hdc with invisible join – 33 hdc

Round 4) Ch 1, hdc in back loops only, join to first hdc with invisible join – 33 hdc

Round 5) Ch 1, hdc in both loops, join to first hdc with invisible join – 33 hdc

Round 6) Ch 1, hdc dec in first 2 loops, hdc in next 12 hdc, hdc dec in next 2 – 14 hdc

Round 7) Ch 1, turn, hdc in front loop only – 14 hdc

Round 8) Ch 1, turn, hdc dec in first 2 hdc, hdc in next 10, hdc dec in last 2 in both loops – 12 hdc

Round 9) Ch 1, turn, hdc dec in first 2 hdc, hdc in next 8, hdc dec in last 2 in both loops – 10 hdc

Round 10 -17) Ch 1, turn, hdc in both loops across – 10 hdc

Round 18) Ch 1, turn, 2 hdc in first st, hdc in next 8 hdc, 2 hdc in last hdc – 12 hdc

Round 19) Ch 1, turn, 2 hdc in first st, hdc in next 8 hdc, 2 hdc in last hdc – 14 hdc

Round 20) Ch 1, turn, hdc in both loops across – 14 hdc

Round 21) Ch 1, hdc in front loop across – 14 hdc

Fold inside out, then fold the bottom portion in half, stitch last row to row 6 using the sl st, be sure to go through both loops of both rows!

Use sl st to st the band together.

Take ruffle material and hook through a top loop and into the second  line showing on the diaper cover (the second time you only crocheted through the front loop), you will use this material and sc around. Once you are back at your starting point, take the material and join it into the first line (right under the band) and sc around there as well. You can use the third line as an option for more ruffle or just use the top two. My preference is the top two lines only. 


Friday, February 14, 2014

Butterfly Beanie


Hook: I
Material: Red Heart
Gauge: 2 rows = 1 inch

Abbreviations:
-          Ch – chain
-          Sc – single crochet
-          St – stitch
-          Dc – double crochet
-          YO – Yarn over

Special stitches:
-          Puff stitch  – *YO, place hook in stitch, YO and pull up a loop, YO and pull through first two loops on hook* repeat three times (so you’ll have three half completed double crochets on your hook), YO and pull through all loops on hook – It’s like doing 3 dc dec all in the same stitch!

Helpful Hints & Tips
-          When working the mirrored round, count your stitches because it is easy to think you are putting the stitch in the wrong place. You want 6 st (or however many are indicated for your size) between each butterfly, a wing, a sc and then a wing all directly across from one another.
-          Use the pictures at the bottom to help with the butterfly body. When I say go through the top loop you will go all the way through. You place your hook between the front and back loop, draw up a loop from behind the butterfly so it completely wraps around the sc between the wings. Then you will go under the entire st as if it isn’t even there and do a dc and then you’ll slip your hook between the front and back loop again like you did in the start. Hopefully the pictures help with this! This makes it where the body stays tightly together and won’t move around because it is locked through that stitch.
-          The 0-3 month might stretch to fit 6 months as well. I do not have a baby that young and couldn’t for sure test that. The second size fit my one year old son as well as my three year old daughter. It didn’t look loose on my son or tight on my daughter which was perfect!
-          In the larger size, there is an additional butterfly and some left over sc. Between all of the butterflies but TWO there will be 6 sc. In the last one there are a few extra. This is not a mistake, it is just the back of the hat.
-    This pattern does require that you work up from the bottom and decrease once you reach the top rather than working from the top and going down. The last decrease (12 decreases) is challenging but can be done! 

Size: 0-3 Months

Edging
With A

Round 1) Ch 37, sc in 2nd ch from hook,* change to B, puff st in next st, , 1 sc in next st,  puff st in next st, change to A, sc in next 6 st* repeat until end, tie off – 4 butterflies, 24 sc

Mirrored round) Join with A on the opposite side of the chain. You will follow the same instructions as round 1, mirroring the first row on the opposite side EXCEPT you will start at the very last st of the previous round

With A – join on the same side as round 1, not the mirrored side

Round 1) Join, ch 1, sc in first st, *change to C, skip ½ cluster st, double crochet through front loop of mirrored round, double crochet over entire middle stitch (the stitch between the wings), dc over the front loop of middle stitch (again), skip wing stitch again, Change to A, sc in next 6 st*join to first sc with sl st – 36 st

Round 2) Ch 2, dc in every st around, join to first dc with sl st – 36 dc

Round 3 - 6) Repeat round 2

Round 7) Ch 2, *dc in first st, dc dec in next 2 st* until you reach the end, join to first dc with sl st – 24 dc

Round 8) Ch 2, *dc dec in next 2 st*12 times, join to first dc with sl st – 12 dc

Round 9) Ch 2, dc dec over next 12 st, join to same dc (it will be the only one) with sl st, tie off, cut and pull piece through to inside of hat, tie double knot to keep secure  – 1 dc

Tie and trim loose ends.


Size: Toddler (1 year to 3 years)

Round 1) Ch 49, sc in 2nd ch from hook,* change to B,  puff st in next st, 1 sc in next st,  puff st in next st, change to A, sc in next 6 st* repeat until you reach the last butterfly, sc in last 8 st, tie off – 5 butterflies, 33 sc

Mirrored Round) Join with A on the opposite side of the chain. You will follow the same instructions as round 1, mirroring the first row on the opposite side EXCEPT you will start at the very last st of the previous round

With A – join on the same side as round 1, not the mirrored side

Round 1) Join, ch 1, sc in first st, *Change to C, skip ½ cluster st, double crochet through front loop of mirrored round, double crochet over entire middle stitch (the stitch between the wings), dc over the front loop of middle stitch (again), skip wing stitch again, Change to A, sc in next 6 st*join to first sc with sl st – 48 st

Round 2) Ch 2, dc in every st around, join to first dc with sl st – 48 dc

Round 3 - 5) Repeat round 2

Round 6) Ch 2, *dc in first 2 st, dc dec in next st* until you reach the end, join to first dc with sl st - 36

Round 7) Ch 2, *dc in first st, dc dec in next 2 st* until you reach the end, join to first dc with sl st – 24 dc

Round 8) Ch 2, *dc dec in next 2 st*12 times, join to first dc with sl st – 12 dc

Round 9) Ch 2, dc dec over next 12 st, join top of ch 2, tie off, cut and pull piece through to inside of hat, tie double knot to keep secure  – 1 dc

Tie and trim loose ends. 

This is the first st. As you can see, I went in between the front and back loops and pulled the yarn up from behind the butterfly. 

In this photo, I am doing the 2nd dc and am going under the entire st. The third st will be done by repeating the first image. you may have to kind of scooth the first two stitches over to see the st. 


Thursday, January 30, 2014

Mermaid Photography Prop


This is my second pattern listed on etsy and I am so excited! I worked so hard on this pattern and am so glad I am able to share it with you all! There are so many things about it that I love and I'd like to share some of those with you!

First is the headband. It can fit a newborn AND a 12 month old. it is incredibly stretchy. It's the stretchiest crochet headband technique I've ever used.

Second is the chest piece. While the flower and the lace make for awesome decoration they are not required at all for this piece to look beautiful! The top dips in the center and curves up towards the shoulders gradually. The back is stretchy so it will fit up to 3-4 inches more due to stretch.

Then there comes the actual tail. I think my number one favorite thing with the tail is that the stitches look like little hearts! I just love that!

Right now, this tail is for sale on my etsy page at: https://www.etsy.com/listing/177720078/mermaid-photography-prop?ref=af_shop_favitem

For those interested, I also sell completed items, just comment or e-mail me at manda-nicole92@live.com or visit my facebook page at www.facebook.com/MNECrafts