Showing posts with label animal. Show all posts

Wednesday, September 17, 2014

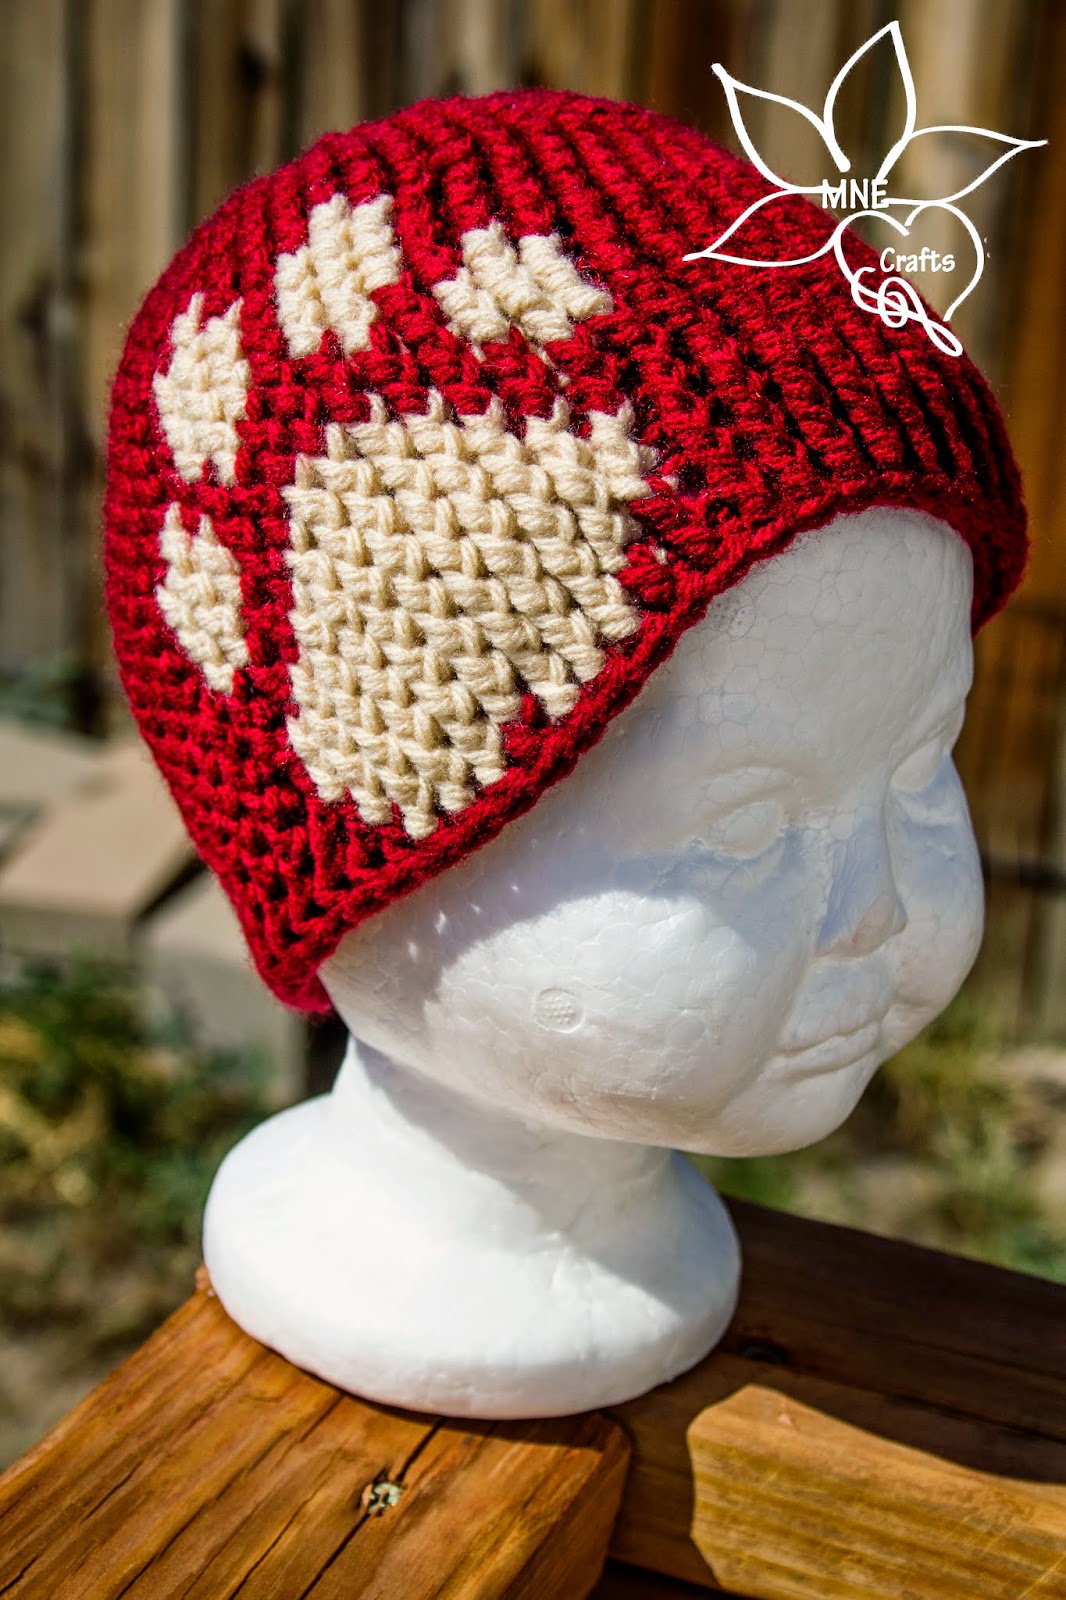
Paw Print Graph Pattern


Hook: I
Material:
Red Heart Super Saver or Loops & Thread Impeccable
Gauge: 4 rows & 4 stitches = 1”

Size: Baby – 0-6 months
Round 1) With MC - Using magic circle, ch 2, 12 dc in circle, pull tight and join to first dc with sl st – 12 dc

Round 2) Ch 2, 2 fpdc around every st around, join to first dc with sl st – 24 dc

Round 3) Ch 2, *fpdc around next st, 2 fpdc around next st* around, join to first dc with sl st  - 36 dc

Round 4) Ch 2, *fpdc around next 2 st, 2 fpdc around next st* around, join to first dc with sl st – 48 dc

Round 5 - 6) Ch 2, fpdc around every st around, join to first dc with sl st – 48 dc

Round 7) Ch 2, fpdc around next 14 st, change to CC, fpdc around next st, change to MC, fpdc around next 3 st, change to CC, fpdc around next st, change to MC, fpdc around to end, join to first st with sl st – 48 dc

Round 8) Ch 2, fpdc around next 13 st, change to CC, fpdc around next 3 st, change to MC, fpdc around next st, change to CC, fpdc around next 3 st, change to MC, fpdc around to end, join to first st with sl st – 48 dc

Round 9 - 10) Repeat round 8 – 48 dc

Round 11) Ch 2, fpdc around next 11 st, change to CC, fpdc around next st, change to MC, fpdc around next 2 st, change to CC, fpdc around next st, change to MC, fpdc around next 3 st, change to CC, fpdc around next st, change to MC, fpdc around next 2 st, change to CC, fpdc around next st, change to MC, fpdc around to end, join to first st with sl st – 48 dc

Round 12) Ch 2, fpdc around next 10 st, change to CC, fpdc around next 3 st, change to MC, fpdc around next 7 st, change to CC, fpdc around next 3 st, change to MC, fpdc around to end, join to first st with sl st – 48 dc

Round 13) Ch 2, fpdc around next 10 st, change to CC, fpdc around next 3 st, change to MC, fpdc around next 2 st, change to CC, fpdc around next 3 st, change to MC, fpdc around next 2 st, change to CC, fpdc around next 3 st, change to MC, fpdc around to end, join to first st with sl st – 48 dc

Round 14) Ch 2, fpdc around next 10 st, change to CC, fpdc around next 2 st, change to MC, fpdc around next 2 st, change to CC, fpdc around next 5 st, change to MC, fpdc around next 2 st, change to CC, fpdc around next 2 st, change to MC, fpdc around to end, join to first st with sl st – 48 dc

Round 15) Ch 2, fpdc around next 13 st, change to CC, fpdc around next 7 st, change to MC, fpdc around to end, join to first st with sl st – 48 dc

Round 16) Ch 2, fpdc around next 12 st, change to CC, fpdc around next 9 st, change to MC, fpdc around to end, join to first st with sl st – 48 dc

Round 17) Ch 2, fpdc around next 11 st, change to CC, fpdc around next 11 st, change to MC, fpdc around to end, join to first st with sl st – 48 dc

Round 18) Repeat round 17

Round 19) Ch 1, fpdc around next 12 st, change to CC, fpdc around next 9 st, change to MC, fpdc around to end, join to first st with sl st – 48 dc

Round 20) Ch 1, fpdc around next 13 st, change to CC, fpdc around next 3 st, change to MC, fpdc around next, change to CC, fpdc around next 3 st, change to MC, fpdc around to end, join to first st with sl st – 48 dc

Round 21) Ch 1, fpsc in every st around, join to first st with sl st and tie off – 48 sc

Size: Child – Toddler (1 – 3.5/4 years)   
Round 1) With MC - Using magic circle, ch 2, 12 dc in circle, pull tight and join to first dc with sl st – 12 dc

Round 2) Ch 2, 2 fpdc around every st around, join to first dc with sl st – 24 dc

Round 3) Ch 2, *fpdc around next st, 2 fpdc around next st* around, join to first dc with sl st  - 36 dc

Round 4) Ch 2, *fpdc around next 2 st, 2 fpdc around next st* around, join to first dc with sl st – 48 dc

Round 5) Ch 2, *fpdc around next 3 st, 2 fpdc around next st* around, join to first dc with sl st – 60 dc

Round 6 - 8) Ch 2, fpdc around every st around, join to first dc with sl st – 60 dc

Round 9) Ch 2, fpdc around next 19 st, change to CC, fpdc around next st, change to MC, fpdc around next 3 st, change to CC, fpdc around next st, change to MC, fpdc around to end, join to first st with sl st – 60 dc

Round 10) Ch 2, fpdc around next 18 st, change to CC, fpdc around next 3 st, change to MC, fpdc around next st, change to CC, fpdc around next 3 st, change to MC, fpdc around to end, join to first st with sl st – 60 dc

Round 11 - 12) Repeat round 10 – 60 dc

Round 13) Ch 2, fpdc around next 16 st, change to CC, fpdc around next st, change to MC, fpdc around next 2 st, change to CC, fpdc around next st, change to MC, fpdc around next 3 st, change to CC, fpdc around next st, change to MC, fpdc around next 2 st, change to CC, fpdc around next st, change to MC, fpdc around to end, join to first st with sl st – 60 dc

Round 14) Ch 2, fpdc around next 15 st, change to CC, fpdc around next 3 st, change to MC, fpdc around next 7 st, change to CC, fpdc around next 3 st, change to MC, fpdc around to end, join to first st with sl st – 60 dc

Round 15) Ch 2, fpdc around next 15 st, change to CC, fpdc around next 3 st, change to MC, fpdc around next 2 st, change to CC, fpdc around next 3 st, change to MC, fpdc around next 2 st, change to CC, fpdc around next 3 st, change to MC, fpdc around to end, join to first st with sl st – 60 dc

Round 16) Ch 2, fpdc around next 15 st, change to CC, fpdc around next 2 st, change to MC, fpdc around next 2 st, change to CC, fpdc around next 5 st, change to MC, fpdc around next 2 st, change to CC, fpdc around next 2 st, change to MC, fpdc around to end, join to first st with sl st – 60 dc

Round 17) Ch 2, fpdc around next 18 st, change to CC, fpdc around next 7 st, change to MC, fpdc around to end, join to first st with sl st – 60 dc

Round 18) Ch 2, fpdc around next 17 st, change to CC, fpdc around next 9 st, change to MC, fpdc around to end, join to first st with sl st – 60 dc

Round 19) Ch 2, fpdc around next 16 st, change to CC, fpdc around next 11 st, change to MC, fpdc around to end, join to first st with sl st – 60 dc

Round 20) Repeat round 19

Round 21) Ch 1, fpdc around next 17 st, change to CC, fpdc around next 9 st, change to MC, fpdc around to end, join to first st with sl st – 60 dc

Round 22) Ch 1, fpdc around next 18 st, change to CC, fpdc around next 3 st, change to MC, fpdc around next, change to CC, fpdc around next 3 st, change to MC, fpdc around to end, join to first st with sl st – 60 dc

Round 23) Ch 1, fpsc in every st around, join to first st with sl st and tie off – 60 sc

Size: Teen/Adult
Round 1) With MC - Using magic circle, ch 2, 12 dc in circle, pull tight and join to first dc with sl st – 12 dc

Round 2) Ch 2, 2 fpdc around every st around, join to first dc with sl st – 24 dc

Round 3) Ch 2, *fpdc around next st, 2 fpdc around next st* around, join to first dc with sl st - 36 dc

Round 4) Ch 2, *fpdc around next 2 st, 2 fpdc around next st* around, join to first dc with sl st – 48 dc

Round 5) Ch 2, *fpdc around next 3 st, 2 fpdc around next st* around, join to first dc with sl st – 60 dc

Round 6) Ch 2, *fpdc around next 4 st, 2 fpdc around next st* around, join to first dc with sl st – 72 dc

Round 7 - 10) Ch 2, fpdc around every st around, join to first dc with sl st – 72 dc

Round 11) Ch 2, fpdc around next 19 st, change to CC, fpdc around next st, change to MC, fpdc around next 3 st, change to CC, fpdc around next st, change to MC, fpdc around to end, join to first st with sl st – 72 dc

Round 12) Ch 2, fpdc around next 18 st, change to CC, fpdc around next 3 st, change to MC, fpdc around next st, change to CC, fpdc around next 3 st, change to MC, fpdc around to end, join to first st with sl st – 72 dc

Round 13 - 14) Repeat round 12 – 72 dc

Round 15) Ch 2, fpdc around next 16 st, change to CC, fpdc around next st, change to MC, fpdc around next 2 st, change to CC, fpdc around next st, change to MC, fpdc around next 3 st, change to CC, fpdc around next st, change to MC, fpdc around next 2 st, change to CC, fpdc around next st, change to MC, fpdc around to end, join to first st with sl st – 72 dc

Round 16) Ch 2, fpdc around next 15 st, change to CC, fpdc around next 3 st, change to MC, fpdc around next 7 st, change to CC, fpdc around next 3 st, change to MC, fpdc around to end, join to first st with sl st – 72 dc

Round 17) Ch 2, fpdc around next 15 st, change to CC, fpdc around next 3 st, change to MC, fpdc around next 2 st, change to CC, fpdc around next 3 st, change to MC, fpdc around next 2 st, change to CC, fpdc around next 3 st, change to MC, fpdc around to end, join to first st with sl st – 72 dc

Round 18) Ch 2, fpdc around next 15 st, change to CC, fpdc around next 2 st, change to MC, fpdc around next 2 st, change to CC, fpdc around next 5 st, change to MC, fpdc around next 2 st, change to CC, fpdc around next 2 st, change to MC, fpdc around to end, join to first st with sl st – 72 dc

Round 19) Ch 2, fpdc around next 18 st, change to CC, fpdc around next 7 st, change to MC, fpdc around to end, join to first st with sl st – 72 dc

Round 20) Ch 2, fpdc around next 17 st, change to CC, fpdc around next 9 st, change to MC, fpdc around to end, join to first st with sl st – 72 dc

Round 21) Ch 2, fpdc around next 16 st, change to CC, fpdc around next 11 st, change to MC, fpdc around to end, join to first st with sl st – 72 dc

Round 22) Repeat round 21

Round 23) Ch 1, fpdc around next 17 st, change to CC, fpdc around next 9 st, change to MC, fpdc around to end, join to first st with sl st – 72 dc

Round 24) Ch 1, fpdc around next 18 st, change to CC, fpdc around next 3 st, change to MC, fpdc around next, change to CC, fpdc around next 3 st, change to MC, fpdc around to end, join to first st with sl st – 72 dc


Round 25) Ch 1, fpsc in every st around, join to first st with sl st and tie off – 72 sc


Friday, March 28, 2014

Lovey Round-Up - 10 Free Lovey Patterns


I made my first Lovey for my son when he was under a year old (he's almost 14 months now). It was my own design and featured a lovely (and large) snowman head with a scarf and a granny blanket. It was quite a big of fun to design. I wrote that pattern down somewhere and need to find it! Until then, check out all of these other awesome lovies by some very creative and talented designers. I even threw in one knit pattern for all of those who love knitting! (#5) 

1) The Tau Crochet Lion Lovie  By Dedri at Look What I Made has this pattern is absolutely beautiful and sure to make any child smile! It's small size makes it perfect for a newborn to start with and a toddler to carry around without dragging it on the group. A little interesting  tidbit the designer includes is the meaning behind the name Tau. It means Lion in one of Africa's 11 official langauges! That's kind of how Disney came up with Simba from The Lion King. Simba means lion  in one of the other African languages. 


2) Let's all hope on over to The Stitchin' Mommy who has this delightful Bunny Lovey that would just be perfect to throw in the easter basket! You can make the blanket any size and with the wonderful granny stitch used, you don't have to worry about to much heat while making it! Not that the weather is staying warm consistantly for it to even be a concern. 


3) RAWR! No child will fear a monster again with this Monster Fleece Lovey by Sarah at Repeat Crafter Me who is amazing at taking some decorative fleece and adding some crochet accent to it. This monster lovey is one of several that this creative designer has out! Other free patterns include her Owl Fleece Lovey, Dinosaur Lovey, and Love Bug Lovey! - That's four fantastic lovey patterns using both crochet and fleece all in one spot! 


4) This Owl Lovey by Jessie at Jessie At Home is a hoot! It features an adorable baby sized owl on the famous granny stitch. This link will take you to more then just a pattern for an owl attached to a blanket. You'll see detailed pictures that will show you what to do every step of the way and give you the tools to attach any number of other animals or objects to a blanke to make a lovey! 


5) Any knitting mommy with a pair of needles and some yarn near by will love this Teething Dolly Lovey by MishiDesigns on Ravelry who has this delightful pattern on Raverly as a free  download! Knowing that babies love putting things in their mouth, MishiDesigns really put some creativity into this lovey by working with organic cotton making it the perfect item for a baby to carry around and chew on all at the same time! 


6) This little critter is one hot item with the little girls right now! This Hello Kitty Lovies by Yarn Artists are another free Ravelry Download. This creative designer also mixes fleece with crochet to arrive at a unique and awesome pattern. This blanket is decorative, handmade and will be a special gift for any child that has a passion for Hello Kitty!


7) With every child needing a special teddy bear this Bear Lovey by Kara at Petals to Picots created this little lovey for her son. She shares the cutest story about her inspiration above the pattern so be sure to check that out! Even better? Her inspiration came from the Monster Fleece Lovey by Repeat Crafter me which is number 3 in this round up! 


8) The circus is considered a fun family event and what better way to bring it home then with this Circus Elephant Lovey is another beautiful design by Dedri at Look What I Made. Apparently Lions are not her only speciality! Above the pattern she states her inspiration as Dumbo and is based off of her regular Elephant Lovey! Dedri clearly loves animals and is amazing at recreating them in crochet form! 


9) With this next Teddy Lovey by Aishakenza at Is It a Toy I was able to step out of my American culture     and learn a new word for the lovey. In france this wonderful item is called a doudou and apparently very       popular! Like with the teething dolly (#5) this designer recommends organic cotton because it is perfect         for baby! 


10) Let's throw our paws in the air like we just don't care for this Puppy Lovey by Sara at Posh Pooch Designs. Sara loves all things dog and what better way to share that love then create something for the little ones that aren't quite ready for a real puppy just yet? 

Friday, February 14, 2014

Butterfly Beanie


Hook: I
Material: Red Heart
Gauge: 2 rows = 1 inch

Abbreviations:
-          Ch – chain
-          Sc – single crochet
-          St – stitch
-          Dc – double crochet
-          YO – Yarn over

Special stitches:
-          Puff stitch  – *YO, place hook in stitch, YO and pull up a loop, YO and pull through first two loops on hook* repeat three times (so you’ll have three half completed double crochets on your hook), YO and pull through all loops on hook – It’s like doing 3 dc dec all in the same stitch!

Helpful Hints & Tips
-          When working the mirrored round, count your stitches because it is easy to think you are putting the stitch in the wrong place. You want 6 st (or however many are indicated for your size) between each butterfly, a wing, a sc and then a wing all directly across from one another.
-          Use the pictures at the bottom to help with the butterfly body. When I say go through the top loop you will go all the way through. You place your hook between the front and back loop, draw up a loop from behind the butterfly so it completely wraps around the sc between the wings. Then you will go under the entire st as if it isn’t even there and do a dc and then you’ll slip your hook between the front and back loop again like you did in the start. Hopefully the pictures help with this! This makes it where the body stays tightly together and won’t move around because it is locked through that stitch.
-          The 0-3 month might stretch to fit 6 months as well. I do not have a baby that young and couldn’t for sure test that. The second size fit my one year old son as well as my three year old daughter. It didn’t look loose on my son or tight on my daughter which was perfect!
-          In the larger size, there is an additional butterfly and some left over sc. Between all of the butterflies but TWO there will be 6 sc. In the last one there are a few extra. This is not a mistake, it is just the back of the hat.
-    This pattern does require that you work up from the bottom and decrease once you reach the top rather than working from the top and going down. The last decrease (12 decreases) is challenging but can be done! 

Size: 0-3 Months

Edging
With A

Round 1) Ch 37, sc in 2nd ch from hook,* change to B, puff st in next st, , 1 sc in next st,  puff st in next st, change to A, sc in next 6 st* repeat until end, tie off – 4 butterflies, 24 sc

Mirrored round) Join with A on the opposite side of the chain. You will follow the same instructions as round 1, mirroring the first row on the opposite side EXCEPT you will start at the very last st of the previous round

With A – join on the same side as round 1, not the mirrored side

Round 1) Join, ch 1, sc in first st, *change to C, skip ½ cluster st, double crochet through front loop of mirrored round, double crochet over entire middle stitch (the stitch between the wings), dc over the front loop of middle stitch (again), skip wing stitch again, Change to A, sc in next 6 st*join to first sc with sl st – 36 st

Round 2) Ch 2, dc in every st around, join to first dc with sl st – 36 dc

Round 3 - 6) Repeat round 2

Round 7) Ch 2, *dc in first st, dc dec in next 2 st* until you reach the end, join to first dc with sl st – 24 dc

Round 8) Ch 2, *dc dec in next 2 st*12 times, join to first dc with sl st – 12 dc

Round 9) Ch 2, dc dec over next 12 st, join to same dc (it will be the only one) with sl st, tie off, cut and pull piece through to inside of hat, tie double knot to keep secure  – 1 dc

Tie and trim loose ends.


Size: Toddler (1 year to 3 years)

Round 1) Ch 49, sc in 2nd ch from hook,* change to B,  puff st in next st, 1 sc in next st,  puff st in next st, change to A, sc in next 6 st* repeat until you reach the last butterfly, sc in last 8 st, tie off – 5 butterflies, 33 sc

Mirrored Round) Join with A on the opposite side of the chain. You will follow the same instructions as round 1, mirroring the first row on the opposite side EXCEPT you will start at the very last st of the previous round

With A – join on the same side as round 1, not the mirrored side

Round 1) Join, ch 1, sc in first st, *Change to C, skip ½ cluster st, double crochet through front loop of mirrored round, double crochet over entire middle stitch (the stitch between the wings), dc over the front loop of middle stitch (again), skip wing stitch again, Change to A, sc in next 6 st*join to first sc with sl st – 48 st

Round 2) Ch 2, dc in every st around, join to first dc with sl st – 48 dc

Round 3 - 5) Repeat round 2

Round 6) Ch 2, *dc in first 2 st, dc dec in next st* until you reach the end, join to first dc with sl st - 36

Round 7) Ch 2, *dc in first st, dc dec in next 2 st* until you reach the end, join to first dc with sl st – 24 dc

Round 8) Ch 2, *dc dec in next 2 st*12 times, join to first dc with sl st – 12 dc

Round 9) Ch 2, dc dec over next 12 st, join top of ch 2, tie off, cut and pull piece through to inside of hat, tie double knot to keep secure  – 1 dc

Tie and trim loose ends. 

This is the first st. As you can see, I went in between the front and back loops and pulled the yarn up from behind the butterfly. 

In this photo, I am doing the 2nd dc and am going under the entire st. The third st will be done by repeating the first image. you may have to kind of scooth the first two stitches over to see the st. 


Wednesday, January 30, 2013

Bumble Bee Photography Prop

Click to enlarge

Size: Newborn 

Size I hook

*Change colors during sl st before you start next round*

Beanie:
Round 1) In magic circle, ch 2 (does not count as dc here and through-out), 12 dc in loop, pull tight, join with sl st to first dc – 12 dc
Round 2) Ch 2, 2 dc in same st as joining, 2 dc in every dc around, join with sl st to first dc – 24 dc
Round 3) Ch 2, 2 dc in same st as joining, 1 dc in next dc, *2 dc in next dc, 1 dc in next dc* around, join with sl st to first dc  - 36 dc
Round 4) Ch 2, dc in same st as joining, 1 dc in every dc around, join with sl st to first dc – 36 dc
Round 5 – 9) repeat round 4
Round 10) Ch 1, sc in same st as joining, sc in every st around, join with sl st to first sc, tie off – 36 dc

Antennae:
Make 2
Ch 11, sl st in 2nd ch from hook and in every chain down, tie off.

Stinger Piece:
Round 1) In magic circle, ch 2 (does not count as dc here and through-out), 12 dc in loop, pull tight, join with sl st to first dc – 12 dc
Round 2) Ch 2, 2 dc in same st as joining, 2 dc in every dc around, join with sl st to first dc – 24 dc
Round 3) Ch 2, 2 dc in same st as joining, 1 dc in next dc, *2 dc in next dc, 1 dc in next dc* around, join with sl st to first dc  - 36 dc
Round 4) Ch 2, 2 dc in same st as joining, 1 dc in next 2 dc, *2 dc in next dc, 1 dc in next 2 dc* around, join with sl st to first dc – 48 dc
Round 5) Ch 2, dc in same st as joining, 1 dc in every dc around, join with sl st to first dc – 48 dc
Round 6 – 10) Repeat round 5
Round 11) Ch 1, sc in same st as joining, sc in every st around, join with sl st to first sc, tie off – 48 dc
Stinger:
Ch 12, join to first ch with sl st to form ring, ch 2 (counts as first hdc), hdc around, join to top of ch 2 with sl st.

From here you are going to continue going up the stinger doing a hdc decrease twice every row until you have just one at the top. It will narrow into a point.