Showing posts with label free pattern. Show all posts

Tuesday, January 13, 2015

Yours Truly Graph Hat

I'm sure you've noticed a theme here and this post is no different... here is your NEXT Valentine's Day related graph hat! :) You can make this hat in all sizes plus it works up quickly! It doesn't get better then that. :p And, I'd like to give a big thanks to Sarah of Stitched After Dark for making up the hat and taking pictures for me. The one I had made sold before I could get pictures and then I fell ill so she totally made this post possible today! Go check out your free pattern!


And don't forget, if you want to save it to your Ravelry library and avoid the blog (not to mention you will have it forever and never lose it) check out the Ravelry listing HERE and buy your copy for just $2.50!  The free version can be found below! 

Hook: I (toddler); J (young child to adult – refer to notes)
Gauge: 3 rounds & 3st = 1”
Material: Red Heart Super Saver OR Loops & Threads Impeccable

Hints & Tips:
-          For toddler use an I hook and follow the pattern as written.
-          For infant, skip round 5 so that you only have 48 dc and only repeat to round 9 ending with 19 rounds

Abbreviations/stitches:
-          Ch – chain
-          Dc – double crochet
-          Sl st – slip stitch
-          Fpdc – front post double crochet
-          Fphdc – front post half double crochet
-          St – stitch

Round 1) Using magic circle, ch 2, 12 dc in circle, pull tight and join to first st with sl st – 12 dc

Round 2) Ch 2, 2 fpdc around every st around, join to first st with sl st – 24 dc

Round 3) Ch 2, *fpdc around next st, 2 fpdc around next st* around, join to first st with sl st – 36 dc

Round 4) Ch 2, *fpdc around next 2 st, 2 fpdc around next st* around, join to first st with sl st – 48 dc

Round 5) Ch 2, *fpdc around next 3 st, 2 fpdc around next st* around, join to first st with sl st – 60 dc

Round 6 – 11) Ch 2, fpdc around every st around, join to first st with sl st – 60 dc

Round 12) Ch 2, fpdc around 1st 27 st, change to CC, fpdc around next 2 st, change to MC, fpdc around next 5 st, change to CC, fpdc around next 2 st, change to MC, fpdc around to end, join to first st with sl st – 60 dc

Round 13) Ch 2, fpdc around 1st 18 st, change to CC, fpdc around next st, change to MC, fpdc around next 3 st, change to CC, fpdc around next st, change to MC, fpdc around next 3 st, change to CC, fpdc around next 4 st, change to MC, fpdc around next 3 st, change to CC, fpdc around next 4 st, change to MC, fpdc around next 3 st, change to CC, fpdc around next st, change to MC, fpdc around next 3 st, change to CC, fpdc around next st, change to MC, fpdc around to end, join to first st with sl st – 60 dc

Round 14) Ch 2, fpdc around 1st 17 st, *change to CC, fpdc around next 3 st, change to MC, fpdc around next st, change to CC, fpdc around next 3 st, change to MC*, fpdc around next 2 st, change to CC, fpdc around next 5 st, change to MC, fpdc around next st, change to CC, fpdc around next 5 st, change to MC, fpdc around next 2 st, repeat from *-* once, fpdc around to end, join to first st with sl st – 60 dc

Round 15) Ch 2, fpdc around 1st 17 st, *change to CC, fpdc around next 7 st, change to MC* fpdc around next 3 st, change to CC, fpdc around next 9 st, change to MC, fpdc around next 3 st, repeat from *-* once, fpdc around to end, join to first st with sl st – 60 dc

Round 16) Ch 2, fpdc around 1st 18 st, *change to CC, fpdc around next 5 st, change to MC*, fpdc around next 5 st, change to CC, fpdc around next 7 st, change to MC, fpdc around next 5 st, repeat from *-* once, fpdc around to end, join to first st with sl st – 60 dc

Round 17) Ch 2, fpdc around 1st 19 st, *change to CC, fpdc around next 3 st, change to MC*, fpdc around next 7 st, change to CC, fpdc around next 5 st, change to MC, fpdc around next 7 st, repeat from *-* once, fpdc around to end, join to first st with sl st – 60 dc

Round 18) Ch 2, fpdc around 1st 20 st, *change to CC, fpdc around next st, change to MC*, fpdc around 9 st, change to CC, fpdc around next 3 st, change to MC, fpdc around next 9 st, repeat from *-* once, fpdc around to end, join to first st with sl st – 60 dc

Round 19) Ch 2, fpdc around 1st 31 st, *change to CC, fpdc around next st, change to MC, fpdc around to end, join to first st with sl st – 60 dc

Round 20) Ch 2, fpdc around every st to end, join to first st with sl st – 60 dc

Round 21) Ch 2, fphdc around every st to end, join to first st with sl st and tie off – 60 hdc


Tuesday, January 6, 2015

Be Mine Graph Hat

Going along with the same theme as last week... how about another Valentine's Day related graph hat? This one features hearts that go up and down in a pattern. It can be made in a variety of colors and worn all winter long! This is a thick hat, so it's perfect for the cold month of February and, if you're in a cold state like I am... well into May!! If you've been following my graph hats over the past year, you'll notice that the pattern isn't the same as it was with my first, or even second or third! It's an evolution of the graph hat, for sure. As I've made more and more, I've developed easier ways of making the hat. I've not reached a point where ONE set of written instructions with minor tweaks that are written into the notes can make the same pattern work for all sizes. Awesome right? And even better... this method can work with ALL of the graph hats I've released, you just have to plug in that graph to these instructions/methods. :)

Also, if you really like this pattern, you can purchase it for a low fee of $2.50 which will add it to your Ravelry library so you'll never lose it and can easily print it. This means that if I ever retire the pattern, you'll still have a copy saved that you'll never lose. :) In addition to that, the actual graph will be included in the PDF for those of you who prefer to read the graph rather than the written instructions. You can make this purchase HERE.

Anyways, enjoy another freebie!


Hook: I (toddler); J (young child to adult – refer to notes)
Gauge: 3 rounds & 3st = 1”
Material: Red Heart Super Saver OR Loops & Threads Impeccable

Hints & Tips:
-          This pattern was written for young child, ages 4-8; if you’d like to make this hat for a preteen to adult, round 6 – 11 will need to be round 6 – 13 (which adds two additional rounds before you start the hearts) – from there you will continue the pattern as written.
-          For toddler, 1-3, use an I hook and follow the pattern as written.
-          For infant, skip round 5 so that you only have 48 dc and cut off the last heart in the graph. The written instructions will still work but won’t match exactly because the instructions have 7 hearts, and a hat for an infant with only 48 stitches will only have 6 hearts. Make sure to follow the graph attached at the bottom to make the modifications.

Abbreviations/stitches:
-          Ch – chain
-          Dc – double crochet
-          Sl st – slip stitch
-          Fpdc – front post double crochet
-          Fphdc – front post half double crochet
-          St – stitch

Round 1) Using magic circle, ch 2, 12 dc in circle, pull tight and join to first st with sl st – 12 dc

Round 2) Ch 2, 2 fpdc around every st around, join to first st with sl st – 24 dc

Round 3) Ch 2, *fpdc around next st, 2 fpdc around next st* around, join to first st with sl st – 36 dc

Round 4) Ch 2, *fpdc around next 2 st, 2 fpdc around next st* around, join to first st with sl st – 48 dc

Round 5) Ch 2, *fpdc around next 3 st, 2 fpdc around next st* around, join to first st with sl st – 60 dc

Round 6 - 11) Ch 2, fpdc around every st around, join to first st with sl st – 60 dc

Round 12) Ch 2, fpdc around next 10 st, *change to CC, fpdc around next st, change to MC, fpdc around next 3 st, change to CC, fpdc around next st, change to MC, fpdc around next 11 st*, repeat from *-* 3 times, fpdc in last 2 st, join to first st with sl st – 60 dc

Round 13) Ch 2, fpdc around next 9 st, *change to CC, fpdc around next 3 st, change to MC, fpdc around next st, change to CC, fpdc around next 3 st, change to MC, fpdc around next 9 st*, repeat from *-* 3 times, fpdc around last 3 st, join to first st with sl st – 60 dc

Round 14) Ch 2, fpdc around next 2 st, *change to CC, fpdc around next st, change to MC, fpdc around next 3 st, change to CC, fpdc around next st, change to MC, fpdc around next 2 st, change to CC, fpdc around next 7 st, change to MC, fpdc around next 2 st*, repeat from *-* 3 times, change to CC, fpdc around next st, change to MC, fpdc around next 3 st, change to CC, fpdc around next st, change to MC, fpdc around last 5 st, join to first st with sl st – 60 dc

Round 15) Ch 2, fpdc around next st, *change to CC, fpdc around next 3 st, change to MC, fpdc around next st, change to CC, fpdc around next 3 st, change to MC, fpdc around next 2 st, change to CC, fpdc around next 5 st, change to MC, fpdc around next 2 st*, repeat from *-* 3 times, change to CC, fpdc around next 3 st, change to MC, fpdc around next st, change to CC, fpdc around next 3 st, change to MC, fpdc around last 4 st, join to first st with sl st – 60 dc

Round 16) Ch 2, fpdc around next st, *change to CC, fpdc around next 7 st, change to MC, fpdc around next 3 st, change to CC, fpdc around next 3 st, change to MC, fpdc around next 3 st*, repeat from *-* 3 times, change to CC, fpdc around next 7 st, change to MC, fpdc around last 4 st, join to first st with sl st – 60 dc

Round 17) Ch 2, fpdc around next 2 st, *change to CC, fpdc around next 5 st, change to MC, fpdc around next 5 st, change to CC, fpdc around next st, change to MC, fpdc around next 5 st*, repeat from *-* 3 times, change to CC, fpdc around next 5 st, change to MC, fpdc around last 5 st, join to first st with sl st – 60 dc

Round 18) Ch 2, fpdc around next 3 st, *change to CC, fpdc around next 3 st, change to MC, fpdc around next 13 st*, repeat from *-* 3 times, change to CC, fpdc around next 3 st, change to MC, fpdc around last 6 st, join to first st with sl st – 60 dc

Round 19) Ch 2, fpdc around next 4 st, *change to CC, fpdc around next st, change to MC, fpdc around next 15 st*, repeat from *-* 3 times, change to CC, fpdc around next st, change to MC, fpdc around last 7 st, join to first st with sl st 6- dc

Round 20 – 21) Ch 2, fpdc around ever st around, join to first st with sl st – 60 dc

Round 22) Ch 1, fphdc around every st around, join to first st with sl st and tie off  – 60 hdc


Monday, June 23, 2014

Random Pattern Find - Crocodile Stitch Flower


This week's Random Pattern Find is this beautiful and dainty rose pattern! Titled the Crocodile Stitch Flower, it is a beauty!! When I first saw it it was just so unique looking and I was excited to do the crocodile stitch. 

Oddly enough, you don't use a crocodile stitch in this pattern at all so I was a bit surprised by that but pleased with the result none the less. 

You can find this free flower pattern HERE: 

Unfortunately I have no funny story to go along with this pattern. It was pretty simple and straight forward but sometimes that is nice. It worked up quickly and was simple to do. It's the absolute perfect flower pattern for anyone... expert or beginner! 


I do have a different surprise for you guys though! Check out this new pillow pattern! 

Click photo to go to pattern.


Wednesday, May 21, 2014

3 of Hearts Tunisian Kitchen Rag


Hook: K
Material: Lily Sugar & Cream
Gauge: non-essential

Stitches:
-          TKS – Tunisian knit stitch
-          Rtrn – return
-          Sc – single crochet
-          Sl st – slip stitch
-          MC – main color (mine was blue)
-          CC – contrast color (mine was white)

Tutorial Videos to help learn stitches:

Hints & Tips:
-          I count the first and last loops on hook as a st in the count
-          To make color changing easier, have three balls of yarn, the same color for either side of the heart and then a different color for the heart
-     A looser tension makes the curl not as bad ;) 

With MC
Row 1) Foundation row – Ch 23, insert hook in 2nd ch from hook, pull up a loop (2 loops on hook) and then repeat this until you reach the end of the ch and have 23 loops on your hook – return – 23 st

Row 2) Insert hook in 1st st, pull up a loop (2 loops on hook) and then repeat this until you reach the end of the first row – return – 23 st

Row 3) Insert hook in 1st st, pull up a loop (2 loops on hook) and then repeat until you have 11 loops on hook, change to CC, pull up 1 loop, change back to MC, pull up last 11 loops – return with MC for 11 st, change to CC, complete next 1 st, change back to MC, finish remaining 11 st – 23 st

Row 4) Insert hook in 1st st, pull up a loop (2 loops on hook) and then repeat until you have 10 loops on hook, change to CC, pull up next 3 loops, change back to MC, pull up last 10 loops – return with MC for 10 st, change to CC, complete next 3 st, change back to MC, finish remaining 10 st – 23 st

Row 5) Insert hook in 1st st, pull up a loop (2 loops on hook) and then repeat until you have 9 loops on hook, change to CC, pull up next 5 loops, change back to MC, pull up last 9 loops – return with MC for 9 st, change to CC, complete next 5 st, change back to MC, finish remaining 9 st – 23 st

Row 6) Insert hook in 1st st, pull up a loop (2 loops on hook) and then repeat until you have 8 loops on hook, change to CC, pull up next 7 loops, change back to MC, pull up last 8 loops – return with MC for 9 st, change to CC, complete next 7 st, change back to MC, finish remaining 9 st – 23 st

Row 7) Repeat row 6

Row 8) Insert hook in 1st st, pull up a loop (2 loops on hook) and then repeat until you have 8 loops on hook, change to CC, pull up next 3 loops, change back to MC, pull up 1 loop, change back to CC, pull up next 3 loops, change back to MC, pull up last 8 loops – return with MC for 8 st, change to CC, complete next 3 st, change to MC, complete next st, change to CC, complete next 3 st, change to MC and complete last 8 st – 23 st

Row 9) Insert hook in 1st st, pull up a loop (2 loops on hook) and then repeat until you have 8 loops on hook, change to CC, pull up next 2 loops, change back to MC, pull up 3 loop, change back to CC, pull up next 2 loops, change back to MC, pull up last 8 loops – return with MC for 8 st, change to CC, complete next 2 st, change to MC, complete next 3 st, change to CC, complete next 2 st, change to MC and complete last 8 st – 23 st

Row 10 - 11) Repeat row 2

Row 12 – 29) Repeat rows 3 – 11

Edging: Working in last finished st, place a sc in between the st (like where you’d pull up a loop) until you reach corner, sc, ch 1, sc in corner, sc in each row down until corner, sc, ch 1, sc in corner, sc in each row up other side until you reach corner, sc, ch 1 and then attach to first sc made for last corner.

Repeat edging instructions with CC


Tuesday, May 6, 2014

ZigZag Swimsuit Cover


Hook: G & I
Material: I Love This Cotton
Gauge: 9 sl st Rows = 2”

Hints & Tips:
-          In the chest piece, the sc2tog serves the same purpose as the ch 1 at the end of every sl st row
-          In the chest piece, when you sc2tog, you will work in the previous worked ch and the next ch so you don’t lose any stitches.
-          The chest is the only gauge that is important, the skirt you want loose and can adjust length to preference.
-     For the neck tie, you will ch until the desired length (22" for the toddler, for example) and then sl st back down the ch (I used two colors, one for the chain and one for the slip stitch back down) - then you pull it through two rows of sl st in the center of the chest piece, it should not be visible in the front. 

Special Stitches:
BegTrpCl – Begin Treble Cluster – Ch 3, [YO twice, put hook in st, pull up a loop, *YO, pull through two loops on hook* twice], once you have 3 loops on your hook, YO and pull through all loops – repeat *-* while doing stitch and then repeat [] twice.
TrCl – Treble Cluster - , [YO twice, put hook in st, pull up a loop, *YO, pull through two loops on hook* twice] until you have  loops on your hook, YO and pull through all loops - repeat *-* while doing stitch and then repeat [] three times.
Tr V-stitch – Treble V-stitch – Treble stitch, ch 1, treble stitch

Toddler size (3-4T)
Chest Piece:  G hook
Round 1) With color A - Ch 81, join to first ch with a sl st to form a ring, make sure you don’t twist – 80 ch

Row 1) Ch 1, sc2tog, ch 23, sl st in 2nd ch from hook and in every ch down, ch 1, sl st back down row – 22 sl st

Row 2) Sc2tog, sl st in 2nd st from hook, sl st to end, ch 1, sl st back down row

Row 3 – 79) Repeat row 2

Row 80) Sc2tog (the last ch and the first ch), sl st in both the row 1 and row 79 to the top, tie off.

Turn project over and work in opposite end of chain.
Round 1) Join in back of project, ch 1, *sc in next 7 ch, 2 sc in next ch* around, join color B in last st, join to first st with sl st – 90 sc

Skirt: I hook
Round 1) With color B, join in back, BegTrCl, ch 1, skip 2 st, *TrCl, ch 1, sk 2 st* around, join to  BegTrCl with sl st, tie off -  30 clusters

Round 2) With color C, join in a ch 1 sp near the back, ch 2, tr v-stitch in same sp as joining, *tr v-stitch* in every ch 1 sp around, join to first tr with sl st, tie off – 30 v-stitch

Round 3 - 11) Repeat rounds 1 & 2


Teen size:
Chest Piece:  G hook
Round 1) With color A - Ch 126, join to first ch with a sl st to form a ring, make sure you don’t twist – 126 ch

Row 1) Ch 1, sc2tog, ch 47, sl st in 2nd ch from hook and in every ch down, ch 1, sl st back down row – 46 sl st

Row 2) Sc2tog, sl st in 2nd st from hook, sl st to end, ch 1, sl st back down row

Row 3 – 125) Repeat row 2

Row 126) Sc2tog (the last ch and the first ch), sl st in both the row 1 and row 149 to the top, tie off.

Turn project over and work in opposite end of chain.
Round 1) Join in back of project, ch 1, *sc in next 5 ch, 2 sc in next ch* around, join color B in last st, join to first st with sl st – 147 sc

Skirt: I hook
Round 1) With color B, join in back, BegTrCl, ch 1, skip 2 st, *TrCl, ch 1, sk 2 st* around, join to  BegTrCl with sl st, tie off -  49 clusters

Round 2) With color C, join in a ch 1 sp near the back, ch 2, tr v-stitch in same sp as joining, *tr v-stitch* in every ch 1 sp around, join to first tr with sl st, tie off – 49 v-stitch

Round 3 - 30) Repeat rounds 1 & 2


***How to adjust size***
-          To adjust size, you will make a chain that wraps around the person’s chest (under the breasts). This is Round 1.
-          For Row 1, you will chain until the length comes up from under the breast and covers them completely. You will then follow the instructions as they go until you reach the skirt.
-          For round 1 before the start of the skirt, you will count your total stitches and see what they are divisible by and to make sure your end result is divisible by three, otherwise you will end up with a cluster in round 1 that doesn’t quite have the same number of stitches separating it. It’s all about the math.
-          For the final rounds (which determine the length) you will just keep repeating rounds 1 and 2 until the garment is long enough for you.


Saturday, May 3, 2014

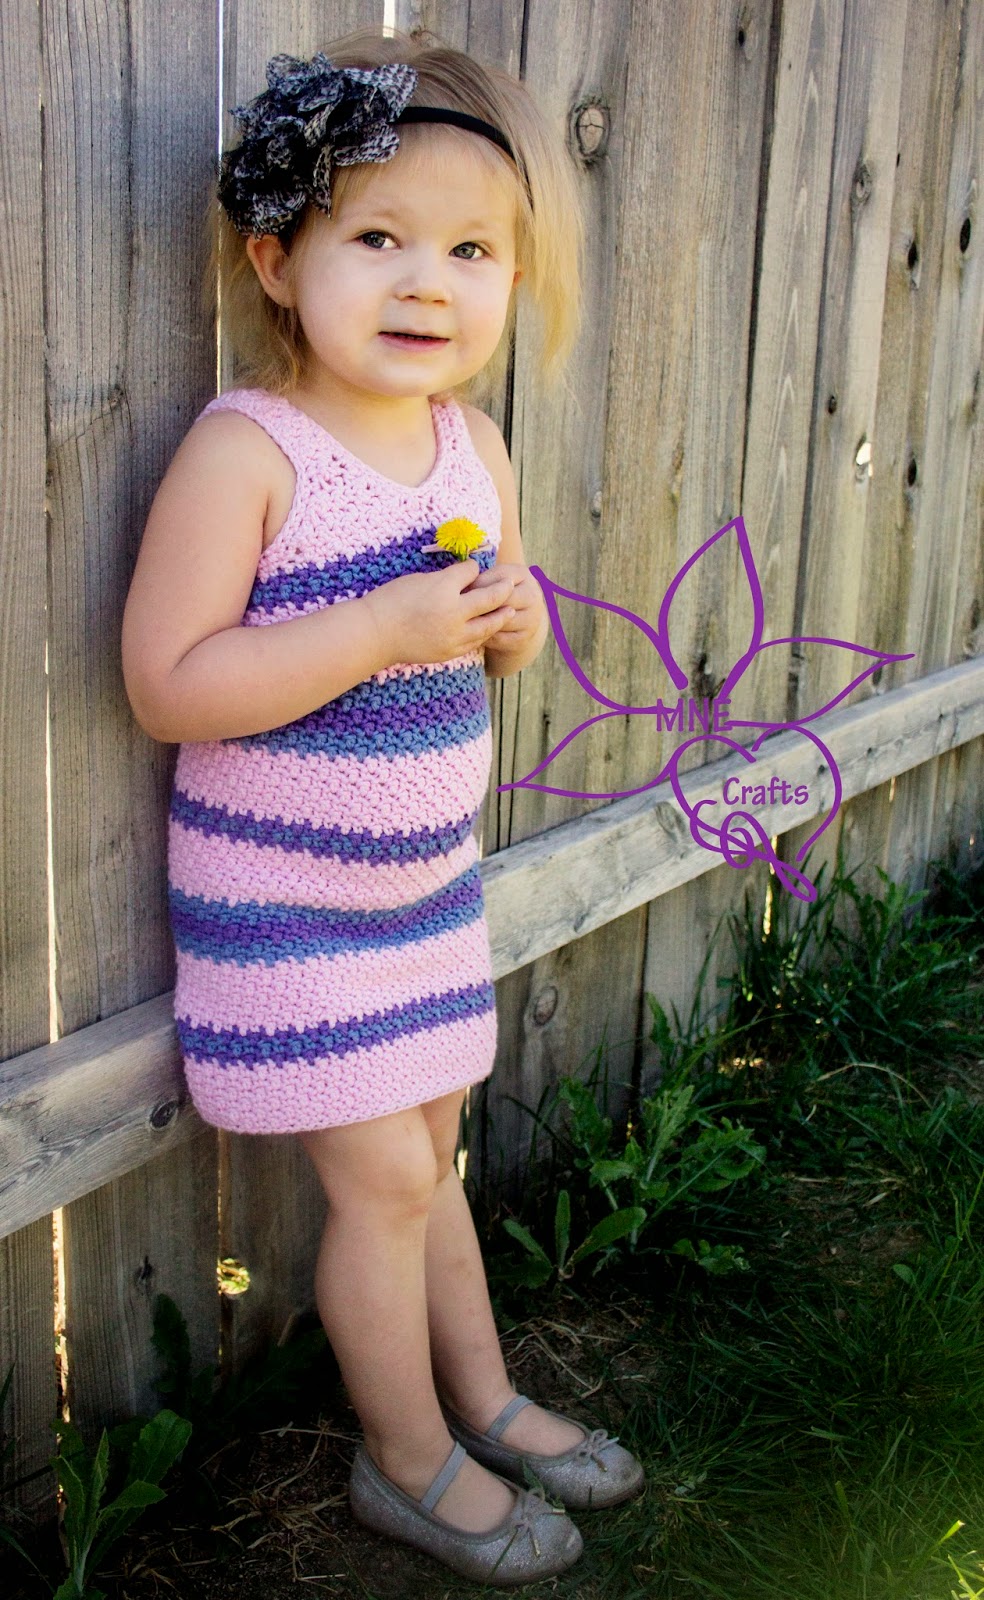
A Little Spring Time Dress


***A funny story to get you started*** - When I was finishing this dress and working on the chest piece my daughter came out and exclaimed "It has boobies on it! You made the boobies on it!!" - It made me laugh so hard and I just knew I would have to share. :)

Hook: G
Material: I Love This Cotton
Gauge: 3 rows = 1”, 3 st = 1” (between 3& 4 stitches equals an inch, not a perfect 3 stitches)

Hints & Tips
-          Chains at the start of any row do not count as a st so always put the first st in the same st as the ch
-          When you join with a ch 1 (like when you’ll change colors or start on the chest piece) you will join with a sl st and  a ch 1
-          To make counting your rows easier, instead of moving the stitch marker up, use a new stitch marker for each row.
-          When changing color, to keep the rows looking even but mostly avoid a seam, you will want to sl st to join the last st to the first st, ch 1 (only 1) and then do the normal st by pulling the yarn through that stitch and the sl st that joined the two stitches. You will essentially be doing a normal join whenever changing colors to help keep the rows looking even.
-          Though you will repeat round 1 throughout the pattern, you will not repeat the chain 1 instruction in round 1 in any round BUT round 1.

How to change color:
-          To change color, you will join the final stitch of the round BEFORE you change color to the first st in that round. You will then take the second color, join in the same st that you joined to (so the first st) with a sl st and a ch 1 – one good way to join, instead of the sl st and ch 1 is a standing sc or a standing dc

Special stitches:
-          Double stitch decrease – A decrease that uses both a double crochet and a single crochet to keep the alternate stitch appearance

Colors:
-          Pink – MC
-          Purple – A
-          Blue – C


Size: 2-3T
Foundation Row – With MC, Create a chainless row of 67 sc, join to first sc with sl st making sure not to twist

Round 1) Ch 1, *sc in next st, dc in next st* around, mark last st, do not join with sl st

Round 2) *dc in next st, sc in next st* (should stagger with round 1) around, move stitch marker up, do not join with sl st

Round 3 & 6) Repeat rounds 1 & 2 (skip the ch 1)
Change to color A

Round 7) Join with sRepeat round 1 (skip the ch 1)
Change to color B

Round 8) Repeat round 2
Change to color A

Round 9) Repeat round 1 (skip the ch 1)
Change to MC

Round 10) repeat round 2

Round 11 - 16) Repeat rounds 1 & 2 (skip the ch 1)
Change to color B

Round 17 & 18) Repeat rounds 2 & 1 (skip the ch 1)
Change to color A

Round 19 & 20) Repeat rounds 2 & 1 (skip the ch 1)
Change to color B

Round 21 & 22) Repeat rounds 2 & 1 (skip the ch 1)
Change to MC

Round 23 – 29) Repeat rounds 2 & 1 (skip the ch 1)
Change to Color A

Round 30) Repeat round 1 (skip the ch 1)
Change to Color B

Round 31) Repeat round 2
Change to Color A

Round 32) Repeat round 1 (skip the ch 1)
Change to MC

Round 33 – 39) Repeat rounds 1 & 2 (skip the ch 1
Change to Color B

Round 40 & 41) Repeat rounds 1 & 2 (skip the ch 1),
Change to Color A

Round 42 & 43) Repeat rounds 1 & 2 (skip the ch 1)
Change to Color B

Round 44 & 45) Repeat rounds 1 & 2 (skip the ch 1)
Change to MC

Round 46-52) Repeat round 1 & 2,
Change to Color A

Round 53) Repeat round 1,
Change to Color B

Round 54) Repeat round 2,
Change to Color A

Round 55) Repeat round 1
Change to MC

Round 56) Repeat round 2

Round 57) Repeat round 1, join to first st (it will be the st after the marked st) with sl st, tie off.

To start top of dress, line up the seam so that it is in the back of the dress.  Using 2 stitch markers, mark 1 stitch (on the right side of the front of the dress) and then the 22nd stitch from it – the first stitch you mark isn’t a specific stitch, just make sure that the seam is in the back and won’t be visible between the two stitches you mark.

Row 1) Join in st with ch 1, dc in first st (my joining st was a sc so I made a dc to start), *sc in next st, dc in next st* until you have 11 stitches

Row 2) Ch 1, turn, double st dec (sc first, then dc), *dc in next st, sc in next st*to last 2 st, double st dec again (dc first, then sc)

Row 3) ch 1, turn, double st dec (sc first, then dc), *sc in next st, dc in next st* to last 2 st, double st dec again (dc first, then sc)

Row 4 - 5) Repeat row 2 & 3 (until 3 st remain)

Row 6) Ch 1, turn, sc in next st, dc in next st, sc in last st

Row 7) Ch 1, turn, dc in next st, sc in next st, dc in last st

Row 8 – 20) Repeat row 6 and 7

Other chest strap:
Join with ch 1 in st directly next to the last st from row 1 of first chest strap

Row 1) Ch 1, *sc in first st, dc in next st*to marked stitch (should be 11 st)

Row 2) ch 1, turn, double st dec (dc first, then sc), *dc in next st, sc in next st* to last 2 st, double st dec again (sc first, then dc)

Row 3) Ch 1, turn, double st dec (dc first, then sc), *dc in next st, sc in next st*to last 2 st, double st dec again (sc first, then dc)

Row 4 -5) Repeat row 2 & 3

Row 6) Ch 1, turn, dc in next st, sc in next st, dc in last st

Row 7) Ch 1, turn, dc in next st, sc in next st, dc in last st

Row 8 – 20) repeat row 6 & 7

Edging:
Join in back of dress with ch 1 (you want to work in a direction so that the front of the st is the outside of the dress to keep a uniform look), sc in every st around including straps, join to first st with sl st
Sew straps to back of dress.

Working in each arm hole, do another row of edging until you reach the strap, sl st across the strap and return to the sc edging  - this is for the arm hole only, not the neck hole.
Join in back of dress where the collar is, sl st in every st around collar and then tie off.  


Size 4-5T
Foundation Row – Create a chainless row of 73 sc, join to first sc with sl st making sure not to twist

Round 1) Ch 1, *sc in next st, dc in next st* around, mark last st, do not join with sl st

Round 2) *dc in next st, sc in next st* (should stagger with round 1) around, move stitch marker up, do not join with sl st

Round 3 - 6) Repeat rounds 1 & 2 (skip the ch 1)
Change to color A

Round 7) Repeat round 1 (skip the ch 1)
Change to color B

Round 8) Repeat round 2
Change to color A

Round 9) Repeat round 1 (skip the ch 1)
Change to MC

Round 10) repeat round 2

Round 11 - 16) Repeat rounds 1 & 2 (skip the ch 1)
Change to color B

Round 17 & 18) Repeat rounds 2 & 1 (skip the ch 1)
Change to color A

Round 19 & 20) Repeat rounds 2 & 1 (skip the ch 1)
Change to color B

Round 21 & 22) Repeat rounds 2 & 1 (skip the ch 1)
Change to MC

Round 23 – 29) Repeat rounds 2 & 1 (skip the ch 1)
Change to Color A

Round 30) Repeat round 1 (skip the ch 1)
Change to Color B

Round 31) Repeat round 2
Change to Color A

Round 32) Repeat round 1 (skip the ch 1)
Change to MC

Round 33 – 39) Repeat rounds 1 & 2 (skip the ch 1
Change to Color B

Round 40 & 41) Repeat rounds 1 & 2 (skip the ch 1),
Change to Color A

Round 42 & 43) Repeat rounds 1 & 2 (skip the ch 1)
Change to Color B

Round 44 & 45) Repeat rounds 1 & 2 (skip the ch 1)
Change to MC

Round 46-52) Repeat round 1 & 2,
Change to Color A

Round 53) Repeat round 1,
Change to Color B

Round 54) Repeat round 2,
Change to Color A

Round 55) Repeat round 1
Change to MC

Round 56) Repeat round 2

Round 57) Repeat round 1, join to first st (it will be the st after the marked st) with sl st, tie off.  

To start top of dress, line up the seam so that it is in the back of the dress.  Using 2 stitch markers, mark 1 stitch (on the right side of the front of the dress) and then the 26th sitch from it – the first stitch you mark isn’t a specific stitch, just make sure that the seam is in the back and won’t be visible between the two stitches you mark.

Row 1) Join in 1st marked st with ch 1, dc in first st (my joining st was a sc so I made a dc to start), *sc in next st, dc in next st* until you have 13 stitches

Row 2) Ch 1, turn, double st dec (sc first, then dc), *dc in next st, sc in next st*to last 2 st, double st dec again (dc first, then sc)

Row 3) ch 1, turn, double st dec (sc first, then dc), *sc in next st, dc in next st* to last 2 st, double st dec again (dc first, then sc)

Row 4 - 6) Repeat row 2 & 3 (until 3 st remain)

Row 7) Ch 1, turn, sc in next st, dc in next st, sc in last st

Row 8) Ch 1, turn, dc in next st, sc in next st, dc in last st

Row 9 – 23) Repeat row 6 and 7

Other chest strap:
Join with ch 1 in st directly next to the last st from row 1 of first chest strap

Row 1) Ch 1, *sc in first st, dc in next st*to marked stitch (should be 13 st)

Row 2) ch 1, turn, double st dec (dc first, then sc), *dc in next st, sc in next st* to last 2 st, double st dec again (sc first, then dc)

Row 3) Ch 1, turn, double st dec (dc first, then sc), *dc in next st, sc in next st*to last 2 st, double st dec again (sc first, then dc)

Row 4 -7) Repeat row 2 & 3

Row 6) Ch 1, turn, dc in next st, sc in next st, dc in last st

Row 7) Ch 1, turn, dc in next st, sc in next st, dc in last st

Row 8 – 23) repeat row 6 & 7

Edging:
Join in back of dress with ch 1 (you want to work in a direction so that the front of the st is the outside of the dress to keep a uniform look), sc in every st around including straps, join to first st with sl st

Sew straps to back of dress – you’ll have 16 stitches between where you join the straps which should be directly across from the front of the straps.

Working in each arm hole, do another row of edging until you reach the strap, sl st across the strap and return to the sc edging  - this is for the arm hole only, not the neck hole.
Join in back of dress where the collar is, sl st in every st around collar and then tie off.


Wednesday, April 23, 2014

Vintage Tulip Sun Hat


Hook: H 
Material: Red Heart Shimmer
Gauge:  8 dc rows = 3” & 3 dc stitches = 1”

Hints & Tips:
-          Ch 1 doesn’t count as a stich anywhere in the pattern
-          Color A is the color of the strips, color B is the color between the strips, so in my images, the grey is color A and  the blue is color B.
-          Image to help understand where to place the stitches when increasing at the bottom, after the entire pattern instructions.
-          If you use a cotton yarn, use an F hook to get your gauge right and don’t do as many rows as the material will make it a little longer. You’ll need to measure your project as you go to accommodate the different material. (Cotton such as peaches and cream)
-          If you use a yarn like Red Heart Super Saver or I Love This Yarn you should be able to match the gauge by decreasing to a G hook, but make sure you check your work as you go if you do use a different material then that listed.
-          If you do not have Red Heart Shimmer, you can also get away with using another type of baby weight type yarn. The material says it is a weight 4 but I find it to be thin in comparison to the Red Heart Super Saver which also says 4.
-          When your gauge is off, try using a smaller or larger hook and measuring your project again.
-          The listed gauge is specific to the hat. I measured a finished hat to get the gauge.
-     I strongly suggest you use the listed material with this hat as other materials did alter the size in testing. If you do use alternate sizes be sure that you check the gauge. :)


Size: 6-12 months
With color A:

Hat:
Round 1) Using magic circle, ch 1, 12 dc in circle, pull tight, join to first dc with sl st – 12 dc

Round 2) Ch 1, 2 fpdc around every dc, join to first dc with sl st – 24 dc

Round 3) Ch 1, *fpdc around next 2 st, change to color B, dc in between current st and next st, change to color A* around, join to first dc with sl st – 36 dc

Round 4) Ch 1, *fpdc around next 2 st, change to color B, dc in space between current st and next st, skip next st, dc in space between skipped st and next st, change to color A* around, join to first dc with sl st – 48 dc

Round 5) Ch 1, *fpdc around next 2 st, change to color B, dc in next st, dc in space between current st and next st, dc in next st, change to color A* around, join to first dc with sl st  - 60 dc

Round 6 – 16) Ch 1, *fpdc around next 2 st, change to color B, dc in next 3 st, change to color A* around, join to first dc with sl st – 60 dc

Brim:
Round 17) Ch 1, * fpdc around next 2 st, change to color B, dc in next st, dc in space before next st, dc in space after next st (so 1 dc on either side of st), dc in next st, change to color A* around, join to first dc with sl st – 72 dc

Round 18) Ch 1, *fpdc around next 2 st, change to color B, dc in next 2 st, dc in space between current st and next st, dc in next 2 st, change to color A* around, join to first dc with sl st – 84 dc

Round 19) Ch 1, *fpdc around next 2 st, change to color B, dc in next 2 st, dc in space before next st, dc in space after next st (so 1 dc on either side of st), dc in next 2 st, change to color A* around, join to first dc with sl st – 96 dc

Round 20) Ch 1, *fpdc around next 2 st, change to color B, dc in next 3 st, dc in space between current st and next st, dc in next 3 st, change to color A* around, join to first dc with sl st – 108 dc


Size: Child/ Pre-teen
With color A:

Hat:
Round 1) Using magic circle, ch 1, 12 dc in circle, pull tight, join to first dc with sl st – 12 dc

Round 2) Ch 1, 2 fpdc around every dc, join to first dc with sl st – 24 dc

Round 3) Ch 1, *fpdc around next 2 st, change to color B, dc in between current st and next st, change to color A* around, join to first dc with sl st – 36 dc

Round 4) Ch 1, *fpdc around next 2 st, change to color B, dc in space between current st and next st, skip next st, dc in space between skipped st and next st, change to color A* around, join to first dc with sl st – 48 dc

Round 5) Ch 1, *fpdc around next 2 st, change to color B, dc in next st, dc in space between current st and next st, dc in next st, change to color A* around, join to first dc with sl st  - 60 dc

Round 6) Ch 1, * fpdc around next 2 st, change to color B, dc in next st, dc in space before next st, dc in space after next st (so 1 dc on either side of st), dc in next st, change to color A* around, join to first dc with sl st – 72 dc

Round 7– 18) Ch 1, *fpdc around next 2 st, change to color B, dc in next 4 st, change to color A* around, join to first dc with sl st – 72 dc

Brim:
Round 19) Ch 1, *fpdc around next 2 st, change to color B, dc in next 2 st, dc in space between current st and next st, dc in next 2 st, change to color A* around, join to first dc with sl st – 84 dc

Round 20) Ch 1, *fpdc around next 2 st, change to color B, dc in next 2 st, dc in space before next st, dc in space after next st (so 1 dc on either side of st), dc in next 2 st, change to color A* around, join to first dc with sl st – 96 dc

Round 21) Ch 1, *fpdc around next 2 st, change to color B, dc in next 3 st, dc in space between current st and next st, dc in next 3 st, change to color A* around, join to first dc with sl st – 108 dc

Round 22) Ch 1, *fpdc around next 2 st, change to color B, dc in next 3 st, dc in next sp between current st and next st,  dc in next sp  (dc in sp on either side of st), dc in next 3 st, change to color A* around, join to first dc with sl st – 120 dc


Size: Adult
With color A:

Hat:
Round 1) Using magic circle, ch 1, 12 dc in circle, pull tight, join to first dc with sl st – 12 dc

Round 2) Ch 1, 2 fpdc around every dc, join to first dc with sl st – 24 dc

Round 3) Ch 1, *fpdc around next 2 st, change to color B, dc in between current st and next st, change to color A* around, join to first dc with sl st – 36 dc

Round 4) Ch 1, *fpdc around next 2 st, change to color B, dc in space between current st and next st, skip next st, dc in space between skipped st and next st, change to color A* around, join to first dc with sl st – 48 dc

Round 5) Ch 1, *fpdc around next 2 st, change to color B, dc in next st, dc in space between current st and next st, dc in next st, change to color A* around, join to first dc with sl st  - 60 dc

Round 6) Ch 1, * fpdc around next 2 st, change to color B, dc in next st, dc in space before next st, dc in space after next st (so 1 dc on either side of st), dc in next st, change to color A* around, join to first dc with sl st – 72 dc

Round 7) Ch 1, *fpdc around next 2 st, change to color B, dc in next 2 st, dc in space between current st and next st, dc in next 2 st, change to color A* around, join to first dc with sl st – 84 dc

Round 8– 20) Ch 1, *fpdc around next 2 st, change to color B, dc in next 5 st, change to color A* around, join to first dc with sl st – 84 dc

Brim:
Round 21)
Ch 1, *fpdc around next 2 st, change to color B, dc in next 2 st, dc in space before next st, dc in space after next st (so 1 dc on either side of st), dc in next 2 st, change to color A* around, join to first dc with sl st – 96 dc

Round 22) Ch 1, *fpdc around next 2 st, change to color B, dc in next 3 st, dc in space between current st and next st, dc in next 3 st, change to color A* around, join to first dc with sl st – 108 dc

Round 23) Ch 1, *fpdc around next 2 st, change to color B, dc in next 3 st, dc in next sp between current st and next st,  dc in next sp  (dc in sp on either side of st), dc in next 3 st, change to color A* around, join to first dc with sl st – 120 dc

Round 24) Ch 1, *fpdc around next 2 st, change to color B, dc in next 4 st, dc in space between current st and next st, dc in next 4 st, change to color A* around, join to first dc with sl st – 132 dc

Round 25) Ch 1, *fpdc around next 2 st, change to color B, dc in next 4 st, dc in next sp between current st and next st,  dc in next sp  (dc in sp on either side of st), dc in next 4 st, change to color A, around, join to first dc with sl st – 144 dc 


Wednesday, April 16, 2014

Springtime Showers Sun Hat


Material: Red Heart Super Saver

Hints & Tips:
-          Ch 1 doesn’t count as a stitch in any round
-          Join the last st to the first st with a sl st in every round
-          Use any color arrangement you want! Rainbow colors are just one variations that would be perfect for it.
-          Complete brim by following surface slip stitch technique (here is a tutorial) in every round of the brim doing the color pattern you created backwards (so I ended with purple as a row and started with purple towards the base of the hat, please see picture to see what I mean.
-          If your gauge doesn’t match up or your hat size doesn’t come out right, try altering your hook size to make the hat larger or smaller.

Size: Toddler
Hook: H
Gauge: 5 rows & 5 stitches = 2”

Hat:
Round 1) Using magic circle, ch 1, 10 hdc in circle, pull tight, join to first hdc with sl st – 10 hdc

Round 2) Ch 1, 2 hdc in every st around – 20 hdc

Round 3) Ch 1, *hdc in next st, 2 hdc in next st* around – 30 hdc

Round 4) Ch 1, *hdc in next 2 st, 2 hdc in next st* around – 40 hdc

Round 5) Ch 1, *hdc in next 3 st, 2 hdc in next st* around – 50 hdc

Round 6 – 11) Ch 1, hdc in every st around (change to red in last st before joining round 12)

Round 12) Ch 1, *sc in next st, dc in next st* around, change to orange in last st, join to first sc with sl st

Round 13) Ch 1, *dc in next st, sc in next st* around, change to yellow in last st, join to first dc with sl st

Round 14) Repeat round 13 but change to green

Round 15) Repeat round 14 but change to blue

Round 16) Repeat round 13 but change to purple

Round 17) Repeat round 14 but change to main color

Brim:
Round 18)
Ch 1, *sc in next 4 st, 2 sc in next st* around – 60 sc

Round 19) Ch 1, *sc in next 5 st, 2 sc in next st* around – 70 sc

Round 20) Ch 1, *2 sc in next st, sc in next 6 st * around – 80 sc

Round 21) Ch 1, *sc in next 7 st, 2 sc in next st* around – 90 sc

Round 22) Ch 1, *2 sc in next st, sc in next 8 st* around – 100 sc

Round 23) Ch 1, * sc in next 9 st, 2 sc in next st* around – 110 sc

Round 24) Ch 1, *2 sc in next st, sc in next 10 st* around – 120 sc

Round 25) Ch 1, sl st in every st around, join to first sl st with sl st, tie off – 120 sl st


Size: Child/Teen
Hook: I
Hat:  
Round 1) Using magic circle, ch 1, 10 hdc in circle, pull tight, join to first hdc with sl st – 10 hdc

Round 2) Ch 1, 2 hdc in every st around – 20 hdc

Round 3) Ch 1, *hdc in next st, 2 hdc in next st* around – 30 hdc

Round 4) Ch 1, *hdc in next 2 st, 2 hdc in next st* around – 40 hdc

Round 5) Ch 1, *hdc in next 3 st, 2 hdc in next st* around – 50 hdc

Round 6 – 12) Ch 1, hdc in every st around (change to red in last st before joining round 12

Round 13) Ch 1, *sc in next st, dc in next st* around, change to orange in last st, join to first sc with sl st

Round 14) Ch 1, *dc in next st, sc in next st* around, change to yellow in last st, join to first dc with sl st

Round 15) Repeat round 15 but change to green

Round 16) Repeat round 16 but change to blue

Round 17) Repeat round 15 but change to purple

Round 18) Repeat round 16 but change to main color

Brim:
Round 19) Ch 1, *hdc in next 4 st, 2 hdc in next st* around – 60 hdc

Round 20) Ch 1, *hdc in next 5 st, 2 hdc in next st* around – 70 hdc

Round 21) Ch 1, *2 hdc in next st, hdc in next 6 st * around – 80 hdc

Round 22) Ch 1, *hdc in next 7 st, 2 hdc in next st* around – 90 hdc

Round 23) Ch 1, *2 hdc in next st, hdc in next 8 st* around – 100 hdc

Round 24) Ch 1, * hdc in next 9 st, 2 hdc in next st* around – 110 hdc

Round 25) Ch 1, *2 hdc in next st, hdc in next 10 st* around – 120 hdc

Round 26) Ch 1, sl st in every st around, join to first sl st with sl st, tie off – 120 sl st

Size: Adult
Hook: J
Gauge: 7 rows & 9 stitches = 3”

Hat:  
Round 1) Using magic circle, ch 1, 10 hdc in circle, pull tight, join to first hdc with sl st – 10 hdc

Round 2) Ch 1, 2 hdc in every st around – 20 hdc

Round 3) Ch 1, *hdc in next st, 2 hdc in next st* around – 30 hdc

Round 4) Ch 1, *hdc in next 2 st, 2 hdc in next st* around – 40 hdc

Round 5) Ch 1, *hdc in next 3 st, 2 hdc in next st* around – 50 hdc

Round 6 – 14) Ch 1, hdc in every st around (change to red in last st before joining round 14

Round 15) Ch 1, *sc in next st, dc in next st* around, change to orange in last st, join to first sc with sl st

Round 16) Ch 1, *dc in next st, sc in next st* around, change to yellow in last st, join to first dc with sl st

Round 17) Repeat round 15 but change to green

Round 18) Repeat round 16 but change to blue

Round 19) Repeat round 15 but change to purple

Round 20) Repeat round 16 but change to main color

Brim:
Round 21) Ch 1, *hdc in next 5 st, 2 hdc in next st* around – 70 hdc

Round 22) Ch 1, *2 hdc in next st, hdc in next 6 st * around – 80 hdc

Round 23) Ch 1, *hdc in next 7 st, 2 hdc in next st* around – 90 hdc

Round 24) Ch 1, *2 hdc in next st, hdc in next 8 st* around – 100 hdc

Round 25) Ch 1, * hdc in next 9 st, 2 hdc in next st* around – 110 hdc

Round 26) Ch 1, *2 hdc in next st, hdc in next 10 st* around – 120 hdc

Round 27) Ch 1, *hdc in next 4 st, 2 hdc in next st* around – 130 hdc


Round 28) Ch 1, sl st in every st around, join to first sl st with sl st, tie off – 130 sl st