Showing posts with label holiday. Show all posts

Wednesday, January 21, 2015

I Love U Graph Hat

This crochet graph hat is the last in the Valentine's Day series I've been working on. :) It's cute, works up quickly and you're sure to love it as another V-Day hat to make! The instructions come in all sizes (make sure to read the hints & tips) and can be made in any worsted weight material!

Make sure you check out the Ravelry listing HERE - add it to your favorites, make up a hat and add a photo or, if you really like the hat, buy the PDF on Ravelry for just $2.50 which will ensure you ALWAYS have it even if I ever discontinue the pattern. The PDF also includes the actual graph for those of you who prefer to use a graph rather than written instructions. If you don't want to buy the PDF just scroll on down and get the free version on my blog. :)

One last note: A big thank you to my friend Sarah. She contributed to the Valentine's Day graph designs I've been releasing lately, even working up some of the patterns for me and letting me use her photos when I was sick and unable to crochet! <3 She has not only designed the graphs for some of my hats but inspired many of the graphs I've created!


Hook: I (toddler); J (young child to adult – refer to notes)
Gauge: 3 rounds & 3st = 1”
Material: Red Heart Super Saver OR Loops & Threads Impeccable

Hints & Tips:
-          For toddler use an I hook and start the graph after round 7 (skip round 8).
-          For infant, also use an I hook, skip round 5 so that you only have 48 dc and only repeat to round 6 ending with 20 rounds – you may want to start graph at 8 st instead of 14 like is written.
-          For adult, repeat round 6 - 9
-          Pattern is written in older child size.

Abbreviations/stitches:
-          Ch – chain
-          Dc – double crochet
-          Sl st – slip stitch
-          Fpdc – front post double crochet
-          Fphdc – front post half double crochet
-          St – stitch

Round 1) With MC, using magic circle, ch 2, 12 dc in circle, pull tight and join to first st with sl st – 12 dc

Round 2) Ch 2, 2 fpdc around every st around, join to first st with sl st – 24 dc

Round 3) Ch 2, *fpdc around next st, 2 fpdc around next st* around, join to first st with sl st – 36 dc

Round 4) Ch 2, *fpdc around next 2 st, 2 fpdc around next st* around, join to first st with sl st – 48 dc

Round 5) Ch 2, *fpdc around next 3 st, 2 fpdc around next st* around, join to first st with sl st – 60 dc

Round 6 – 8) Ch 2, fpdc around every st around, join to first st with sl st – 60 dc

Round 9) Ch 2, fpdc around next 14 st, change to CC1, fpdc around next 6 st, change to MC, fpdc around to end, join to first st with sl st – 60 dc

Round 10) Ch 2, fpdc around next 14 st, change to CC1, fpdc around next 6 st, *change to CC2, fpdc around next 2 st, change to MC*, fpdc around next 3 st, repeat from *-* once more, fpdc around to end, join to first st with sl st – 60 dc

Round 11) Ch 2, fpdc around next 16 st, change to CC1, fpdc around next 2 st, *change to MC, fpdc around next st, change to CC2, fpdc around next 4 st*, repeat from *-* once more, change to MC, fpdc around to end, join to first st with sl st 60 dc

Round 12) Ch 2, fpdc around next 16 st, change to CC1, fpdc around next 2 st, change to MC, fpdc around next st, change to CC2, fpdc around next 9 st, change to MC, fpdc around to end, join to first st with sl st – 60 dc

Round 13) Ch 2, fpdc around next 16 st, change to CC1, fpdc around next 2 st, change to MC, fpdc around next 2 st, change to CC2, fpdc around next 7 st, change to MC, fpdc around to end, join to first st with sl st – 60 dc

Round 14) Ch 2, fpdc around next 14 st, change to CC1, fpdc around next 6 st, change to MC, fpdc around next st, change to CC2, fpdc around next 5 st, change to MC, fpdc around to end, join to first st with sl st – 60 dc

Round 15) Ch 2, fpdc around next 14 st, change to CC1, fpdc around next 6 st, change to MC, fpdc around next 2 st, change to CC2, fpdc around next 3 st, change to MC, fpdc around to end, join to first st with sl st – 60 dc

Round 16) Ch 2, fpdc around next 17 st, change to CC1, fpdc around next 2 st, change to MC, fpdc around next 2 st, change to CC1, fpdc around next 2 st, change to CC2, fpdc around next st, change to MC, fpdc around to end, join to first st with sl st – 60 dc

Round 17 – 20) Ch 2, fpdc around next 17 st, change to CC1, fpdc around next 2 st, change to MC, fpdc around next 2 st, change to CC1, fpdc around next 2 st, change to MC, fpdc around to end, join to first st with sls t – 60 dc

Round 21) Ch 2, fpdc around next 18 st, change to CC1, fpdc around next 4 st, change to MC, fpdc around to end, join to first st with sl st – 60 dc

Round 22) Ch 2, fpdc around next 19 st, change to CC2, fpdc around next 2 st, change to MC, fpdc around to end, join to first st with sl st – 60 dc

Round 23) Ch 1, fphdc around to end, join to first st with sl st and tie off – 60 hdc


Tuesday, January 13, 2015

Yours Truly Graph Hat

I'm sure you've noticed a theme here and this post is no different... here is your NEXT Valentine's Day related graph hat! :) You can make this hat in all sizes plus it works up quickly! It doesn't get better then that. :p And, I'd like to give a big thanks to Sarah of Stitched After Dark for making up the hat and taking pictures for me. The one I had made sold before I could get pictures and then I fell ill so she totally made this post possible today! Go check out your free pattern!


And don't forget, if you want to save it to your Ravelry library and avoid the blog (not to mention you will have it forever and never lose it) check out the Ravelry listing HERE and buy your copy for just $2.50!  The free version can be found below! 

Hook: I (toddler); J (young child to adult – refer to notes)
Gauge: 3 rounds & 3st = 1”
Material: Red Heart Super Saver OR Loops & Threads Impeccable

Hints & Tips:
-          For toddler use an I hook and follow the pattern as written.
-          For infant, skip round 5 so that you only have 48 dc and only repeat to round 9 ending with 19 rounds

Abbreviations/stitches:
-          Ch – chain
-          Dc – double crochet
-          Sl st – slip stitch
-          Fpdc – front post double crochet
-          Fphdc – front post half double crochet
-          St – stitch

Round 1) Using magic circle, ch 2, 12 dc in circle, pull tight and join to first st with sl st – 12 dc

Round 2) Ch 2, 2 fpdc around every st around, join to first st with sl st – 24 dc

Round 3) Ch 2, *fpdc around next st, 2 fpdc around next st* around, join to first st with sl st – 36 dc

Round 4) Ch 2, *fpdc around next 2 st, 2 fpdc around next st* around, join to first st with sl st – 48 dc

Round 5) Ch 2, *fpdc around next 3 st, 2 fpdc around next st* around, join to first st with sl st – 60 dc

Round 6 – 11) Ch 2, fpdc around every st around, join to first st with sl st – 60 dc

Round 12) Ch 2, fpdc around 1st 27 st, change to CC, fpdc around next 2 st, change to MC, fpdc around next 5 st, change to CC, fpdc around next 2 st, change to MC, fpdc around to end, join to first st with sl st – 60 dc

Round 13) Ch 2, fpdc around 1st 18 st, change to CC, fpdc around next st, change to MC, fpdc around next 3 st, change to CC, fpdc around next st, change to MC, fpdc around next 3 st, change to CC, fpdc around next 4 st, change to MC, fpdc around next 3 st, change to CC, fpdc around next 4 st, change to MC, fpdc around next 3 st, change to CC, fpdc around next st, change to MC, fpdc around next 3 st, change to CC, fpdc around next st, change to MC, fpdc around to end, join to first st with sl st – 60 dc

Round 14) Ch 2, fpdc around 1st 17 st, *change to CC, fpdc around next 3 st, change to MC, fpdc around next st, change to CC, fpdc around next 3 st, change to MC*, fpdc around next 2 st, change to CC, fpdc around next 5 st, change to MC, fpdc around next st, change to CC, fpdc around next 5 st, change to MC, fpdc around next 2 st, repeat from *-* once, fpdc around to end, join to first st with sl st – 60 dc

Round 15) Ch 2, fpdc around 1st 17 st, *change to CC, fpdc around next 7 st, change to MC* fpdc around next 3 st, change to CC, fpdc around next 9 st, change to MC, fpdc around next 3 st, repeat from *-* once, fpdc around to end, join to first st with sl st – 60 dc

Round 16) Ch 2, fpdc around 1st 18 st, *change to CC, fpdc around next 5 st, change to MC*, fpdc around next 5 st, change to CC, fpdc around next 7 st, change to MC, fpdc around next 5 st, repeat from *-* once, fpdc around to end, join to first st with sl st – 60 dc

Round 17) Ch 2, fpdc around 1st 19 st, *change to CC, fpdc around next 3 st, change to MC*, fpdc around next 7 st, change to CC, fpdc around next 5 st, change to MC, fpdc around next 7 st, repeat from *-* once, fpdc around to end, join to first st with sl st – 60 dc

Round 18) Ch 2, fpdc around 1st 20 st, *change to CC, fpdc around next st, change to MC*, fpdc around 9 st, change to CC, fpdc around next 3 st, change to MC, fpdc around next 9 st, repeat from *-* once, fpdc around to end, join to first st with sl st – 60 dc

Round 19) Ch 2, fpdc around 1st 31 st, *change to CC, fpdc around next st, change to MC, fpdc around to end, join to first st with sl st – 60 dc

Round 20) Ch 2, fpdc around every st to end, join to first st with sl st – 60 dc

Round 21) Ch 2, fphdc around every st to end, join to first st with sl st and tie off – 60 hdc


Tuesday, January 6, 2015

Be Mine Graph Hat

Going along with the same theme as last week... how about another Valentine's Day related graph hat? This one features hearts that go up and down in a pattern. It can be made in a variety of colors and worn all winter long! This is a thick hat, so it's perfect for the cold month of February and, if you're in a cold state like I am... well into May!! If you've been following my graph hats over the past year, you'll notice that the pattern isn't the same as it was with my first, or even second or third! It's an evolution of the graph hat, for sure. As I've made more and more, I've developed easier ways of making the hat. I've not reached a point where ONE set of written instructions with minor tweaks that are written into the notes can make the same pattern work for all sizes. Awesome right? And even better... this method can work with ALL of the graph hats I've released, you just have to plug in that graph to these instructions/methods. :)

Also, if you really like this pattern, you can purchase it for a low fee of $2.50 which will add it to your Ravelry library so you'll never lose it and can easily print it. This means that if I ever retire the pattern, you'll still have a copy saved that you'll never lose. :) In addition to that, the actual graph will be included in the PDF for those of you who prefer to read the graph rather than the written instructions. You can make this purchase HERE.

Anyways, enjoy another freebie!


Hook: I (toddler); J (young child to adult – refer to notes)
Gauge: 3 rounds & 3st = 1”
Material: Red Heart Super Saver OR Loops & Threads Impeccable

Hints & Tips:
-          This pattern was written for young child, ages 4-8; if you’d like to make this hat for a preteen to adult, round 6 – 11 will need to be round 6 – 13 (which adds two additional rounds before you start the hearts) – from there you will continue the pattern as written.
-          For toddler, 1-3, use an I hook and follow the pattern as written.
-          For infant, skip round 5 so that you only have 48 dc and cut off the last heart in the graph. The written instructions will still work but won’t match exactly because the instructions have 7 hearts, and a hat for an infant with only 48 stitches will only have 6 hearts. Make sure to follow the graph attached at the bottom to make the modifications.

Abbreviations/stitches:
-          Ch – chain
-          Dc – double crochet
-          Sl st – slip stitch
-          Fpdc – front post double crochet
-          Fphdc – front post half double crochet
-          St – stitch

Round 1) Using magic circle, ch 2, 12 dc in circle, pull tight and join to first st with sl st – 12 dc

Round 2) Ch 2, 2 fpdc around every st around, join to first st with sl st – 24 dc

Round 3) Ch 2, *fpdc around next st, 2 fpdc around next st* around, join to first st with sl st – 36 dc

Round 4) Ch 2, *fpdc around next 2 st, 2 fpdc around next st* around, join to first st with sl st – 48 dc

Round 5) Ch 2, *fpdc around next 3 st, 2 fpdc around next st* around, join to first st with sl st – 60 dc

Round 6 - 11) Ch 2, fpdc around every st around, join to first st with sl st – 60 dc

Round 12) Ch 2, fpdc around next 10 st, *change to CC, fpdc around next st, change to MC, fpdc around next 3 st, change to CC, fpdc around next st, change to MC, fpdc around next 11 st*, repeat from *-* 3 times, fpdc in last 2 st, join to first st with sl st – 60 dc

Round 13) Ch 2, fpdc around next 9 st, *change to CC, fpdc around next 3 st, change to MC, fpdc around next st, change to CC, fpdc around next 3 st, change to MC, fpdc around next 9 st*, repeat from *-* 3 times, fpdc around last 3 st, join to first st with sl st – 60 dc

Round 14) Ch 2, fpdc around next 2 st, *change to CC, fpdc around next st, change to MC, fpdc around next 3 st, change to CC, fpdc around next st, change to MC, fpdc around next 2 st, change to CC, fpdc around next 7 st, change to MC, fpdc around next 2 st*, repeat from *-* 3 times, change to CC, fpdc around next st, change to MC, fpdc around next 3 st, change to CC, fpdc around next st, change to MC, fpdc around last 5 st, join to first st with sl st – 60 dc

Round 15) Ch 2, fpdc around next st, *change to CC, fpdc around next 3 st, change to MC, fpdc around next st, change to CC, fpdc around next 3 st, change to MC, fpdc around next 2 st, change to CC, fpdc around next 5 st, change to MC, fpdc around next 2 st*, repeat from *-* 3 times, change to CC, fpdc around next 3 st, change to MC, fpdc around next st, change to CC, fpdc around next 3 st, change to MC, fpdc around last 4 st, join to first st with sl st – 60 dc

Round 16) Ch 2, fpdc around next st, *change to CC, fpdc around next 7 st, change to MC, fpdc around next 3 st, change to CC, fpdc around next 3 st, change to MC, fpdc around next 3 st*, repeat from *-* 3 times, change to CC, fpdc around next 7 st, change to MC, fpdc around last 4 st, join to first st with sl st – 60 dc

Round 17) Ch 2, fpdc around next 2 st, *change to CC, fpdc around next 5 st, change to MC, fpdc around next 5 st, change to CC, fpdc around next st, change to MC, fpdc around next 5 st*, repeat from *-* 3 times, change to CC, fpdc around next 5 st, change to MC, fpdc around last 5 st, join to first st with sl st – 60 dc

Round 18) Ch 2, fpdc around next 3 st, *change to CC, fpdc around next 3 st, change to MC, fpdc around next 13 st*, repeat from *-* 3 times, change to CC, fpdc around next 3 st, change to MC, fpdc around last 6 st, join to first st with sl st – 60 dc

Round 19) Ch 2, fpdc around next 4 st, *change to CC, fpdc around next st, change to MC, fpdc around next 15 st*, repeat from *-* 3 times, change to CC, fpdc around next st, change to MC, fpdc around last 7 st, join to first st with sl st 6- dc

Round 20 – 21) Ch 2, fpdc around ever st around, join to first st with sl st – 60 dc

Round 22) Ch 1, fphdc around every st around, join to first st with sl st and tie off  – 60 hdc


Monday, December 1, 2014

Christmas Stocking Crochet Patterns


This is officially my very first Christmas as a crochet designer. In honor of that I'm releasing TWO brand new stocking patterns to start off December. :) These patterns were inspired by two of my favorite stitches and if you explore my website, you'll see a few other patterns using these stitches! They work up quickly and are easy to get the hang of!

First up: Tastefully Textured Stocking


&

Etsy

Second up: Christmas Peaks Stocking


Now that you've seen the stockings, here is a little info about them! The first stocking (the purple one) shows the larger size while the second stocking (the blue one) shows the smaller size. The pattern is worked in the round and requires minimal sewing. They both work up quickly and look fantastic! 

Today (12/1/14) only, you can save $1.50 off of each pattern on Ravelry only - no coupon code needed. :) 


Tuesday, September 23, 2014

Halloween Pattern Set


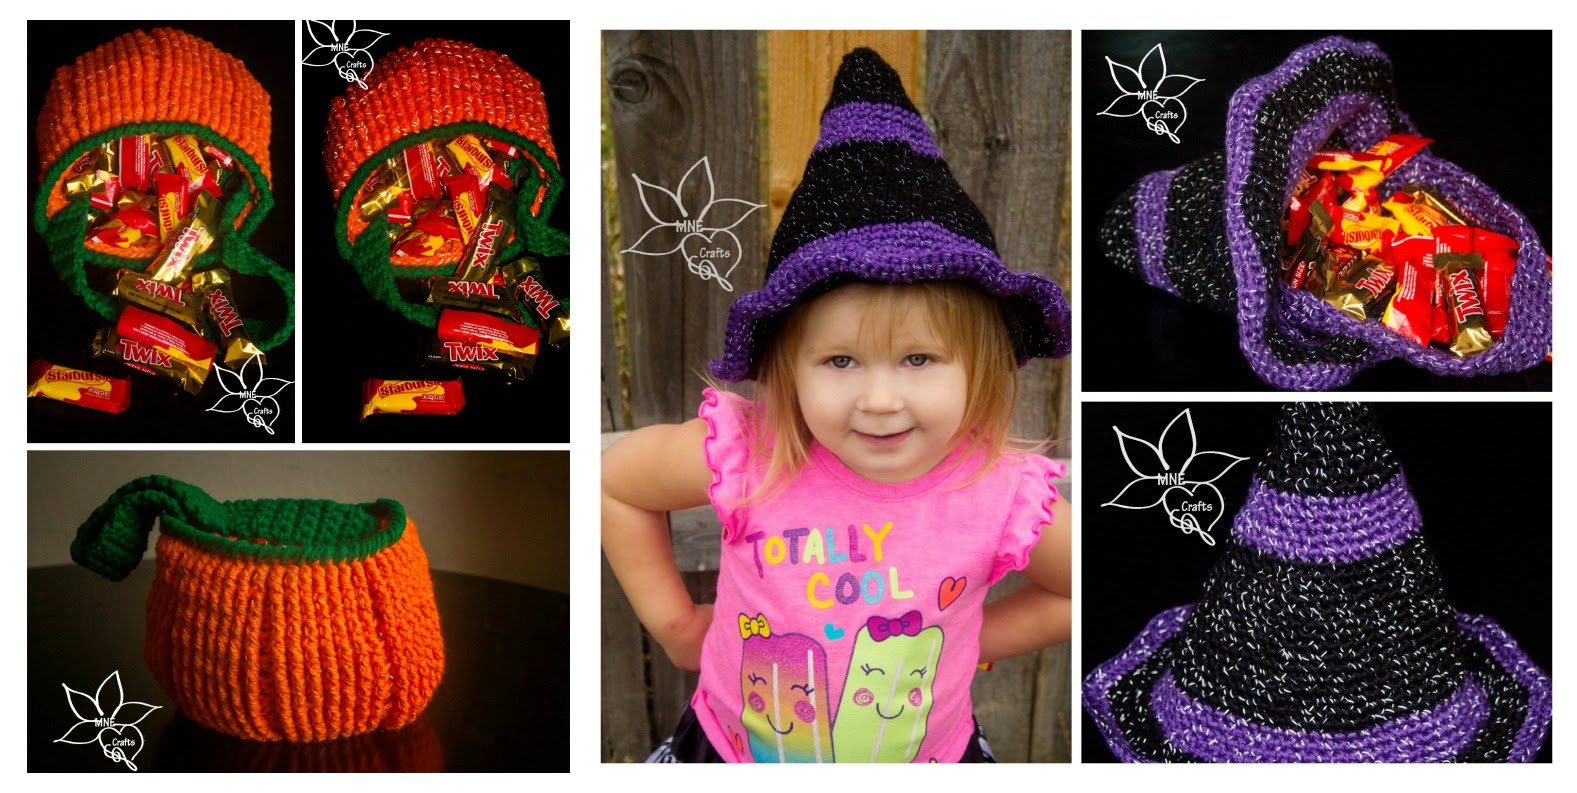
As a mother, I am all about safety and as a designer I am also all about crochet. That's what makes Red Heart Yarn's new material Reflective so incredible! You can make completely normal items with the material and it double as a safety item! 

Both of these items were designed with cost in mind. The material runs about $7 at the local Wal-Mart and only has 88 yards in it... so I knew I needed to design a pattern that didn't use to much. I refused to go over 2 skeins each with my two designs and was actually able to keep it right under a full two skeins so there is a bit left over! Awesome right?! 

Now, let's talk these new items I've designed, starting with the pumpkin bucket! 


This pumpkin has a couple of nice little features to it. As you can see in the bottom picture, it looks pretty normal and then in the top pictures it shows the reflection material side by side. While you're kids are trick or treating, they WILL be seen and in the dark, that is a good thing! 

This pumpkin also has a nifty little feature that allows it to "grow". If you look at a real pumpkin, you'll see slight indents going up the side in a symmetrical pattern. This pumpkin has that too! As it fills with candy it fills out and goes from a "baby" pumpkin to a full grown pumpkin that can hold 3-4 regular sized bags of candy. 

That's a lot of candy! 

Now, because of the intricate design of this pumpkin that looks a bit simpler than it is, you can change the colors as indicated in the pattern and have a spider's web!!! Awesome right?  

On to the witch's hat! 


As I was designing this hat I saw it being more than one item. I realized I could make it a great bucket that could hold a lot of candy AND the perfect witch's hat for my daughter (even though she is going to be a princess lol). A good sturdy witch hat costume at a costume store can easily run you $20 and in material, this is right around $15 so there is a savings and it has that added in quality of the reflective material that will help keep your little witch safe! 

And if your child isn't going to be a witch it still makes a great bucket! Instructions are included on how to make the straps removable so that it can be either without those straps getting in the way! 

Nifty right? And like the first patter, this pattern includes instructions on how to turn it into a completely different item with the color changes. Can you guess what? ;) 

You can buy these patterns individually or as a set at Ravelry or Etsy below: 

Ravelry: 


Etsy: 


Wednesday, July 2, 2014

3 Star Applique Patterns


Hook: G
Material: Cotton (or any)
Gauge: Non-essential

Special stitches:
-          Beginning triangle stitch - YO, pick up a loop in first st, YO, pick up a loop in next st, YO, pick up a loop in next st, YO and pull through all 7 loops on hook
-          Triangle stitch - YO, pick up a loop in previous worked st, YO, pick up a loop in next st, YO, pick up a loop in next st, YO and pull through all 7 loops on hook

Hints & Tips:
-          Larger hooks/materials will produce larger stars and vice versa
-          On star C, the final point will be worked using the last 2 st and the first st

Star A: red
Round 1) Using magic circle, sc 10, pull tight, join to first sc with sl st – 10 sc

Round 2) Ch 1, 2 sc in every st around, join to first sc with sl st, tie off  – 20 sc

Point 1) Join in any st with sc, sc in next 3 st, ch 1, turn, sc in next st, sc2tog, sc in last st, ch 1, turn, sc3tog, tie off

Points 2 – 5) Join in next st with a sc, sc in next 4 st, ch 1, turn, sc in next st, sc2tog, sc in last st, ch 1, turn, sc3tog, tie off

Weave in ends/trim

Star B: white
Round 1) Using magic circle, sc 10, pull tight, join to first sc with sl st – 10 sc

Round 2) Ch 1, 2 sc in every st around, join to first sc with sl st, tie off  – 20 sc

Point 1) Join in any st with sc, sc in next 3 st, ch 1, turn, sc2tog twice, ch 1, turn, sc2tog, tie off

Point 2 – 5) Join in next st with sc, sc in next 3 st, ch 1, turn, sc2tog twice, ch 1, turn, sc2tog, tie off

Weave in ends/trim

Star C: blue
Round 1) Using magic circle, sc 5, pull tight, join to first sc with sl st – 5 sc

Round 2) Ch 1, 2 sc in every st around, join to first sc with sl st, tie off – 10 sc

Point 1) Beginning triangle st, tie off.

Points 2 – 5) Triangle st, tie off. 


Also released this week

Click image to go to pattern.


Tuesday, June 24, 2014

Free For All Market Tote


Hook: I
Material: Red Heart Super Saver
Gauge: 20” long & 10” wide

Round 1) Using magic circle, ch 1, 12 dc in circle, join to first dc with sl st  - 12 dc

Round 2) Ch 1, sk first st, 2 dc in every st around ending with 2 dc in sk st, join to first dc with sl st – 24 dc

Round 3) Ch 1, sk first st, sk first st, *2 dc in next st, dc in next st* around ending with last dc in sk st, join to first dc with sl st – 36 dc

Round 4) Ch 1, sk first st, *2 dc in next st, dc in next 2 st* around ending with last dc in sk st, join to first dc with sl st – 48 dc

Round 5) Ch 1, sk first st, *2 dc in next st, dc in next 3 st* around ending with last dc in sk st, join to first dc with sl st – 60 dc

Round 6) Ch 1, sk first st, *2 dc in next st, dc in next  4 st* around ending with last dc in sk st, join to first dc with sl st – 72 dc

Round 7 – 9) Ch 1, sk first st,  dc in next st and in every st around ending with last dc in sk st, join to first dc with sl st – 72 dc

Round 10) Ch 1 (does not count as stitch), *dc in next 3 st, ch 2, sk next st* around, join to first dc with sl st – 54 dc

Round 11) Sl st to ch 2 sp, ch 1, *sc in ch 2 sp, ch 4, sk 3 dc* around, join to first dc with sl st

Rounds 12 – 26) Repeat rounds 10 & 11

Round 27) Ch 1, sc in every dc and ch 2 sp around, joint to first sc with sl st – 72 sc

Round 28 - 29) Ch 1, sk 1st st, sc in every st around ending with last sc in sk st, join to first sc with sl st – 72 sc

Round 30) Ch 1, sk 1st st, sc in next 2 st, ch 50, sk 10 st, sc in next 26 st, ch 50, sk 10 st, sc in last 24 st ending with last sc in sk st, join to first sc with sl st –  52 sc; 20 ch  

Round 33) Ch 1, sk 1st st, sc in every st around ending with last st in sk st, join to first sc with sl st (tie off at end of round 33) – 152 sc 


Also released this week: 

Click photo to get pattern links.


Friday, April 11, 2014

Easter Round-Up - 10 Free Easter Patterns

With Easter less then ten days away I know we will ally be cramming in some last minute Easter ideas! Here are TEN ideas all in one place to make the rushing a little easier. 


1) Over at Posh Pooch Designs we have this delightful little family of chicks! This little set would be perfect for any young (or older) child who likes to play with little stuffed animals. You could totally take a yarn needle, and string it through all the chicks (starting with mom) and put knots in the right places to hold the chicks in place and have something similar to that little duck type toy where kid drags mom and mom drags babies! 


2) Over on Lisa's Squidoo page, we see a beautiful pattern for this delightful flower bunny hat. It's so multipurpose! You can leave off the ears and have an adorable bunny beanie for your child, change up the colors to make it boy or girl, leave of the flower for boy specific or get crafty with some Velcro and make the ears and flower add-on optionals!! 


3) If you head over to Cre8tion Crochet, you'll find a delightful variety of patterns, many free. When I saw this hat, I just knew I had to include it. It's classy, beautiful and so full of spring! 


4) Ravelry is an amazing site filled with gifted designers, many who offer free patterns. One of these talented designers is amilovers who offers this adorable chick toy as a free ravelry download! I'm telling you, it doesn't get better then that. The detail is incredible and any child, young or old, is sure to love this! 


5) Moogly is one of the most popular crochet pattern websites out there and it's easy to see why! One of her adorable patterns include these rose appliques that are sure to add some pizazz to any item! 


6) With Easter being in spring, it is understandable that sun hats become a bit popular. But spring is far from the only reason... after all, these hats are amazing! Check out My Hobby is Crochet for this professional yet incredibly cute sun hat pattern. 


7) This beautiful dress features one of MNE Craft's Patterns (yay!) and is perfect, not just for Easter but any holiday. By switching around the colors you can have Halloween (orange & black), Christmas (red & white, green & red) or Valentine's day (pink and white). But since it is Easter, we'll just keep it to some yellow, bluish purple and pink right now. 


8) This little beauty reminds me of my own journey to a healthier lifestyle and how those 1lb bars of chocolate shaped like rabbits throw a bolder into that path. This bunny has the appearance without the calories! Talk about a win. :D Head on over to Delights-Gems for this free pattern! 


9) This pattern was to fantastic not to include in my round-up but is slightly different from the others. The free instructions are add ons to this Bina the Bear pattern which is not free. The egg patterns and rabbit coat and cross stitch designer ARE free and they are beautiful. If you choose not to use the designer's doll, I'm sure your own creativity could figure out a different pattern to use these freebies with! Check out these freebies at Laly Lala!


10) Over at Petals to Pictos, you will find this fantastic Easter basket! I know my little girl would LOVE this and I am considering making it for her. The flowers could be made into hair clips and the clips stuck onto the basket so they'd serve two purposes and you could mix in some beads on it. Oh the things you could do to make this basket special for your little girl. And if you have a little boy, skip the flowers, check out some car appliques and add those on! With crochet, options truly do seem endless!