Showing posts with label character. Show all posts

Friday, July 11, 2014

Character Crochet Round Up - 10 Free Patterns


This week's round up is all about different characters that we can easily recognize! Which of these fun creations do you want to make up? Just click the picture to go to the pattern! 
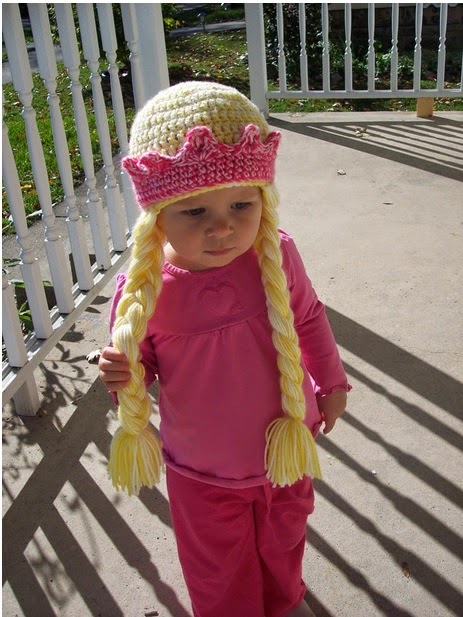

Isn't this little Rapunzel beanie darling? My own daughter would absolutely love this! And you could totally decorate the crown portion with beads or gems! The designer of Stitch 11 has some brilliant ideas! 


This free Ravelry download is the perfect asset to your collection! What Thomas the Train loving child wouldn't love this brilliant design? 


This little doll is also a free Ravelry download and isn't it impressive?! An interchangeable cinderella doll. She can go to the ball right after her wicked step mother leaves in this brilliant design! 


This free Ravelry download took me right back to my childhood! I remember watching Bugs Bunny and the Road Runner and several others on the boomarang channel with my dad. They are truly classic and this designer did an INCREDIBLE job with this guy. So much talent! And she is kindly giving it for free!


This is the last free Ravelry download I have for you guys but we will end this with a bang because this final download is awesome! That is what I love most about doing these round-ups... helping so many people find AMAZING designers they might not have found otherwise! 


When I finally watched this movie for the first time, it brought a tear to my eye. I can only hope that some day people begin carrying about the world all at the same time like happens in the movie... because then changes will happen so quickly! Until then, let's all keep working hard and working together and remember what the Lorax said - "Unless someone like you cares a whole awful lot, nothing is going to get better. It's not." A big thank you to the designer of this wonderful beanie! 


Until I saw this I was dreading the coming winter and now I'm like BRING IT ON! Thanks to this creative designer, I (and all the other talented crocheters out there) got this! 


So... these are amazing. I love Nemo. I'm a pretty big Nemo fan. More then Nemo or his dad, though... I LOVE Dori. She reminds me of what I imagine I'll be like when I'm 80... and every now and then... how I am now (shhhh don't tell). She's just so fun! "Just keep swimming, swimming, swimming." LOL Click the pic and head on over to this talented designer's website to learn how to make these fish! 


With the new moving coming out, this pattern just had to be included. Head on over to Crochet Cricket and check out this amazing design. Major props to the designer and BIG thank yous for sharing this pattern for free! 


Ah, Harry Potter. I remember being about 8 years old and truly believing I was going to marry Daniel Radcliff. Oh lost dreams. (hehe) but what isn't lost is the amazing sorting hat pattern I found by the talented Allison of CraftyisCool. Yes, yes it is and you, my fellow designer, are amazingly talented! This thing is seriously spot on. 

Also this week: 


I released an eBook! You can get all paid patterns (prior to the publishing of the book) and the majority of my patterns on this site (ad free, downloadable & printable!) for just $14.99! The paid patterns alone total in at over $50!

Ravelry link


Friday, February 28, 2014

Cat in the Hat - Hat & Bow Tie Set

My little boy modeling this beautiful pattern for me. :p 

A big thanks to the momma who shared her adorable little guy in this hat! I designed this hat for her custom order. In it you can see the band as well! 

Hook: I
Gauge: 5 hdc rows & 3 dc rows = 2 inches
Material: Red Heart Super Saver
Size: 12 months - Toddler (3-4 years) 

Hat
With red
Round 1) Magic circle, Ch 1, 10 hdc in circle, pull tight, join to first hdc with sl st

Round 2) Ch 1, 2 hdc in every st around, join to first hdc with sl st - 20

Round 3) Ch 1, *hdc in first st, 2 hdc in next st* around, join to first hdc with sl st  - 30

Round 4) Ch 1, *hdc in first 2 st, 2 hdc in next st* around, join to first hdc with sl st - 40

Round 5) Ch 1, *hdc in first 3 st, 2 hdc in next st* around, join to first hdc with sl st – 50

Round 6) Ch 1, *hdc in first 4 st, 2 hdc in next st* around, join to first hdc with sl st – 60

Round 7) Ch 1, *hdc in first 5 st, 2 hdc in next st* 3 times, hdc in every st around, join to first hdc with sl st – 63

Round 8) Ch 2, dc in first 21 st, *dc in next 5 st, dc dec next 2 st* to end, join to first hdc with sl st – 56

Round 9) Ch 2, dc in every st around, join to first dc with sl st, join to first dc with sl st –  56

Round 10) Ch 2, dc in every st around, join to first dc with sl st – 56

Change color to white
Round 11) Ch 2, *dc in next 5 st, dc dec* 3 times, dc around, join to first dc with sl st - 53

Round 12) Ch 2, dc in every st around, join to first dc with sl st - 53

Round 13) Repeat round 12– tie off

Change color to red - Join where you tied off with sl st
Round 14) Ch 2, dc in every st around, join to first dc with sl st Repeat

Round 15) Repeat round 14 – tie off

Change color to white - Join where you tied off
Round 16) Ch 2, dc in every st around, join to first dc with sl st

Round 17-18) Repeat round 16

Change color to red - Join where you tied off
Round 19) Ch 2, *dc in next 4 st, dc dec, dc in next 10, dc dec* around, join to first dc with sl st - 48

Round 20) Ch 2, dc around, join to first dc with sl st

Round 21) Repeat round 20, tie off

Change to white
Round 22) Ch 1, *sc in first 3 st, 2 sc in next st* around, join to first sc with sl st

Round 23) Ch 1, *sc in first 4 st, 2 sc in next st* around, join to first sc with sl st

Round 24) Ch 1, *sc in first 5 st, 2 sc in next st* around, join to first sc with sl st

Round 25) Ch 1, *sc in first 6 st, 2 sc in next st* around, join to first sc with sl st

Bow Tie
Row 1) Ch 21, sl st in 2nd st from hook, sl st across in back loops only– 20 st

Row 2) Ch 1, sl st in every st across in back loops only from here on out –20 st

Row 3 – 15) Repeat round 2 for a total of 15 rows and then tie off– 20 st

Should measure 4.5” wide by 2” long.

Take a piece of string and thread through center two stitches on top and bottom of bow and then tie together. This will help with positioning.

Center piece of tie
 Row 1) (Leave a tail long enough to stitch with) Ch 4, sl st in 2nd ch from hook and to end in back loops only – 3 st

Row 2-15) Ch 1, sl st across for a total of 15 rows
should measure almost 2” long and 1” wide.

Sew two ends together with tail and slide over bow until it is over the center.

The piece that goes around the neck
Row 1) Ch 61, sl st in 2nd ch from hook and all the way across (back loop only) – 60 st

Thread through back of bow center piece.
Add Velcro to make adjustable. You will need a several inches of Velcro so it will be able to get tight enough. It is supposed to dangle off of the babies neck and not actually be around it in the traditional style. You can shorten the ch by 10-15 ch to shorten if you desire.
I used hot glue to secure the cord to the center of the bow and the Velcro.

Stretchy piece for specific sizes:

With red
Row 1) Ch 3, sl st in back loop of first 2 ch – 2 sl st

Row 2) Ch 1, sl st in back loop to end – 2 sl st

Row 3 – desired length) Repeat row 2

Sew both ends to each other to make a band, do not twist.

*** You will need to measure the head of the person you are making this for. This is VERY stretchy so I recommend making it 1-2 inches shorter than the head measurement. The hat will fit almost any size head past 12 months up to a toddler of 3-4. This band is what makes it adjustable. On smaller heads it would actually appear to be to big but this band which is barely visible as it blends in with the bottom round of red holds it perfect to babies heads!


Thursday, January 30, 2014

Mermaid Photography Prop


This is my second pattern listed on etsy and I am so excited! I worked so hard on this pattern and am so glad I am able to share it with you all! There are so many things about it that I love and I'd like to share some of those with you!

First is the headband. It can fit a newborn AND a 12 month old. it is incredibly stretchy. It's the stretchiest crochet headband technique I've ever used.

Second is the chest piece. While the flower and the lace make for awesome decoration they are not required at all for this piece to look beautiful! The top dips in the center and curves up towards the shoulders gradually. The back is stretchy so it will fit up to 3-4 inches more due to stretch.

Then there comes the actual tail. I think my number one favorite thing with the tail is that the stitches look like little hearts! I just love that!

Right now, this tail is for sale on my etsy page at: https://www.etsy.com/listing/177720078/mermaid-photography-prop?ref=af_shop_favitem

For those interested, I also sell completed items, just comment or e-mail me at manda-nicole92@live.com or visit my facebook page at www.facebook.com/MNECrafts 

Friday, January 24, 2014

Top 5 Favorite Creations from 2013

I had an amazing year in 2013. I thought I would share a post of my 10 favorite projects and the pattern (be it for free or the link to where you can buy it).


2) Finger Knit Rainbow Scarf 


I absolutely loved making this scarf! I made some with the clouds and some without. It was probably one of the most time consuming projects I made as well as one of the most challenging. Once I started, my hands were completely tied up and when you have children, well... you might end up starting over! 

This pattern is from: RookieMag.com. The link is: http://rookiemag.com/2013/11/marlena-scarf-diy/

I don't know if I'm just a wee bit special when it comes to finger knitting, but I had to look up some youtube tutorial videos before I could figure it out but I got it. I also used a calculator on my computer to help me keep track of stitch count which allowed for each row to be more even towards the end. I originally tried just doing one and then making the second one just as long but that shrunk the overall scarf by a LOT when it came to sewing them all together. My stitch count was 120. This makes about a 6foot scarf, longer if you use the clouds as that kind of weighs each end down.

2) Dispicable Me Minion Hat 


I ended up purchasing this pattern from Cathyren's Etsy shop after a customer showed me an image and asked me to duplicate it. I didn't think it looked that challenging and figured "sure!" After all, it's just a character beanie right? Turns out, that little mouth was harder to figure out than I thought and the designer who came up with it is incredibly talented. Mad props to her!

This beanie is different then most character beanies for several reasons. The first is the arms, the second is the mouth and the third... that would be the removeable eye. I thought that little part of it was particularly neat! - This pattern can be found at: https://www.etsy.com/transaction/155502224?ref=fb2_tnx_title

3) Winter Boots 

This little pattern was designed by yours truly and was a handful! The pattern was totally worth the work involved though. They are soft, stylish and perfect for any baby that is in that stage of starting to crawl, stand and walk. The pattern was designed for the 6-12 month range and is perfect for any princess. You can even make a boy design by switching out the heart buttons and removing the fringe. What I did for a boy pair I made was I used a ch 3 and sl st around the edge of the hat and accented the bottom of the foot and around all the edging with a darker shade of the brown I used. 100% cute!

This pattern (along with four others) can be bought at: http://www.amazon.com/Creative-Booties-Kids-Amanda-Evanson-ebook/dp/B00FCC29ZU/ref=sr_1_1?ie=UTF8&qid=1390585275&sr=8-1&keywords=amanda+evanson

4) Mermaid Tail Prop 


This was another one of my favorite creations from 2013. Like the previous, I designed this one and have it listed for free on this blog. What I particularly liked about this pattern was that I used it to make two other sizes of tail! 

This matching sibling set was perfect and the larger tail was opened so it still allowed for walking!

Then this tail was a Dora copycat tail and absolutely adorable! 

This fun little pattern can be found here: http://mandanicolescrochetpatterns.blogspot.com/2013/03/mermaid-photography-prop.html

5) Textured Newsboy Beanie


This little beauty takes forever to make! It's an interesting little pattern and its 100% cute. I originally made it for my daughter and then had a purchase for several more of them. There is just something about it. Now, I did change up the pattern when it came to the flower. I prefered this decorative edging and the flower I usually do for my projects. I don't actually know what pattern for the flower is in the instructions as I didn't look. That flower is cute too though! If you're interested in doing this flower, the main thing is the three layers, and the edging around the outside one is ch 1, sl st in next st, ch 1, sl st in next st all the way around. It just works for it! 

This hat was an ety purchase (which I made in bulk from the seller who gives a discount if you buy more than one). The etsy shop is bubnut Patterns and this pattern can be found here: https://www.etsy.com/transaction/152891297?ref=fb2_tnx_title


2013 was a wonderful year for me and I'm sure 2014 will be just as amazing!! 


Thursday, January 23, 2014

Broncos Bow Beanie


Broncos Bow Beanie
Hook: J & G
Size: Toddler
Gauge: 5 st & 4 rows = 2 inches
Special stitches:
-          Invisible join – drop loop on hook, put hook in first st’s loop, pick dropped loop back up and pull it through the first st

Beanie:
With H Hook
Row 1.                With Navy
              Using magic circle, ch 2, 12 dc in magic circle, join to first sc with sl st – 12 dc
Row 2.                Ch 2, 2 dc in every st around, join to first st with sl st – 24 dc
Row 3.                Ch 2, *1 dc in first st, 2 dc in next st* around, join to first st with sl st – 36 dc
Row 4.                Ch 2, *1 dc in first 2 st, 2 dc in next st* around, join to first st with sl st – 48 dc
Row 5.                Ch 2, 1 dc in every st around – 48 dc
Row 6.                Ch 2, 1 dc in every st around changing to white in last st, join with invisible join – 48 dc
Row 7.                Ch 2, dc in every st around changing to orange in last st, join with invisible join – 48 dc
Row 8.                Ch 2, dc in every st around – 48 dc
Row 9.                Ch 2, dc in every st around – 48 dc
Row 10.            Ch 2, dc in every st around changing to white in last st, join with invisible join – 48 dc
Row 11.            Ch 2, dc in every st around changing to navy in last st, join with invisible join – 48 dc
Row 12.            Ch 1, sc in every st around, join to first st with sl st, tie off – 48 dc

Bow:
With G hook
Row 1 - Ch 9, sc in 2nd st from hook to end – 8 sc
Row 2 - Ch 1, sc in every st across
Row 3 – 42 - Repeat row 2
Tie off.
Join in any corner with orange
Ch 1, sc down long side of strip, tie off – 42 sc
Join on other side of strip in corner with orange
Ch 1, sc down long side of strip, tie off – 42 sc
With dark blue place the two ends together (so that the right side of the project is on the inside) and use the whip stitch to sew it together. Tie off loose ends, trim and turn it inside out.
For center piece
Row 1 - With white Ch 4, sc in 2nd ch from hook and in ever ch across – 3 sc
Row 2 – 13 - Ch 1, sc in every st across –3 sc
Ch 1, use sl st to join to ends together, tie off and trim loose ends and then fold piece inside out.
Sew the bow to the hat by going through the bow.

Optional:
Secure bow with glue after sewing it into place.
Use two strands of yarn for thicker hat. 

Thursday, January 16, 2014

Sharks, Sharks, Sharks!!!


My adorable son, Christian at 11 months! (Oh how time flies.)


(click to enlarge)

This pattern is for the matching shark beanie ONLY. I created the beanie specifically to match these slippers. The pattern for these slippers can be found at Stacie71's etsy shop. Link: https://www.etsy.com/transaction/175486602?ref=fb2_tnx_title

The pattern for the hat (which will fit from 1 year to 3T - I know because it also fit my 3 year old) is below.
Shark Beanie
Size: 12 months to 3T (very stretchy hat)
Hook: I & J
Gauge: 2 rows of DC = 1”
Material: Grey, White, 2 black buttons
Special stitches:
-          Magic circle – wrap yarn around your first two fingers so that you form an X over the index finger, inster hook into circle, pull working strand into circle and ch however many are needed
-          Invisible join – take hook out of last loop, insert it into both loops of the first st, grab up the last loop again and pull it through; proceed to next round (ch 2 in this design).
-          Picot stitch – ch 3, join with sl st into 3rd ch from hook (so the first ch you make)

Round 1) Using Magic Circle, ch 2, 12 dc in circle, pull tight, join to first dc (ch 2 does not count as dc here and throughout), join to first st with invisible join (at the end of every roung) – 12 dc
Round 2) Ch 2, 2 dc in same st as joining and in every st around – 24 dc
Round 3) Ch 2, 1 dc in same st as joining, 2 dc in next st, *1 dc in next st, 2 dc in next st* around – 36 dc
Round 4) Ch 2, 1 dc in same st as joining, 1 dc in next st, 2 dc in next st, *1 dc in next 2 st, 2 dc in next st* around – 48 dc
Round 5 -11) Ch 2, 1 dc in every st around – 48 dc
Round 12) Ch 1, sc in same st as joining, sc in every st around 48 sc

Earflap 1
Row 1) Sl st in next 6 st, ch 1, hdc in next same st as ch 1, hdc in next 10 – 11 hdc
Row 2) Ch 1, hdc dec in first 2 st, hdc to last 2 hdc, hdc dec in last 2 – 9 hdc
Row 3 – 5)  repeat round 2 
Row 6) Ch 1, hdc dec in next 3 st – 1 hdc  tie off

Earflap 2
Row 1) Join in 16th st from tie off of round 11 with sl st, ch 1, hdc in same st as joining, hdc in next 10 st – 11 hdc
Row 2) Ch 1, hdc dec in first 2 st, hdc to last 2 hdc, hdc dec in last 2 st – 9 hdc
Row 3 - 5) repeat round 2
Row 6) Ch 1, hdc dec in next 3 st – 1 hdc tie off

Trimming
Join in st of tie off from round 11 with sl st, sc in same st as joining, sc in every st to ear flap except for the st right next to flap (skip it), sc up flap, 3 sc at top of ear flap (in same st) and then sc down ear flap working stitches evenly, sc in every st across to next ear flap (except the sc right next to flap – skip it) and then repeat instructions until you reach the first sc and join. There doesn’t need to be a specific number of stitches here, just make them as even as possible when doing the ear flaps.
Trim loose ends.

Fin
Row 1) Ch 11, sc in 2nd ch from hook and across – 10 sc
Row 2) Ch 1, sc in every st across  - 10 sc
Row 3) Repeat row 2
Row 4) Ch 1, sc dec in first 2 st , sc in next 6, sc dec over last 2 – 8 sc
Row 5) Ch 1, sc in ever st across – 8 sc
Row 6) Ch 1, sc in next 6 sc, sc dec in last 2 sc – 7 sc
Row 7) Ch 1, sc dec in first 2 sc, sc to end – 6 sc
Row 8) Ch 1, sc in next 4 sc, sc dec  - 5 sc
Row 9) Ch 1, sc dec in first 2 sc, sc in next 2 sc, 2 sc in last st  – 5 sc
Row 10) Ch 1, 2 sc in first st, sc in next 2 sc, sc dec in last 2 – 5 sc
Row 11) Ch 1, sc dec in first 2 st and in second 2 st, 2 sc in last st – 4 sc
Row 12) Ch 1, 2 sc in first st, sc dec in next 3 st – 3 sc
Row 13) Ch 1, 1 sc across – 3 sc
Make 2, sew together. Leave a long tail on the second one to use to tie it together. Leave an inch and a half open so you can tuck the fin inside out and finish sewing it closed. Then sew it on to the top of hat.

Eyes
Using black and the magic circle, ch 2, 10 dc in circle – tie off with long tail for sewing eye on.

Teeth
Use a J hook and two strands of white. You are going to join on the stitch nearest the fin. You want the slip stitch fronts to be facing you. Join with sl st and make a picot stitch, *sk next st and sl st into next st and do another picot* until you reach the second fin and then tie off.

Special notes: If you want it to be sized more specifically for a 12 month old, lose one row of dc. This will shorten a bit. 

Saturday, March 23, 2013

Mermaid Photography Prop

The set... 
What the tail looks like on :)

Hook: I & G
Size: 0-3 months
Material: weight 4 & 3

Tail (use I)
*Round 1) 43 chainless hdc, join to first hdc with sl st

Round 2) Ch 2, hdc in same ch as joining, hdc in every st around, join to first hdc with sl st – 43 hdc

Round 3-4)  Repeat round 2.

Round 5) Ch 3, dc in back loop of next hdc and every hdc around, join to top of ch 3 with sl st – 43 dc

Round 6) Ch 3, dc in both loops of next dc and every dc around, join to top of ch 3 with sl st – 43 dc
Round 7 – 14) Repeat round 6

Round 15 - 22) Ch 3, dc dec in next 2 st, dc to last 2 dc, dc dec in last two dc, join to top of ch 3 with sl st – 27 dc

Round 23 - 25) Ch 3, dc in next st around to end, join to top of ch 3 with sl st – 27 dc
Tie off.

Flipper
Row 1) Hold tail closed with the decreases directly in the back – Join at edge of tail, sl st in both stitches (one on each side), ch 1, hdc in same st as joining, hdc to end – 16 hdc

Row 2- 13) Ch 1, turn, 2 hdc in same st as ch 1, hdc across to last hdc, 2 hdc in last hdc – 28 hdc

Decoration (use G)
Row 1) Join to front of flipper (same as front of tail), with sl st, *ch 1, sl st in next st* to end, ch 1

Row 2) turn, sl st in first sl st from previous row, ch 2, sl st in next ch 1 sp, *ch 2, sl st in next ch 1 sp* to end.

Tie off.

Round 1) Starting in the back of where you dc in the back loop only, join with sl st, ch 1, 2 sc in same st as joining, 2 sc in next st to end, join to first sc with sl st.

Tie off.

Round 1) Starting at the top of the tail on the opposite side of the chainless hdc, join in the back with a sl st, ch 1, 2sc in same st as joining, 2 sc in every st around to end, join to first sc with sl st.

Tie off.

Headband
Do a strand of chainless double crochets consisting of 44 dc – 44 dc
Ch 3, fpdc around next st, bpdc around next st to last dc, dc in last dc – 44 dc
Repeat row 2

Ch 1, sc in end of dc (along the side), ch 1, sc in next dc, ch 1, sc in next dc, ch 2, sc in ch 1 sp, ch 1, sc in next ch 1 sp (repeat this process until you have reached the length you need (I did about 4-5 rows of the sc and ch 1 spaces) sl st to connect ends together.

Flower
In magic loop (with first color) ch 2 (doesn’t count as first hdc), 12 hdc in loop, pull tight, join with sl st to first hdc while changing colors (to first layer of flower) – 12 hdc

*With second color, ch 1, sc in same space as joining, *ch 3, sk next hdc, sc in next hdc* around, join with sl st to first sc – 6 ch 3 spaces, 6 sc

With second color, sl st into first ch 3 space, ch 1, *sc, hdc, 3 dc, hdc, sc all in ch 3 space* repeat *-* in every ch 3 space to first sc, do not join, bpsc around first sc from round 2, ch 5, *bpsc around sc from round 1, ch 5* around, change color with sl st into first sc – 6 petals, 6 ch 5 spaces, 6 bpsc

Sl st into first ch 5 sp, ch 1, *sc, hdc, 5 dc, hdc, sc all in ch 5 space* repeat *-* in every chain 5 space to first sc, do not join, change color to color 2 with sl st behind previous sc from the bpsc, ch 7, *bpsc, ch 7* repeat *-* around, do not join – 6 petals, 6 ch 7 spaces, 5 bpsc (only 5 because the first one was done with a sl st)

Sl st into first ch 7 sp, ch 1, *sc, hdc, 7 dc, hdc, sc all in ch 7 space* repeat from *-*, join to first sc and tie off – 6 petals

Sew into the flat part where you joined the two ends of the headband and tie off.
*(You do not have to change colors.)

Chest piece
Repeat the steps for the flower of the headband with or without the third layer (I did not do a third layer on the flower). Ch until you have the length you need to tie around the chest (around 120), turn, sl st down ch, tie off.

Sew flowers to strand in the proper place (near the center).