Showing posts with label halloween. Show all posts

Thursday, October 30, 2014

Queen Emy's Hooded Cape

Like hundreds of little girl's across America, my darling 3 year old (going to be 4 at the end of the year!!) wanted to be Frozen's Elsa for Halloween! Being a designer, I wanted her costume to have a unique spin to it so my MIL and I teamed up to design her a dress. The trick? Matching the dress to the cape I had already designed using some CUSTOM hand dyed yarn from Yarn Baby LLC (click the link to her website and comment with your favorite color from her to enter for a chance to win this pattern for free!). It was so funny going through Joanns trying to match all the fabric to this item because it has different shades within it.


I'm going to say we did a bang up job with the color coordination ;)

This hooded cape features the cabled/braid stitch from the Battle of the Stitches Round 3 where my design was an adult hooded cape (different design to it). The cables/braids add a little thickness to it without making it to warm and the lacy design between each cable/braid adds a unique "wintery" touch to it! Add a little fun fur (not in the stitch you think it is) and a wire dog brush (I'm not joking) and you have a perfect furry edging that doesn't even look crocheted. - I actually got stopped in the fabric store so they could poke my brain and figure out how I got the edging to look so perfect and "non-stitched" LOL - it's an effective and easy technique!

With that, you can find the pattern on Ravelry & Etsy (linked below) and see more pictures of my adorable kids in their costumes! And make sure you enter to win a free copy of this pattern by heading over to Yarn Baby LLC (the talented dyer of this yarn) and comment with your favorite color! Also, you can get all individual patterns (not including this one) on sale at 50% off from my ravelry store until tomorrow so make sure you poke around and see what else you like :D

Ravelry 

&

Etsy

Another view of the hooded cape. The hood has a medium fit, not to tight or to loose and it better shows the lacy design between the cables too! 

My MIL and I put our brains together and designed this dress. She used the layout from a different dress pattern, combined it with a couple of other patterns and added her own artistic touch to it. I think we succeeded in giving my daughter a one of a kind Elsa dress! 

My handsome prince in his handmade costume! My MIL is a sewing genius ;) 

Aaaand one of the sweetest pictures you'll see today ;) <3 

Sunday, September 28, 2014

Princess Graph Hats


Hook: I
Material: Worsted Weight Yarn (4) – like RHSS or ILTY
Gauge: 3 rows & 4 stitches = 1”

Hints & Tips:
-          Ch 2 doesn’t count as a st in any round
-          Don’t worry if the hat buckles a bit in the beginning, as you work down the rounds, it rounds out.
-          Giant kudos to the talented crocheting mama over at Stitched After Dark for making up these hats for me so I didn’t have too! I love it when I get to work with this lady. She saved me a bunch of time by making the item so I only had to write the pattern and make the graph! 
-          I only designed the hats and the graph, I did not design the braid. Go HERE to see how that lovely designer did it!

Abbreviations/Stitches:
-          MC – main color
-          CC – contrast color
-          Ch – chain
-          Dc – double crochet
-          Sl st – slip stitch
-          Fpdc – front post double crochet
-          Fpsc – front post single crochet


Size: Child – Toddler (1 – 3.5/4 years)   
Round 1) With MC - Using magic circle, ch 2, 12 dc in circle, pull tight and join to first dc with sl st – 12 dc

Round 2) Ch 2, 2 fpdc around every st around, join to first dc with sl st – 24 dc

Round 3) Ch 2, *fpdc around next st, 2 fpdc around next st* around, join to first dc with sl st  - 36 dc

Round 4) Ch 2, *fpdc around next 2 st, 2 fpdc around next st* around, join to first dc with sl st – 48 dc

Round 5) Ch 2, *fpdc around next 3 st, 2 fpdc around next st* around, join to first dc with sl st – 60 dc

Round 6 - 13) Ch 2, fpdc around every st around, join to first dc with sl st – 60 dc

Round 14) Ch 2, fpdc around first 29 st, change to CC, fpdc around next st, change to MC, fpdc around to end, join to first st with sl st – 60 dc

Round 15) Ch 2, fpdc around first 21 st, change to CC, fpdc around next st, change to MC, fpdc around next 6 st, change to CC, fpdc around next 3 st, change to MC, fpdc around next 6 st, change to MC, fpdc around to end, join to first st with sl st – 60 dc

Round 16) Ch 2, fpdc around first 15 st, change to CC, fpdc around next st, change to MC, fpdc around next 4 st, change to CC, fpdc around next 3 st, change to MC, fpdc around next 4 st, change to CC, fpdc around next 5 st, change to MC, fpdc around next 4 st, change to CC, fpdc around next 3 st, change to MC, fpdc around next 4 st, change to CC, fpdc around next st, change to MC, fpdc around to end, join to first st with sl st – 60 dc

Round 17) Ch 2, fpdc around first 14 st, change to CC, fpdc around next 3 st, change to MC, fpdc around next 2 st, change to CC, fpdc around next 5 st, change to MC, fpdc around next 2 st, change to CC, fpdc around next 7 st, change to MC, fpdc around next 2 st, change to CC, fpdc around next 5 st, change to MC, fpdc around next 2 st, change to CC, fpdc around next 3 st, change to MC, fpdc around to end, change to CC in last st, join to first st with sl st – 60 dc

Round 18 – 20) Ch 2, fpdc in every st around, join to first st with sl st – 60 dc

Round 21) With MC, ch 2, fpdc in every st around, join to first st with sl st – 60 dc

Round 22) Ch 1, fpsc in every st around, join to first st with sl st – 60 sc


Side: Teen/Adult
Round 1) With MC - Using magic circle, ch 2, 12 dc in circle, pull tight and join to first dc with sl st – 12 dc

Round 2) Ch 2, 2 fpdc around every st around, join to first dc with sl st – 24 dc

Round 3) Ch 2, *fpdc around next st, 2 fpdc around next st* around, join to first dc with sl st  - 36 dc

Round 4) Ch 2, *fpdc around next 2 st, 2 fpdc around next st* around, join to first dc with sl st – 48 dc

Round 5) Ch 2, *fpdc around next 3 st, 2 fpdc around next st* around, join to first dc with sl st – 60 dc

Round 6) Ch 2, *fpdc around next 4 st, 2 fpdc around next st* around, join to first dc with sl st – 72 dc

Round 7 - 15) Ch 2, fpdc around every st around, join to first dc with sl st – 72 dc

Round 16) Ch 2, fpdc around first 35 st, change to CC, fpdc around next st, change to MC, fpdc around to end, join to first st with sl st – 72 dc

Round 17) Ch 2, fpdc around first 27 st, change to CC, fpdc around next st, change to MC, fpdc around next 6 st, change to CC, fpdc around next 3 st, change to MC, fpdc around next 6 st, change to MC, fpdc around to end, join to first st with sl st – 72 dc

Round 18) Ch 2, fpdc around first 21 st, change to CC, fpdc around next st, change to MC, fpdc around next 4 st, change to CC, fpdc around next 3 st, change to MC, fpdc around next 4 st, change to CC, fpdc around next 5 st, change to MC, fpdc around next 4 st, change to CC, fpdc around next 3 st, change to MC, fpdc around next 4 st, change to CC, fpdc around next st, change to MC, fpdc around to end, join to first st with sl st – 72 dc

Round 19) Ch 2, fpdc around first 20 st, change to CC, fpdc around next 3 st, change to MC, fpdc around next 2 st, change to CC, fpdc around next 5 st, change to MC, fpdc around next 2 st, change to CC, fpdc around next 7 st, change to MC, fpdc around next 2 st, change to CC, fpdc around next 5 st, change to MC, fpdc around next 2 st, change to CC, fpdc around next 3 st, change to MC, fpdc around to end, change to CC in last st, join to first st with sl st – 72 dc

Round 20 - 22) Ch 2, fpdc in every st around, join to first st with sl st – 72 dc

Round 23) With MC, ch 2, fpdc in every st around, join to first st with sl st – 72 dc

Round 24) Ch 1, fpsc in every st around, join to first st with sl st – 72 sc


Tuesday, September 23, 2014

Halloween Pattern Set


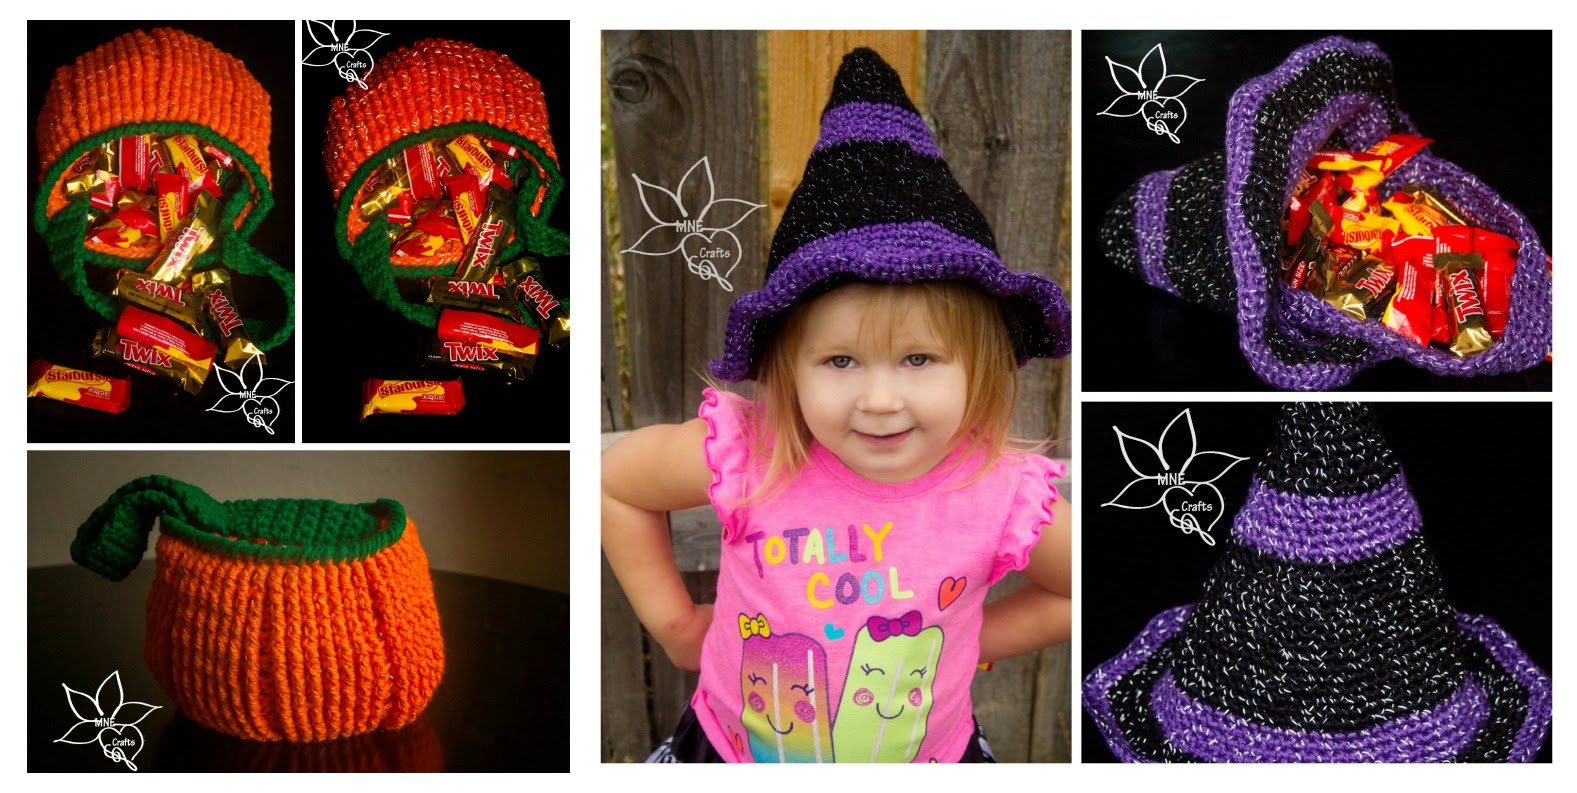
As a mother, I am all about safety and as a designer I am also all about crochet. That's what makes Red Heart Yarn's new material Reflective so incredible! You can make completely normal items with the material and it double as a safety item! 

Both of these items were designed with cost in mind. The material runs about $7 at the local Wal-Mart and only has 88 yards in it... so I knew I needed to design a pattern that didn't use to much. I refused to go over 2 skeins each with my two designs and was actually able to keep it right under a full two skeins so there is a bit left over! Awesome right?! 

Now, let's talk these new items I've designed, starting with the pumpkin bucket! 


This pumpkin has a couple of nice little features to it. As you can see in the bottom picture, it looks pretty normal and then in the top pictures it shows the reflection material side by side. While you're kids are trick or treating, they WILL be seen and in the dark, that is a good thing! 

This pumpkin also has a nifty little feature that allows it to "grow". If you look at a real pumpkin, you'll see slight indents going up the side in a symmetrical pattern. This pumpkin has that too! As it fills with candy it fills out and goes from a "baby" pumpkin to a full grown pumpkin that can hold 3-4 regular sized bags of candy. 

That's a lot of candy! 

Now, because of the intricate design of this pumpkin that looks a bit simpler than it is, you can change the colors as indicated in the pattern and have a spider's web!!! Awesome right?  

On to the witch's hat! 


As I was designing this hat I saw it being more than one item. I realized I could make it a great bucket that could hold a lot of candy AND the perfect witch's hat for my daughter (even though she is going to be a princess lol). A good sturdy witch hat costume at a costume store can easily run you $20 and in material, this is right around $15 so there is a savings and it has that added in quality of the reflective material that will help keep your little witch safe! 

And if your child isn't going to be a witch it still makes a great bucket! Instructions are included on how to make the straps removable so that it can be either without those straps getting in the way! 

Nifty right? And like the first patter, this pattern includes instructions on how to turn it into a completely different item with the color changes. Can you guess what? ;) 

You can buy these patterns individually or as a set at Ravelry or Etsy below: 

Ravelry: 


Etsy: