

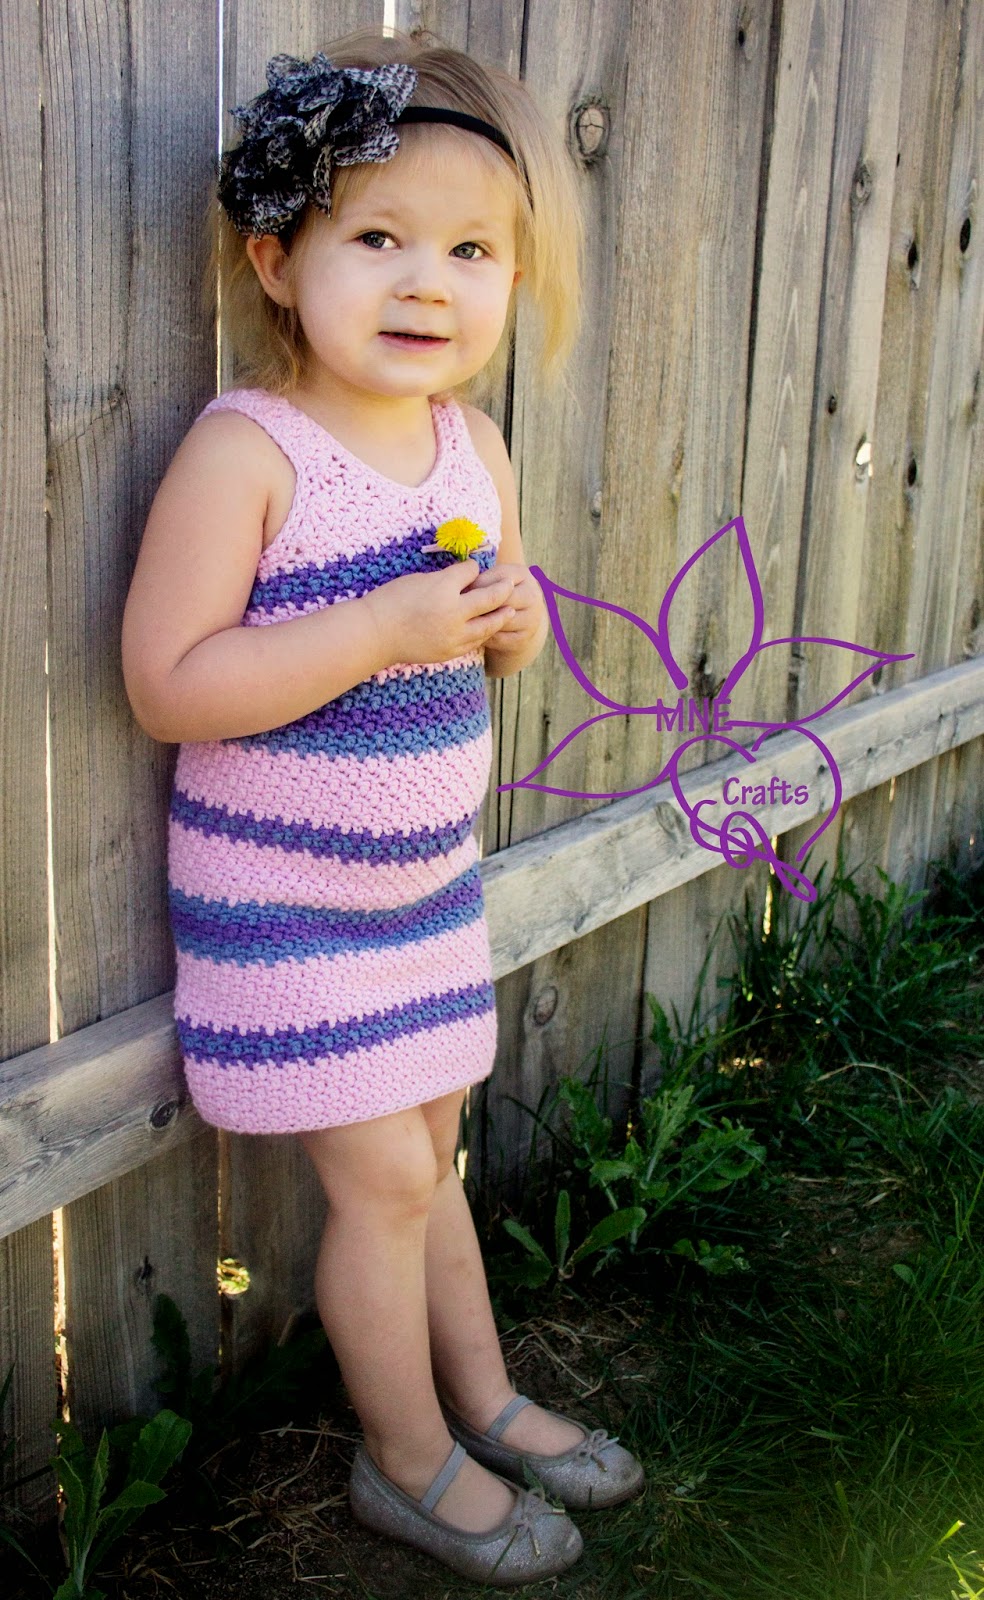
***A funny story to get you started*** - When I was finishing this dress and working on the chest piece my daughter came out and exclaimed "It has boobies on it! You made the boobies on it!!" - It made me laugh so hard and I just knew I would have to share. :)
Hook: G
Material: I Love This Cotton
Gauge: 3 rows = 1”, 3 st = 1” (between 3& 4 stitches equals an inch, not a perfect 3 stitches)
Material: I Love This Cotton
Gauge: 3 rows = 1”, 3 st = 1” (between 3& 4 stitches equals an inch, not a perfect 3 stitches)
Hints & Tips
-
Chains at the start of any row do not count as a
st so always put the first st in the same st as the ch
-
When you join with a ch 1 (like when you’ll
change colors or start on the chest piece) you will join with a sl st and a ch 1
-
To make counting your rows easier, instead of
moving the stitch marker up, use a new stitch marker for each row.
-
When changing color, to keep the rows looking
even but mostly avoid a seam, you will want to sl st to join the last st to the
first st, ch 1 (only 1) and then do the normal st by pulling the yarn through
that stitch and the sl st that joined the two stitches. You will essentially be
doing a normal join whenever changing colors to help keep the rows looking
even.
-
Though you will repeat round 1 throughout the
pattern, you will not repeat the chain 1 instruction in round 1 in any round
BUT round 1.
How to change
color:
-
To change color, you will join the final stitch
of the round BEFORE you change color to the first st in that round. You will
then take the second color, join in the same st that you joined to (so the
first st) with a sl st and a ch 1 – one good way to join, instead of the sl st
and ch 1 is a standing sc or a standing dc
Special stitches:
-
Double stitch decrease – A decrease that uses
both a double crochet and a single crochet to keep the alternate stitch appearance
Colors:
-
Pink – MC
-
Purple – A
-
Blue – C
Size: 2-3T
Foundation Row – With
MC, Create a chainless row of 67 sc, join to first sc with sl st making sure
not to twist
Round 1) Ch 1,
*sc in next st, dc in next st* around, mark last st, do not join with sl st
Round 2) *dc in
next st, sc in next st* (should stagger with round 1) around, move stitch
marker up, do not join with sl st
Round 3 & 6)
Repeat rounds 1 & 2 (skip the ch 1)
Change to color A
Round 7) Join
with sRepeat round 1 (skip the ch 1)
Change to color B
Round 8) Repeat
round 2
Change to color A
Round 9) Repeat
round 1 (skip the ch 1)
Change to MC
Round 10) repeat
round 2
Round 11 - 16)
Repeat rounds 1 & 2 (skip the ch 1)
Change to color B
Round 17 & 18)
Repeat rounds 2 & 1 (skip the ch 1)
Change to color A
Round 19 & 20)
Repeat rounds 2 & 1 (skip the ch 1)
Change to color B
Round 21 & 22)
Repeat rounds 2 & 1 (skip the ch 1)
Change to MC
Round 23 – 29)
Repeat rounds 2 & 1 (skip the ch 1)
Change to Color A
Round 30) Repeat
round 1 (skip the ch 1)
Change to Color B
Round 31) Repeat
round 2
Change to Color A
Round 32) Repeat
round 1 (skip the ch 1)
Change to MC
Round 33 – 39) Repeat rounds 1 & 2 (skip the ch 1
Change to Color B
Round 40 & 41)
Repeat rounds 1 & 2 (skip the ch 1),
Change to Color A
Round 42 & 43)
Repeat rounds 1 & 2 (skip the ch 1)
Change to Color B
Round 44 & 45)
Repeat rounds 1 & 2 (skip the ch 1)
Change to MC
Round 46-52)
Repeat round 1 & 2,
Change to Color A
Round 53) Repeat
round 1,
Change to Color B
Round 54) Repeat
round 2,
Change to Color A
Round 55) Repeat
round 1
Change to MC
Round 56) Repeat
round 2
Round 57) Repeat
round 1, join to first st (it will be the st after the marked st) with sl st,
tie off.
To start top of dress, line up the seam so that it is in the
back of the dress. Using 2 stitch
markers, mark 1 stitch (on the right side of the front of the dress) and then
the 22nd stitch from it – the first stitch you mark isn’t a specific
stitch, just make sure that the seam is in the back and won’t be visible
between the two stitches you mark.
Row 1) Join in st
with ch 1, dc in first st (my joining st was a sc so I made a dc to start), *sc
in next st, dc in next st* until you have 11 stitches
Row 2) Ch 1,
turn, double st dec (sc first, then dc), *dc in next st, sc in next st*to last
2 st, double st dec again (dc first, then sc)
Row 3) ch 1,
turn, double st dec (sc first, then dc), *sc in next st, dc in next st* to last
2 st, double st dec again (dc first, then sc)
Row 4 - 5) Repeat
row 2 & 3 (until 3 st remain)
Row 6) Ch 1,
turn, sc in next st, dc in next st, sc in last st
Row 7) Ch 1,
turn, dc in next st, sc in next st, dc in last st
Row 8 – 20)
Repeat row 6 and 7
Other chest strap:
Join with ch 1 in st directly next to the last st from row 1
of first chest strap
Row 1) Ch 1, *sc
in first st, dc in next st*to marked stitch (should be 11 st)
Row 2) ch 1,
turn, double st dec (dc first, then sc), *dc in next st, sc in next st* to last
2 st, double st dec again (sc first, then dc)
Row 3) Ch 1,
turn, double st dec (dc first, then sc), *dc in next st, sc in next st*to last
2 st, double st dec again (sc first, then dc)
Row 4 -5) Repeat
row 2 & 3
Row 6) Ch 1,
turn, dc in next st, sc in next st, dc in last st
Row 7) Ch 1,
turn, dc in next st, sc in next st, dc in last st
Row 8 – 20)
repeat row 6 & 7
Edging:
Join in back of dress with ch 1 (you want to work in a
direction so that the front of the st is the outside of the dress to keep a
uniform look), sc in every st around including straps, join to first st with sl
st
Sew straps to back of dress.
Working in each arm hole, do another row of edging until you
reach the strap, sl st across the strap and return to the sc edging - this is for the arm hole only, not the neck
hole.
Join in back of dress where the collar is, sl st in every st
around collar and then tie off.
Size 4-5T
Foundation Row – Create a chainless row of 73 sc, join to
first sc with sl st making sure not to twist
Round 1) Ch 1,
*sc in next st, dc in next st* around, mark last st, do not join with sl st
Round 2) *dc in
next st, sc in next st* (should stagger with round 1) around, move stitch
marker up, do not join with sl st
Round 3 - 6)
Repeat rounds 1 & 2 (skip the ch 1)
Change to color A
Round 7) Repeat
round 1 (skip the ch 1)
Change to color B
Round 8) Repeat
round 2
Change to color A
Round 9) Repeat
round 1 (skip the ch 1)
Change to MC
Round 10) repeat
round 2
Round 11 - 16)
Repeat rounds 1 & 2 (skip the ch 1)
Change to color B
Round 17 & 18)
Repeat rounds 2 & 1 (skip the ch 1)
Change to color A
Round 19 & 20)
Repeat rounds 2 & 1 (skip the ch 1)
Change to color B
Round 21 & 22)
Repeat rounds 2 & 1 (skip the ch 1)
Change to MC
Round 23 – 29)
Repeat rounds 2 & 1 (skip the ch 1)
Change to Color A
Round 30) Repeat
round 1 (skip the ch 1)
Change to Color B
Round 31) Repeat
round 2
Change to Color A
Round 32) Repeat
round 1 (skip the ch 1)
Change to MC
Round 33 – 39)
Repeat rounds 1 & 2 (skip the ch 1
Change to Color B
Round 40 & 41)
Repeat rounds 1 & 2 (skip the ch 1),
Change to Color A
Round 42 & 43)
Repeat rounds 1 & 2 (skip the ch 1)
Change to Color B
Round 44 & 45)
Repeat rounds 1 & 2 (skip the ch 1)
Change to MC
Round 46-52)
Repeat round 1 & 2,
Change to Color A
Round 53) Repeat
round 1,
Change to Color B
Round 54) Repeat
round 2,
Change to Color A
Round 55) Repeat
round 1
Change to MC
Round 56) Repeat
round 2
Round 57) Repeat
round 1, join to first st (it will be the st after the marked st) with sl st,
tie off.
To start top of dress, line up the seam so that it is in the
back of the dress. Using 2 stitch
markers, mark 1 stitch (on the right side of the front of the dress) and then
the 26th sitch from it – the first stitch you mark isn’t a specific
stitch, just make sure that the seam is in the back and won’t be visible
between the two stitches you mark.
Row 1) Join in 1st
marked st with ch 1, dc in first st (my joining st was a sc so I made a dc to
start), *sc in next st, dc in next st* until you have 13 stitches
Row 2) Ch 1,
turn, double st dec (sc first, then dc), *dc in next st, sc in next st*to last
2 st, double st dec again (dc first, then sc)
Row 3) ch 1,
turn, double st dec (sc first, then dc), *sc in next st, dc in next st* to last
2 st, double st dec again (dc first, then sc)
Row 4 - 6) Repeat
row 2 & 3 (until 3 st remain)
Row 7) Ch 1,
turn, sc in next st, dc in next st, sc in last st
Row 8) Ch 1,
turn, dc in next st, sc in next st, dc in last st
Row 9 – 23)
Repeat row 6 and 7
Other chest strap:
Join with ch 1 in st directly next to the last st from row 1
of first chest strap
Row 1) Ch 1, *sc
in first st, dc in next st*to marked stitch (should be 13 st)
Row 2) ch 1,
turn, double st dec (dc first, then sc), *dc in next st, sc in next st* to last
2 st, double st dec again (sc first, then dc)
Row 3) Ch 1,
turn, double st dec (dc first, then sc), *dc in next st, sc in next st*to last
2 st, double st dec again (sc first, then dc)
Row 4 -7) Repeat
row 2 & 3
Row 6) Ch 1,
turn, dc in next st, sc in next st, dc in last st
Row 7) Ch 1,
turn, dc in next st, sc in next st, dc in last st
Row 8 – 23)
repeat row 6 & 7
Edging:
Join in back of dress with ch 1 (you want to work in a
direction so that the front of the st is the outside of the dress to keep a
uniform look), sc in every st around including straps, join to first st with sl
st
Sew straps to back of dress – you’ll have 16 stitches
between where you join the straps which should be directly across from the
front of the straps.
Working in each arm hole, do another row of edging until you
reach the strap, sl st across the strap and return to the sc edging - this is for the arm hole only, not the neck
hole.
Join in back of dress where the collar is, sl st in every st
around collar and then tie off.


lovely little fairy you have modeling this! i have twin nieces in size 4t...think i might try this...
ReplyDeleteThank you! I'd love to see how they turn out. :D
DeleteSo pretty! Thanks so much for sharing!
ReplyDeletethanks for sharing. this is just what I was looking for to make for my grand baby.
ReplyDelete